Page 2 of 18

Re: Maddog Manufacturing Open in 2021

Posted: Wed Jan 20, 2021 6:49 pm
by Stuart
Great stuff as always Mark!

Those digital camo decals look like they were fun! :wow:

Re: Maddog Manufacturing Open in 2021

Posted: Fri Jan 22, 2021 4:22 pm
by Duke Maddog
Thanks Bob! Just been trying to stay busy while waiting for calls for work.

Thanks Stuart! Yeah,those digi-camo decals were kinda fun, except when I had to try and thread them underneath the grab handles. I am thrilled with how they look now!

Re: Maddog Manufacturing Open in 2021

Posted: Mon Jan 25, 2021 10:46 pm
by Duke Maddog
Well I got more to show from this past week. I was waiting for my airbrushes to be finished with their repairs, so while I did that, I managed to move forward on these models. Let's start with my aircraft.

After seeing how badly the cowls fit over the engines on my C-54, I sanded the edges of each one and tried again. Success! They fit now:
Image

Now to build the other two engines and see if I can do more on this plane.

Meanwhile, I had a lot of sanding to do on my An-124 around the cockpit area and the shoulders in front of the wings:
Image

While I was sanding them, I also sanded and adjusted the wings so that when I finally glue them, they will seal perfectly and be flush where they are supposed to be:
Image

Later, all these subassemblies went out and got shot with another three or four coats of primer and another clearcoat:
Image

Hopefully I can start moving forward on this monster now.

Okay, here is the work I did on my armor. Let's start with my 1/35th scale Patton. I decided to finish painting my tracks for this tank while waiting for my airbrushes:
Image

Now, once I get them back, I can finish detailing and modulating this big tank.

Okay, enough of the big stuff, here's my progress on my small scale armor.

We'll start with the smallest one. I shot a gloss coat over the little Stuart so I could add the decals. Naturally, the decals disappeared so I dug through my decal stash to find some that would fit. This is totally fictitious, but at least it has markings:
Image

Yes, the decals silvered, I took care of that. I also took care of the silvered decals on three other models as well.

After this dried and the Solvaset finished, I shot a dullcoat on this little tank. Then I decided to experiment with some weathering powders to see how well I could use them. I applied some on the hull and running gear:
Image

I wasn't thrilled with this. However, I did kind of go a bit heavy since the follow-on dullcoat tends to make a lot of it disappear as you can see here:
Image

Yeah, I'll be redoing this with paint when my airbrushes come back.

Moving along, I also did the gloss and decals on the turreted M-113. I liked the Snoopy decals so on they went:
Image

Later this got dullcoated and powdered like the Stuart:
Image

After the second dullcoat it looked better, but I'm still not thrilled:
Image

The final tank I tried this one was the M-551 Sheridan. I shot the gloss and then added the decals:
Image

Next came the powders:
Image

...and finally the last dullcoat:
Image

Well, that experiment on several vehicles was not a roaring success in my eyes, so maybe I'll shelve that idea until I can see what works better. Meanwhile, I continued on my three BTR's. First are the two BTR-70's that got a gloss and decals:
Image

Next I decided to try and weather the wheels a bit before installing them. I painted the treads with a dirt-colored paint first. You can see six of eight done that way now:
Image

Next I tried wiping the top color off, but the paint came completely off, despite whatever light touch I tried. So, I re-painted it and later semi-dry brushed a black color over the paint to get the effect I was looking for. It's kind of hard to see but I went ahead and added the wheels to these vehicles:
Image

One thing I liked about these kits: the wheels were so tight, all I did was snap them on!

Later they got a dullcoat in preparation for weathering:
Image

On the BTR-3K, however; after applying all the decals I had some repairs to make:
Image

Once that was done, I dullcoated this little vehicle:
Image

Then I added the wheels to this. All she needs now is weathering and it's done:
Image

Finally, I gloss coated the M-51 and then decaled it using the old Star decals that I'd gotten for IDF vehicles. I had forgotten they were printed on a solid decal film so I didn't trim close to the decal images until after they were on the model. That being said the chevrons still shattered so they didn't go on. These ones did:
Image

Later I dullcoated this and gave it a dark brown wash and afterward dry-brushed it with a light sand color:
Image

All it needs is tracks and weathering and that little beastie is done!

Wow, I got a bit more done than expected this week. I can only hope that next week is as productive. If so, you'll be seeing almost all these armor vehicles in the finished Forums!

Until then, thank you for looking in, comments are always welcome.

Re: Maddog Manufacturing Open in 2021

Posted: Mon Jan 25, 2021 11:18 pm
by Scruffy
Great update Duke! I really like the An-124 though, I spent a very chilly afternoon back in the mid 90's waiting around the end of the runway at the former Pease AFB to watch one take off that had flown in to pick up a newspaper printing press from a local manufacturer and take it to a trade show in Germany. It was very definitely worth waiting for.

Re: Maddog Manufacturing Open in 2021

Posted: Mon Jan 25, 2021 11:22 pm
by Stikpusher
Good looking progress Mark. Just a suggestion, but weathering powders and pigments look better if you apply them after dull coat. You can even mix them with water or some clear mixing medium and apply them like mud, and once dry wipe them off. Experiment a little and you’ll have fun learning what you can do with them.

Re: Maddog Manufacturing Open in 2021

Posted: Tue Jan 26, 2021 5:20 am
by Stuart
Awesome work Mark - I'm really liking those small scale armour builds!

Re: Maddog Manufacturing Open in 2021

Posted: Tue Jan 26, 2021 1:47 pm
by Duke Maddog
Thanks Scruffy! That is a great story; I'll bet that An-124 looked mighty interesting landing. That must have been quite a huge printing press if they needed one of those planes!

Thanks Carlos! I did actually put the powders on after the dullcoat. That is why I mentioned the second dullcoat afterward. You're right though, I do still need to practice some more.

Thanks Stuart! Hopefully the next time you see them, they'll be finished.

Re: Maddog Manufacturing Open in 2021

Posted: Sat Feb 20, 2021 8:12 pm
by Duke Maddog
Okay, here's the latest I got done this past week; most of it done on the Hobby Day weekend. I'll start with the aircraft that got messed up.

Some time back, I realized I needed a lot more weight in the nose of the A-400. A LOT. So, since the rear end was still open, I decided to add it and then tilt the plane forward. Naturally when I maneuvered the fuselage for additional sanding or fitting of parts, the weights were not fastened down so they rattled around and sometimes fell out of the still open rear end. So, I took an empty paper towel; tube and slipped it down through the rear opening and then shot some spray 77 adhesive through the tube to coat the weights and then set it aside propped up on it's nose to let the stuff dry.


Good news: It worked. The weights don't move anymore.


The Bad news: some of the adhesive flowed down to the nose and apparently was 'hot' enough to do this before drying:
Image


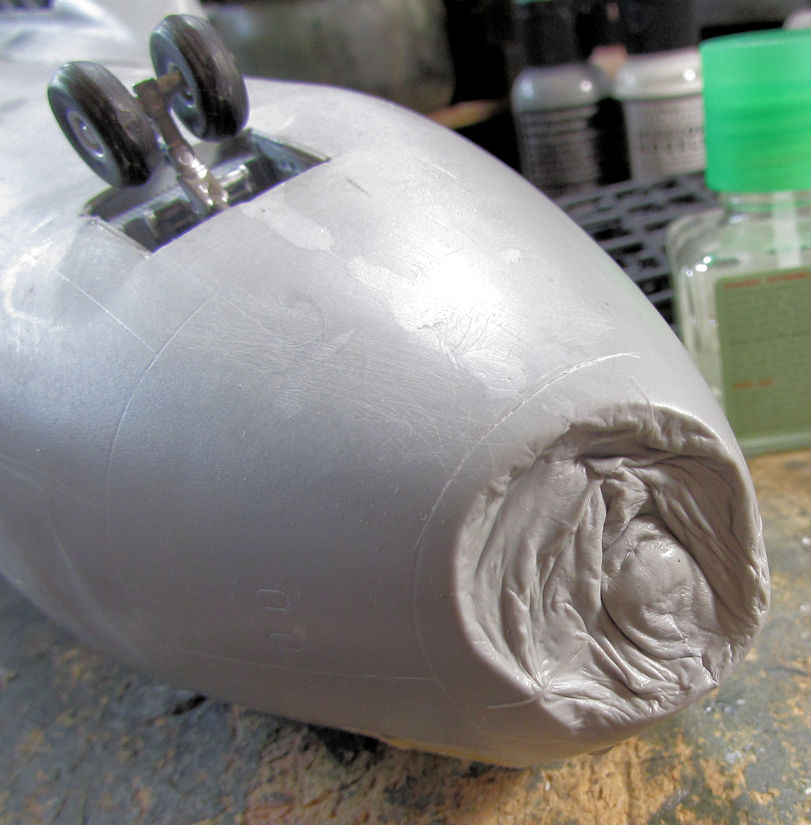
So, until I figure out how to sculpt a nose for this, or find something to graft on; this bird is grounded on the Shelf of Doom for a while.

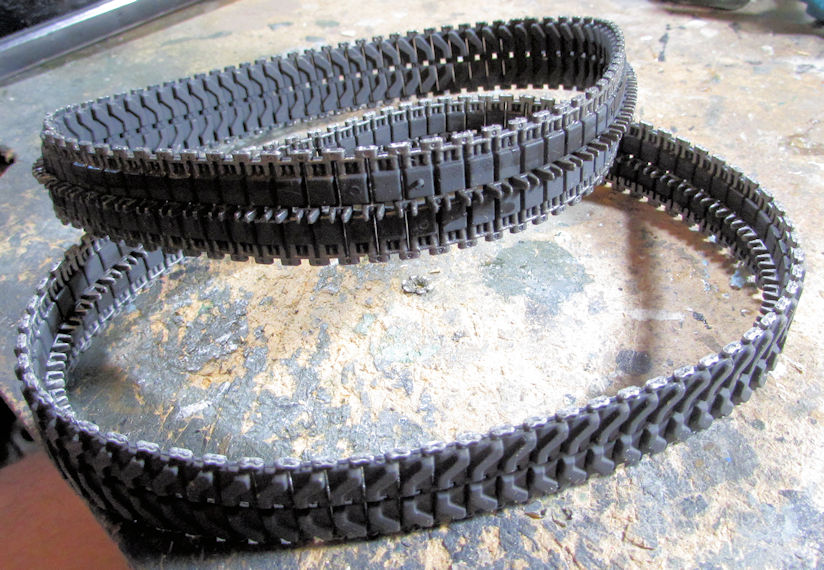
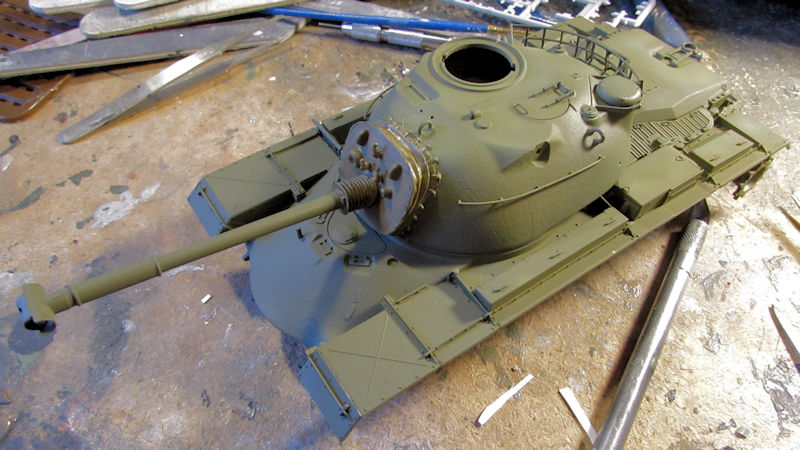
Meanwhile, I moved on and got some progress done on the 1/35th scale M48 Patton tank I'm doing for my local AMPS club Group Build for the Vegas Nationals. First, I painted the tracks that were dry and ready to paint:
Image

I then shot some additional modulation on this:
Image


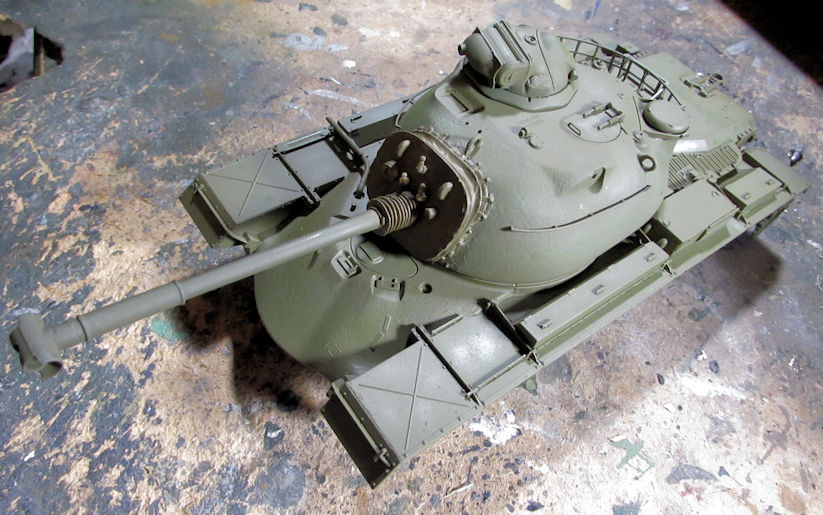
...which I covered with another thin coat of OD green again. It doesn't show up well in these pics, but there is definite modulation here:
Image

Moving on, I started another new kit. This one is the ACE kit of the AT-1 Snapper Anti-tank vehicle. It was started for a "Goodbye 2020 Group Build" that was started on another Forums. Here is my early progress...

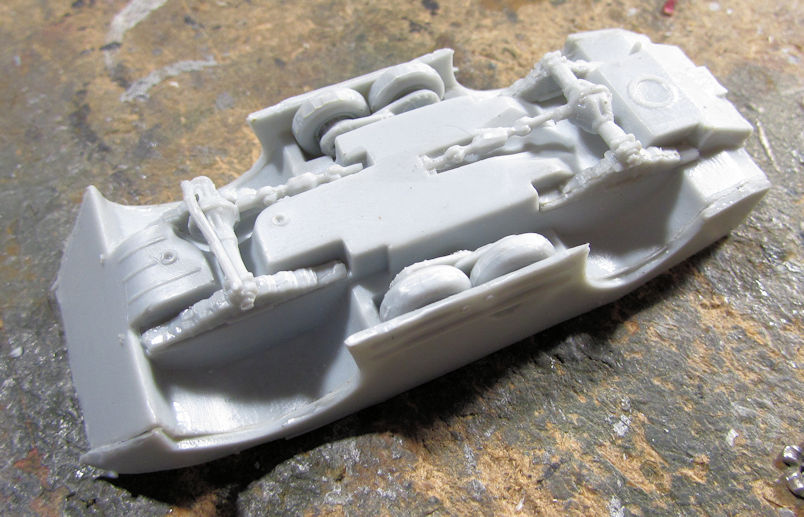
First I completed the suspension underneath:
Image


Then I did the top part:
Image

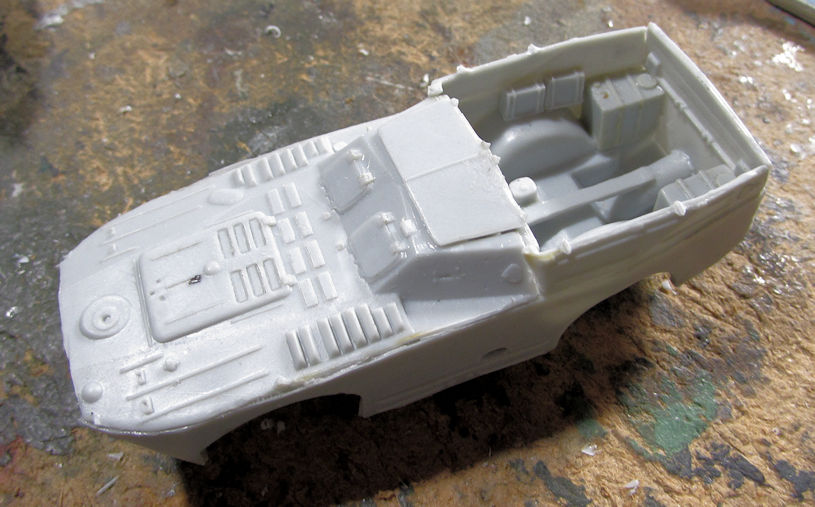
I have some brackets for the spare missiles to go in and then I'll have to paint that interior. Once I put the top on, that will be impossible to paint.

Later, I assembled all the Snapper missiles but didn't shoot pics of them.

Before I get into the next models; I have to show this. Do you remember me leaving off the round cylinder off the HEMMTT tank transporter tractor because it got lost? I was doing some cleaning and finally found it! Here it is installed on the model:
Image

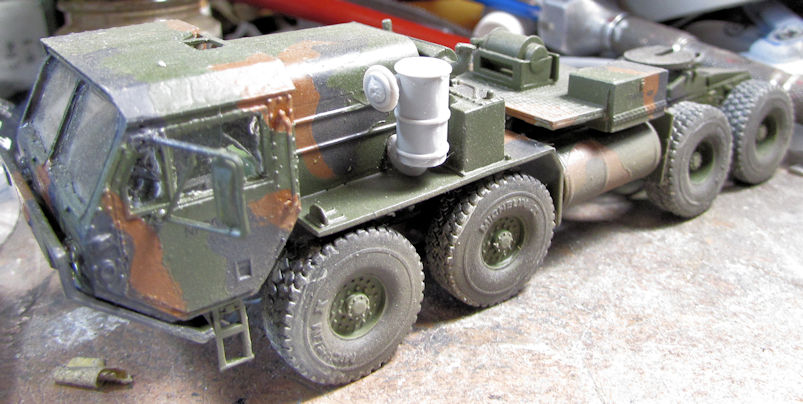
Later I painted it to match the model; but I was so excited that I finally found this that I had to shoot it after it was glued on, just in case it fell off and disappeared again.

Moving on to my other in-progress models....

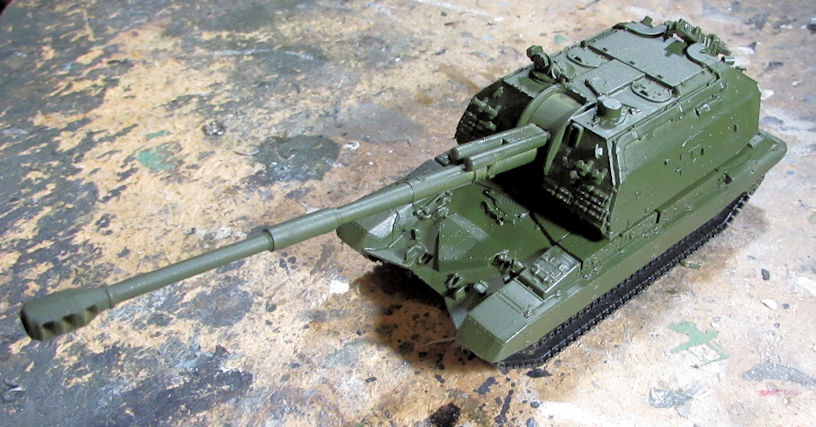
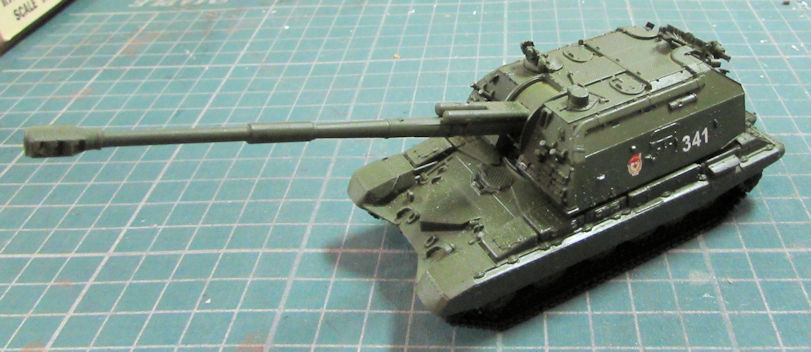
The first thing I did, since this model is so close to the finish line; was to clearcoat the Russian MSTA self propelled gun. Interestingly enough it was such a quick build that I didn't get shots of it under construction! Anyway, here it is in it's basecoat and clear coat:
Image

Later I added the decals to this:
Image

Now all that's left is final parts, detail painting, dullcoat and weathering.

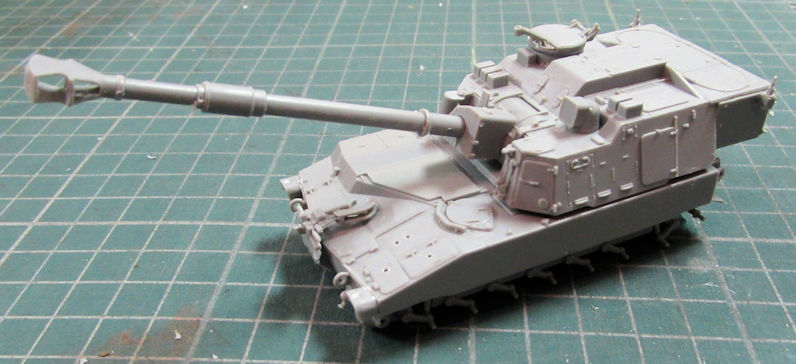
Next up is the US Army M109A6 that got most of the fiddly parts that wouldn't break much during handling before I shoot paint. I added the hatches, headlights and other detail parts:
Image

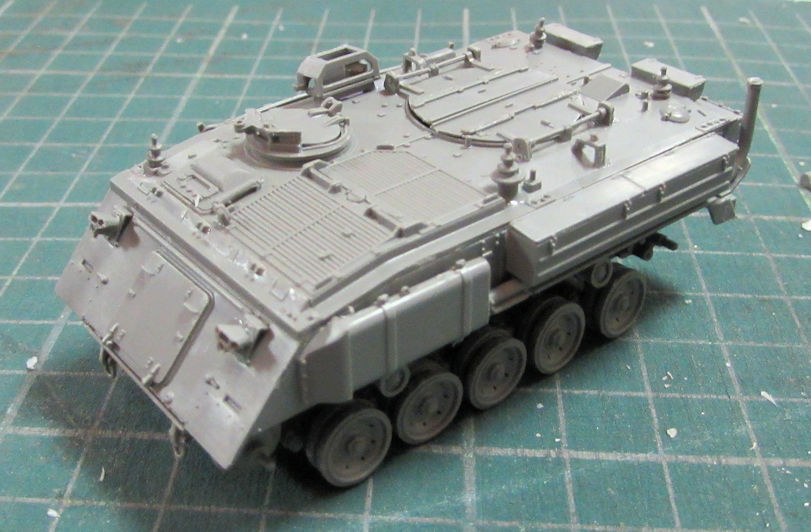
Next, it was time to move forward on the Takom 2-n-1 kits of British vehicles. I started with the FV-432 APC, adding the hatches, headlights and other detail parts that weren't delicate:
Image

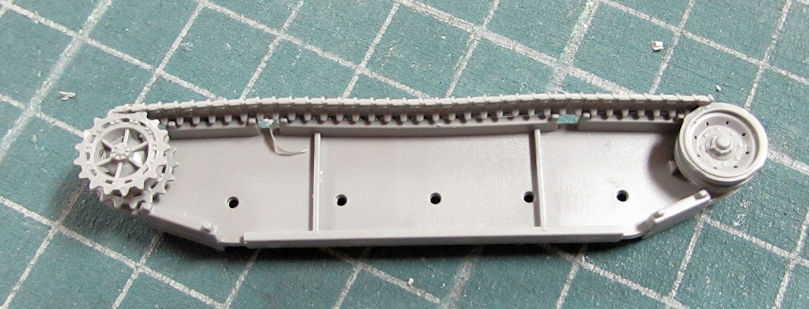
Afterward, I decided to try the tank track jig they included in the kit. It looks like this:
Image

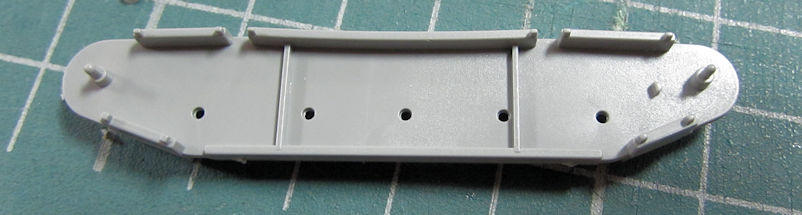
The drive sprocket and idler wheels go on the end posts and the top run of track is glued on to connect them:
Image

On the other side were some huge ejector pin marks that were so close to those posts that one got cut while I was removing the EP. It had to be glued back into place and so I was only able to do one side.

Once the upper run of track was done, then I added the individual track links on the idler and drive sprockets, followed by the end runs to the bottom run of track:
Image

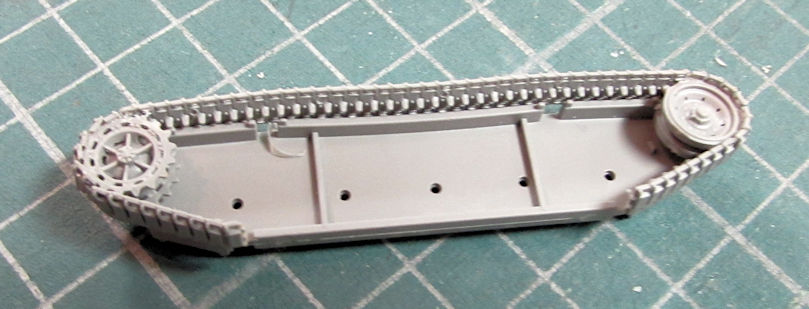
Later that is to be removed from the jig and glued onto the model, then the bottom track run is glued on to complete the tracks. The Chieftains all have the same jig for their tracks. Overall a pretty good system; but I'm hoping the larger track links on the Chieftains are easier to do than these small, fiddly things!

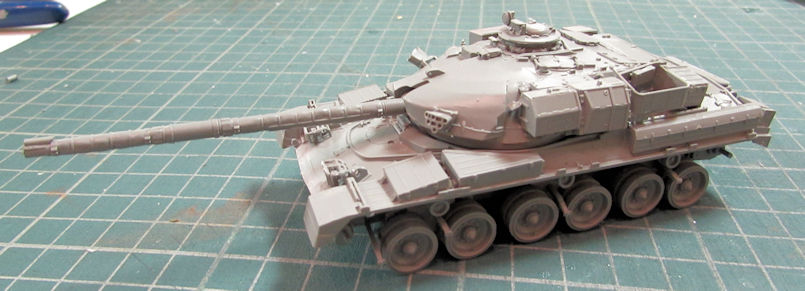
Speaking of Chieftains, I moved ahead on them, finishing off the turrets and adding all the detail parts to the upper and lower hulls; starting with the Chieftain Mk.5:
Image

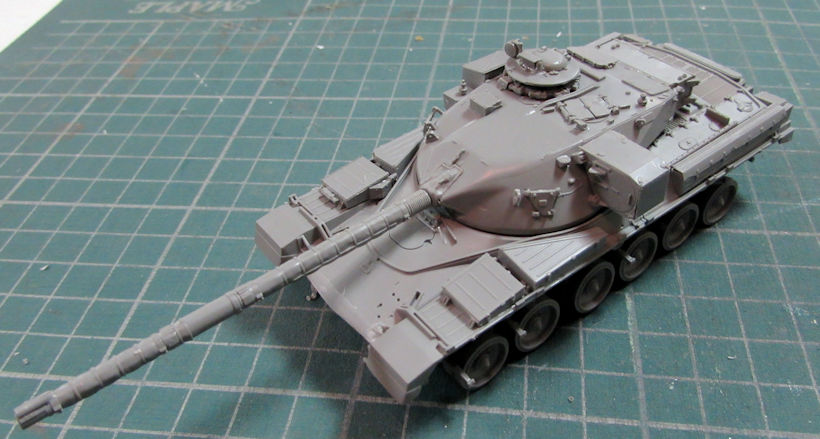
Later I added the baskets to this tank, but I still have some P/E mesh parts to insert inside them before I paint. You'll also notice that the smoke dischargers are missing from the front of the turret. That's because Takom only molded one in the Chieftain Mk.5 kit, the other one was never molded. I know because comparing the sprues to those of the Mk.10 and Mk.11, the sprues that are supposed to hold the second one were shorter and had no broken connection points, indicating that the plastic never quite got into that part of the mold. I'll need to source some extras from the spares box; M1 Abrams dischargers look closest to these used on the Chieftains.They may not be accurate, but they'll be on there!

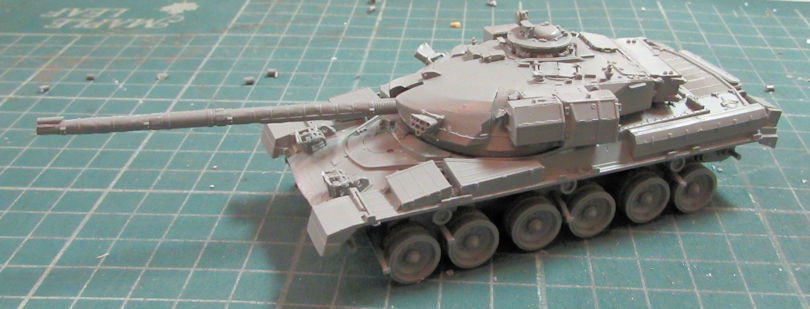
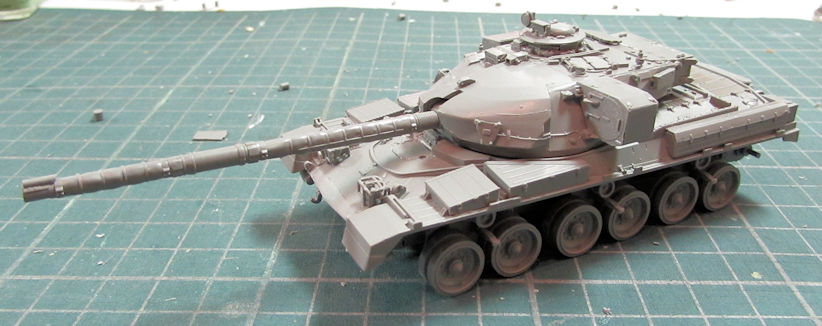
Speaking of the Mk.10, I also finished the turret and added the detail parts to the turret and hull:
Image

Late I added the baskets to this too:
Image

On the Mk.11, it was the same; finished building the turret and then adding all the non breakable detail parts to the turret and hull:
Image

That one got baskets as well when I built them and added them with the other Chieftains:
Image

And yes, the reason I waited to do the baskets is that I had to assemble each one from four to five pieces...each! AND I still have to add P/E mesh to them all!

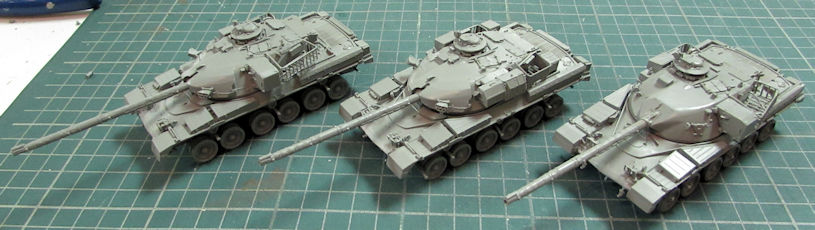
Anyway, here are the three Chieftains ready for track assembly and then paint:
Image

And that completes my latest update on my progress. Thanks all for looking in, comments are always welcome.

Re: Maddog Manufacturing Open in 2021

Posted: Sat Feb 20, 2021 8:36 pm
by Stikpusher
Everything is coming along nicely Mark. But tough break on the A-400 nose. That 77 adhesive must be extremely hot to melt the nose like that. Yikes! Is the nose a separate piece or part of the fuselage halves? If it’s separate, perhaps you can order a new one from Revell.

Re: Maddog Manufacturing Open in 2021

Posted: Sun Feb 21, 2021 3:34 pm
by Duke Maddog
Thanks Carlos. Yeah, it is a tough break on that A-400 nose. I was quite surprised at how hot that spray 77 glue was. I wanted to use it because it was a spray adhesive and I didn't think it would be a hot glue. Oh well, lesson learned and knowledge gained. The nose is all part of the fuselage, not separate like on the C-54. I'll have to form a new one on my own. One guy on another Forums suggested adding some sprue pieces as a framework to help hold the epoxy sculpt. I'm gonna try that when I get back to this.