Dragon 1/35th Tiger I Late

Here is the place to show off the progress of your armor builds
User avatar
Bish
Master Member
Posts: 570
Joined: Wed Apr 09, 2014 7:42 am
Location: Suffolk, England

Dragon 1/35th Tiger I Late

Post by Bish »

My next build is only my second Tiger I and my first in 11 years. Been a bit slower than i expected, largely due to the zimm taking longer than i thought. But its progressing well now.

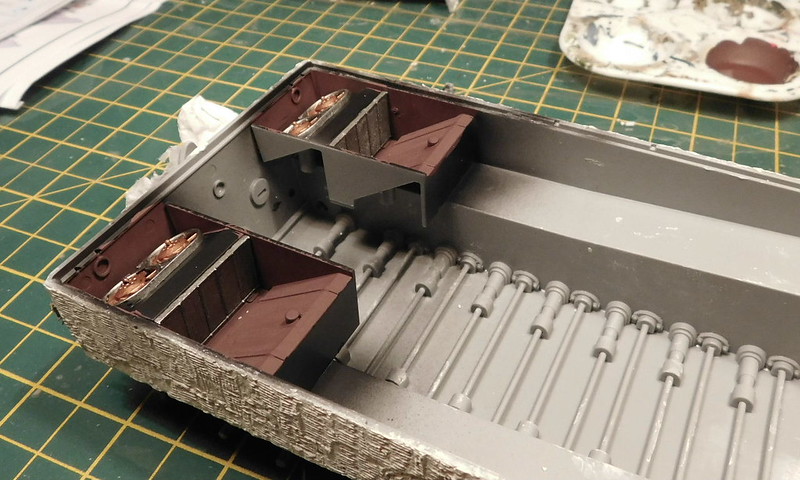
I am adding a Voyager PE set, Aber metal barrel and Fruil metal transport tracks.

Image

Started with the lower hull and the working suspension.

Image

Image

Image

Then got started on the zimmerit useing Miliput white. Been a few years since i did this. Its messy and tedious but it still gives the best results that i have seen IMHO.

Image

Image

Image

Image

Once that was done, i got the turret together, including metal barrel.

Image

Image

And started fitting out the rear.

Image

Got a bit of patching up to do on the zimm once the rest of the PE is fitted. main thing to do now is the PE track guards. I need to keep than workable for the dio. Once there done, i can crack on with the rest.
'I am a Norfolk man and i glory in being so'
On the bench: Revell 1/72nd Type VIIc U-Boat
User avatar
mostrich
Admin
Posts: 2914
Joined: Sun Apr 06, 2014 2:13 pm
Location: Hamburg, Germany
Contact:

Re: Dragon 1/35th Tiger I Late

Post by mostrich »

A mouth watering intro, Bish! I'm absolutely with you regarding the Zim. The manufacturers came along with a couple of new solutions (resin decals, styrene sheets) but in the end it's putty that simulates putty the best.
Did you prepare the model surface before application and which tool did you use for the pattern?
When the sun of culture hangs low even dwarfs throw shadows.
User avatar
Stikpusher
Moderator
Posts: 18957
Joined: Sat Apr 05, 2014 8:37 pm
Location: Ceti Alpha 5

Re: Dragon 1/35th Tiger I Late

Post by Stikpusher »

Bish, you’re off to a great start! And I gotta agree with Torben about your zimm work. Very nice!
"Surely I have made my meaning plain? I intend to avenge myself upon you, Admiral. I have deprived your ship of power, and when I swing 'round, I intend to deprive you of your life."

FLSM
User avatar
Bish
Master Member
Posts: 570
Joined: Wed Apr 09, 2014 7:42 am
Location: Suffolk, England

Re: Dragon 1/35th Tiger I Late

Post by Bish »

Thanks guys.

I do have a couple of pre zimmed kits and have got a set of those zimm decals to try, but i just don't see the effect matching this. I have a set of Airwaves stamps that i got from Hannants years ago. Come with 4 patterns with 3 sizes in each. They re-released it a while back, but doesn't seem to be on sale at the moment.
'I am a Norfolk man and i glory in being so'
On the bench: Revell 1/72nd Type VIIc U-Boat
User avatar
Floki
Elite Member
Posts: 3548
Joined: Wed Dec 12, 2018 2:23 am
Location: Muncie, Indiana

Re: Dragon 1/35th Tiger I Late

Post by Floki »

Going to be a nice looking Tiger Bish. I've only made one attempt at making my own zimm and it didn't turn out very well. The Meng King Tiger that I completed recently had the zimm molded in and they did a great job at that it has random damage, dips and uneven areas just what you would expect not completely uniform.
March as one, Don't look back
Odin's sons... Attack!
Unleash hell! Do not repent! Warfare grants us no lament
Let your weapons slash and tear This is no place for fear
Hold the lines! Move as one! In unity our victory's won
Our shields will form a mighty wall
United we shall never fall
User avatar
Bish
Master Member
Posts: 570
Joined: Wed Apr 09, 2014 7:42 am
Location: Suffolk, England

Re: Dragon 1/35th Tiger I Late

Post by Bish »

Thanks Floki. I do have 2 Meng Tiger II's but un-zimmed ones. I did get a set of decals for one of them. But i like the sound of those with the dmaged zimm molded on.
'I am a Norfolk man and i glory in being so'
On the bench: Revell 1/72nd Type VIIc U-Boat
User avatar
Bish
Master Member
Posts: 570
Joined: Wed Apr 09, 2014 7:42 am
Location: Suffolk, England

Re: Dragon 1/35th Tiger I Late

Post by Bish »

A bit more progress on the Tiger. I got the fuel tanks and fans painted as this will be seen though the grills.

Image

The turret was finsihed off with spare track hangers and other small bits.

Image

Image

And the top deck has been added and then most of the PE has been fitted. The track guards took quite some time to do. The kit ones are nice but i need this movable so it been worth it. I still have to do the rear ones'

Image

Image

Image

And i have started on the Fruil tracks. One is done just a few more links to add to the other.

Image

I can feel the paint stage coming on son and then i can start puting the figures together.
'I am a Norfolk man and i glory in being so'
On the bench: Revell 1/72nd Type VIIc U-Boat
User avatar
Stikpusher
Moderator
Posts: 18957
Joined: Sat Apr 05, 2014 8:37 pm
Location: Ceti Alpha 5

Re: Dragon 1/35th Tiger I Late

Post by Stikpusher »

Your Tiger is coming along great Bish! The fruil tracks are always a fine touch for the look.
"Surely I have made my meaning plain? I intend to avenge myself upon you, Admiral. I have deprived your ship of power, and when I swing 'round, I intend to deprive you of your life."

FLSM
User avatar
Bish
Master Member
Posts: 570
Joined: Wed Apr 09, 2014 7:42 am
Location: Suffolk, England

Re: Dragon 1/35th Tiger I Late

Post by Bish »

Cheers Carlos. I think the tracks will really come into their own in this build if all goes well.
'I am a Norfolk man and i glory in being so'
On the bench: Revell 1/72nd Type VIIc U-Boat
User avatar
Bish
Master Member
Posts: 570
Joined: Wed Apr 09, 2014 7:42 am
Location: Suffolk, England

Re: Dragon 1/35th Tiger I Late

Post by Bish »

Finally got time to post an update. The last of these pics were taken at the start of the week, but been so busy trying to get it done that i haven't had chance to post them, so here goes.

Got the final bits fitted and had her ready for primer and paint.

Image

Image

Image

I then painted with Xtracolour adding a little of their darker DAK yellw to the normal Dark yellow for a later was look. The green was sprayed free hand.

Image

Image

Image

Image

Image

The decals were then added followed by a couple of coats of Alclad Aqua gloss and the first bit of weathering. This was an overall oil wash of raw umber a yellow orche mix. I forgot to take pics of the turret before the wash, but you can see the hull before and after.

Image

Image

Image

Image

I also made a start on the 4 figures, getting them together and ready for painting.

Image

And made a start on the base.

Image

After staining and varnishing the surround i added the Celluclay. The base has been left in the shed all week where it is cold. This slws down drying so i can add the vehicle into the base.

Image

The Tiger has come on quite a bit, i have spent the last couple of days weathering. It should be done by Monday and will get some pics up before adding it to the base and finishing the figures. I would like to wrap this up before the end of this coming week.
'I am a Norfolk man and i glory in being so'
On the bench: Revell 1/72nd Type VIIc U-Boat
Post Reply

Return to “Work In Progress: Armor”