1/32 Meng Me163 Komet

Re: 1/32 Meng Me163 Komet
Your delicate filling work is so tidy and accurate. Those things make the difference at the end.
When the sun of culture hangs low even dwarfs throw shadows.
-
speedgraflex

- Moderator
- Posts: 9749
- Joined: Fri Feb 10, 2017 11:08 pm
- Location: Santa Monica, California

Re: 1/32 Meng Me163 Komet
Thanks Torben! Milliput with water is a great for delicate fill work. Sometimes all you need to do is smooth out the "floor" of the glue seam without totally filling it and Milliput is ideal for that scenario.mostrich wrote:Your delicate filling work is so tidy and accurate. Those things make the difference at the end.
It's normally not the most important part of the build but I did embark on this one specifically to re-ignite my modeling motivation. Therefore, I've tried to keep the build on a more simple path.speedgraflex wrote:No worries, John! Building mojo is most important!
John aka JKim
-----------<><

-----------<><

Re: 1/32 Meng Me163 Komet
Fabulous work so far John!
Stuart Templeton 'I may not be good but I'm slow...'
My blog: https://stuartsscalemodels.blogspot.com/
My blog: https://stuartsscalemodels.blogspot.com/
Re: 1/32 Meng Me163 Komet
A bit more work on the Komet... instead of the kit-supplied gunsight or the one included in the Aires resin cockpit, I chose to use a Quickboost Revi-16 gunsight. The optical glass is cut from a sheet of clear packaging with the edges of the front element painted in transparent blue/green.
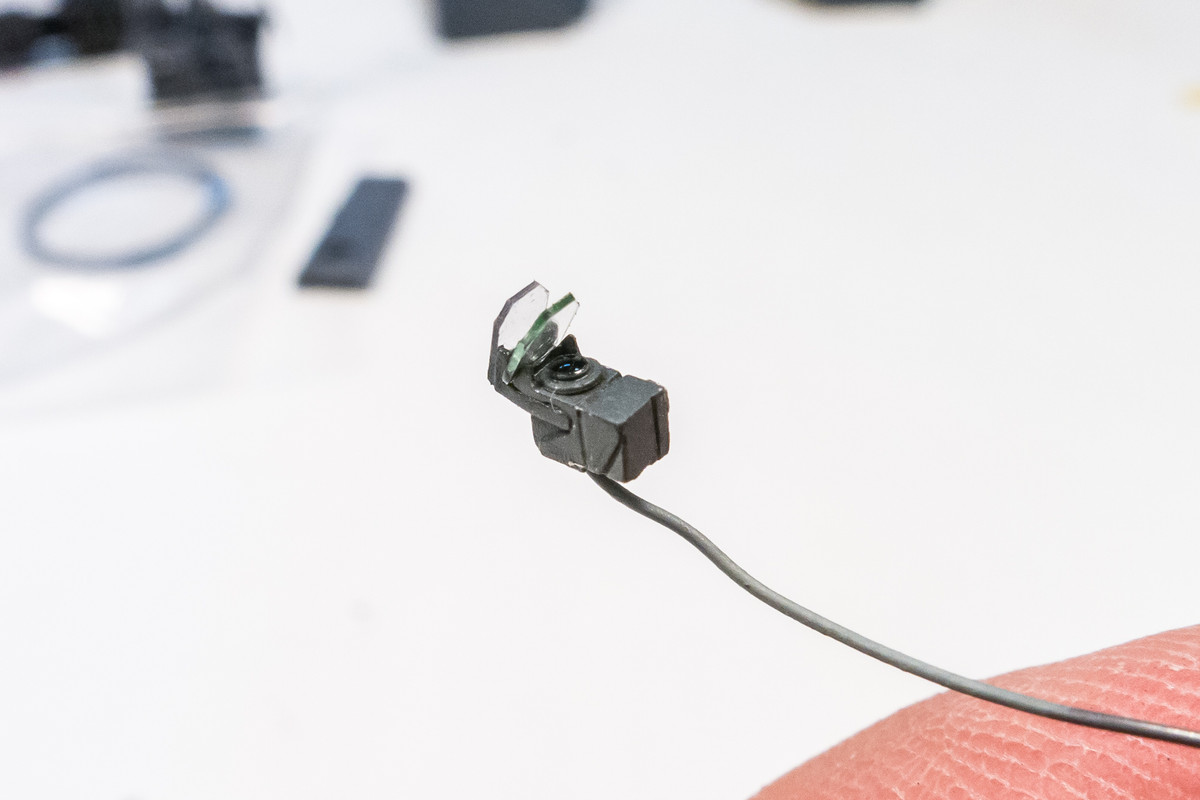
The mounting base from the clear kit part was grafted onto the bottom of the resin gunsight. There are visible stress marks on the transparent armored glass... I have an extra transparent sprue courtesy of Meng customer service so I'll probably utilize it to fix this issue.

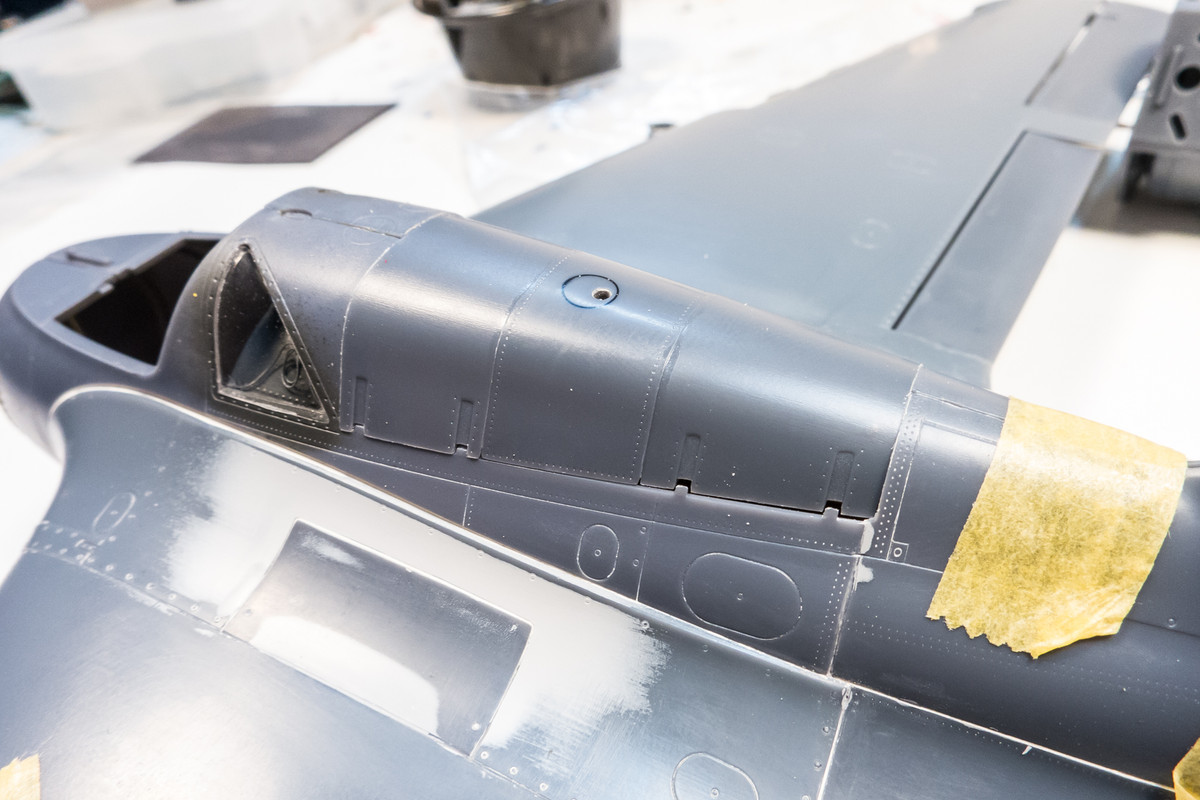
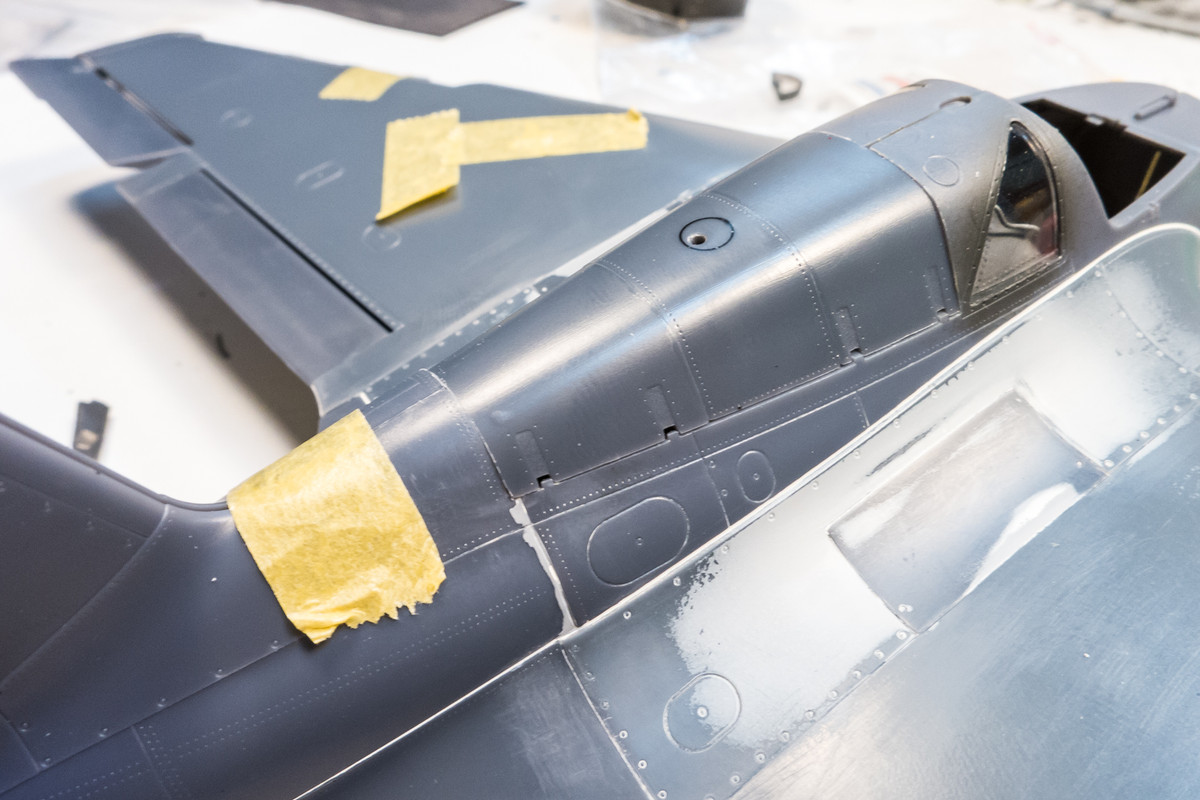
I've decided to glue in the side windows at this point and then mask them off for painting. I REALLY don't like Meng's choice to mold the windows and canopy WITHOUT the surrounding frame. It makes for a tricky and most likely noticeable glue joint.
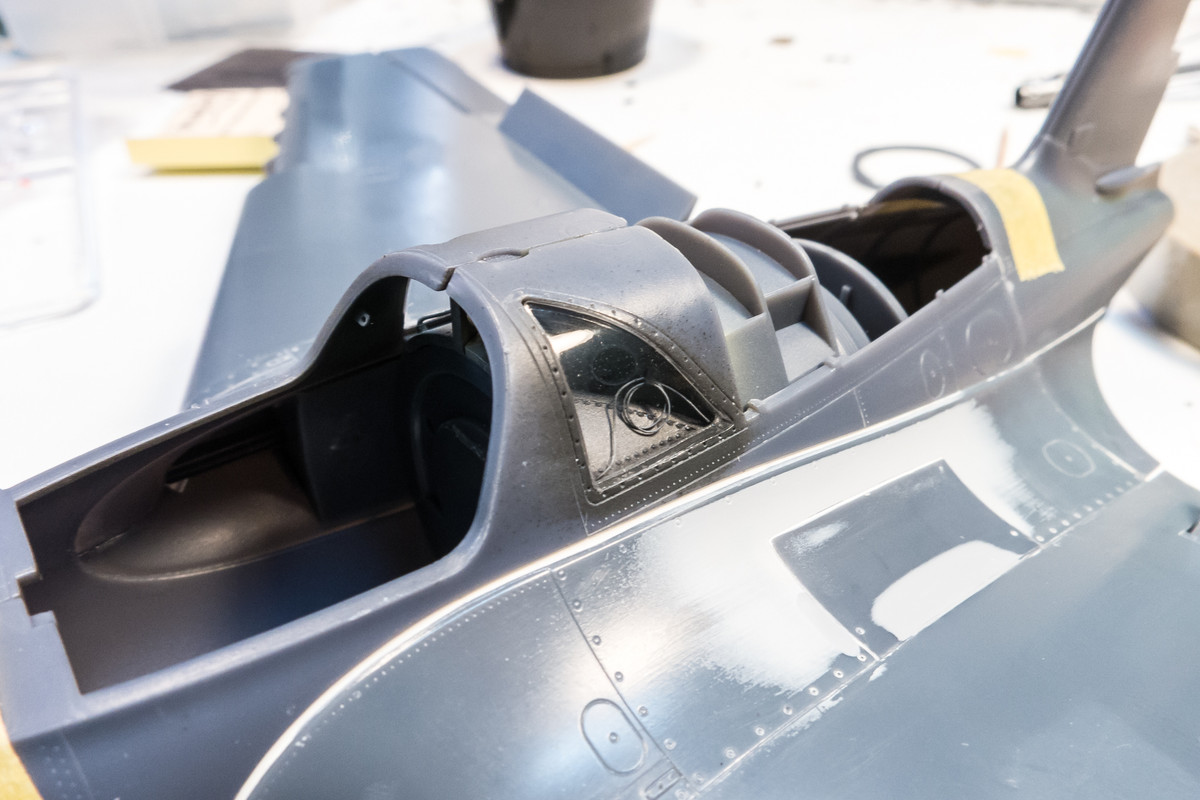
And as previously mentioned, the three-part set of panels along the top spine were glued together instead of trying to glue them in separately later.
Hopefully this strategy will net a neater result but it's hard to stay at this dry-fitting stage.
The mounting base from the clear kit part was grafted onto the bottom of the resin gunsight. There are visible stress marks on the transparent armored glass... I have an extra transparent sprue courtesy of Meng customer service so I'll probably utilize it to fix this issue.
I've decided to glue in the side windows at this point and then mask them off for painting. I REALLY don't like Meng's choice to mold the windows and canopy WITHOUT the surrounding frame. It makes for a tricky and most likely noticeable glue joint.
And as previously mentioned, the three-part set of panels along the top spine were glued together instead of trying to glue them in separately later.
Hopefully this strategy will net a neater result but it's hard to stay at this dry-fitting stage.
John aka JKim
-----------<><
-----------<><


Re: 1/32 Meng Me163 Komet
Looking good John!
Interesting to see, how you will deal with the frameless canopy and windows.
- Kari
Interesting to see, how you will deal with the frameless canopy and windows.
- Kari
---
On the bench:
Tamiya F-4B Phantom II 1/48
Kinetic F-16A (new tool) 1/48
https://www.facebook.com/GrundAsk-Scale ... 721218708/
On the bench:
Tamiya F-4B Phantom II 1/48
Kinetic F-16A (new tool) 1/48
https://www.facebook.com/GrundAsk-Scale ... 721218708/
-
Handiabled

- Master Member
- Posts: 600
- Joined: Sat Mar 15, 2014 7:13 am
Re: 1/32 Meng Me163 Komet
Looks great so far and love the detail. Looks like you have your work cut out for you with seams on this one
Re: 1/32 Meng Me163 Komet
Thanks guys!
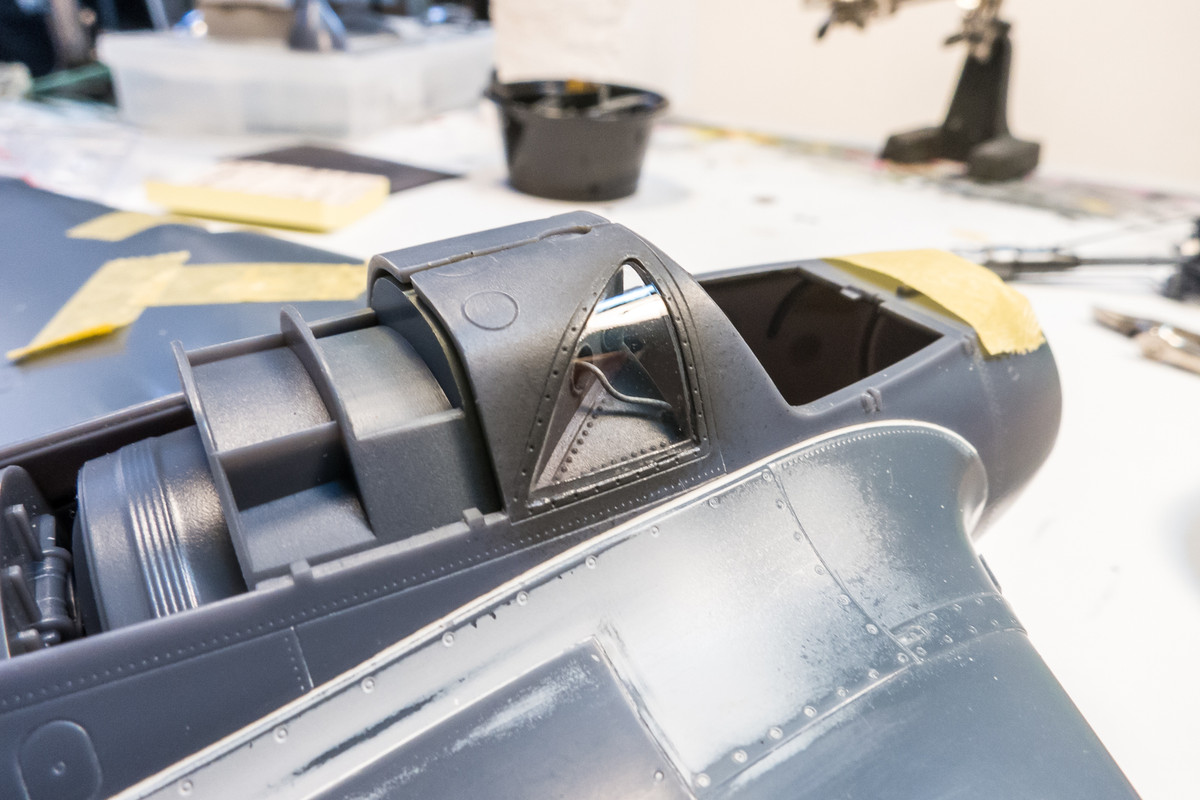
Another shot of the gun sight after replacing one of the armored glass plates. I also had to reverse the gun sight as I had glued it on BACKWARDS. Funny how many Revi 16 gunsights I've installed and how normal the backward one looked to me even when reviewing the photo. I must've have some sort of visual dyslexia.

Hmmm... actually, there really isn't much filler. There IS a large amount of light grey around the upper wing roots but that is just grey primer that was sprayed when I glued in the cannon bay covers and wasn't sanded off.keavdog wrote:Whoa - that's a lot of filler and sanding.
Another shot of the gun sight after replacing one of the armored glass plates. I also had to reverse the gun sight as I had glued it on BACKWARDS. Funny how many Revi 16 gunsights I've installed and how normal the backward one looked to me even when reviewing the photo. I must've have some sort of visual dyslexia.
John aka JKim
-----------<><
-----------<><
Re: 1/32 Meng Me163 Komet
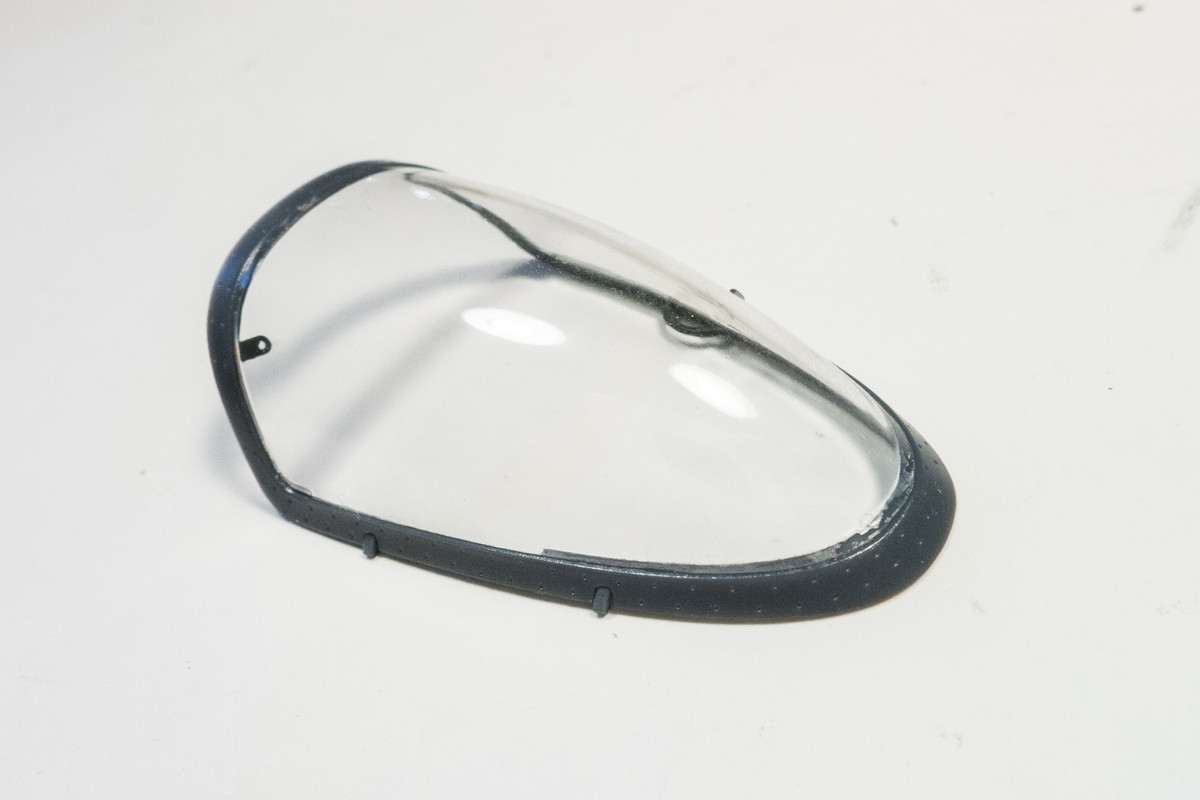
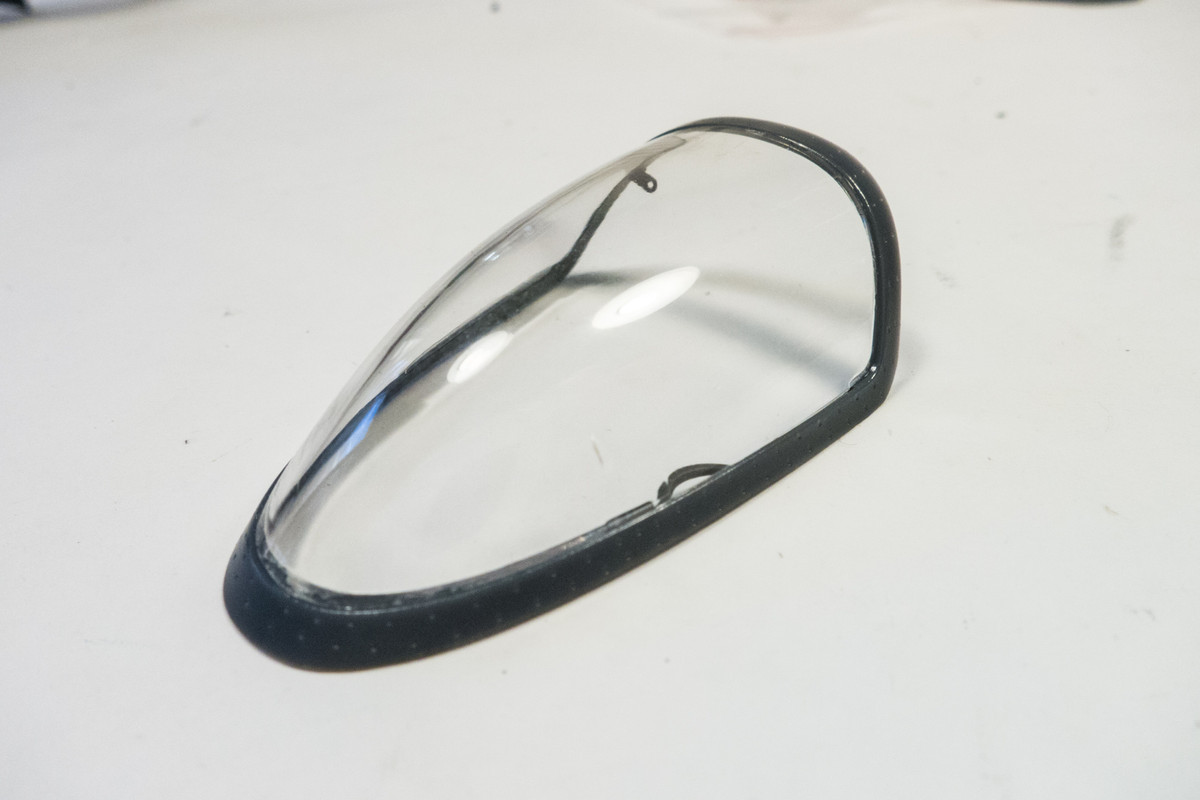
Here is the two-part canopy. The clear part, dipped in Future to enhance clarity, has been glued onto the canopy frame by carefully seeping Tamiya Extra Thin into the seam. I'd much rather have this molded as a single clear piece like almost any other manufacturer would have done. Why reinvent the wheel?
John aka JKim
-----------<><
-----------<><