Maddog Manufacturing 2015 Factory is Open

Show off your completed work! One or two pictures and a brief explanation. Let others have a quick look at your finished masterpieces!
User avatar
Duke Maddog
Elite Member
Posts: 7088
Joined: Tue Jun 03, 2014 11:22 am
Location: Rowland Heights, CA

Re: Maddog Manufacturing 2015 Factory is Open

Post by Duke Maddog »

As promised, I have a bit more to post today. These are the things I got done since the last time I posted about three days ago.

I'll start out with the models I got painted first.

The C-46 had been sitting too long so I pulled out the engine cowling parts and shot them with some Olive Drab on the tops:

Image

Later I assembled them; masked them when they were dry and shot the grey undercoat on them. I also shot the grey on the landing gear doors:

Image

I also re-shot a coat of Olive Drab over the whole aircraft since it needed a second coat due to some irregularities I saw and had to fill and sand out:

Image

You can see that I did that before shooting the grey.

Next, I re-masked and shot a Dark Ghost Grey topcoat on my F/A-18 Hornet again to fix the flaked paint:

Image

Nest, I masked off the openings in the Stearman with Silly Putty to prepare it for paint:

Image

It doesn't look like it, but that plane is still grey in that pic. Here it is after I shot the cream color over the whole thing, including landing gear parts as well as wing struts:

Image

That reminded me to try and color match the red on the decal sheet. The one on the right is Testor's square bottle gloss red. The one on the left is Testor's Model Master Insignia Red:

Image

They both look the same in this pic, but I assure you they are both darker in color compared to the decal. Personally, I think I might have to go with Testor's Model Master Italian Red. I'm hoping to get some picked up next week.

Moving on, I also shot a Dark Green over my T-54B:

Image

Image

This is glossy in these pics because I shot a gloss clearcoat over it before I realized I hadn't shot a pic of it after I painted it. I also should have finished the rear end before I shot this... oh well.

Speaking of clearcoats, I also shot a gloss clear over my Diamond T truck...

Image

...and my Huey Hog:

Image

The Diamond T doesn't look very glossy in the pic, but it is as shiny as the Hog. These will be getting decals soon.


Now on to the rest of the fun.....


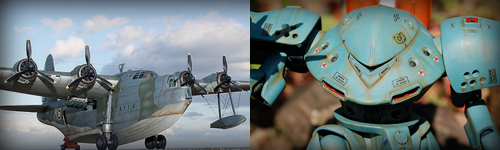
I pulled out my Madge and set to getting the interior finished so I could get it painted and closed up inside the fuselage. First off, I managed to get all the bulkheads installed on the interior:

Image

I purposely left that Exacto in the pic so you can see how big this monster is.

Now here are all the parts for the pilot's seat:

Image

Now here they are all assembled:

Image

I had to make two of them. Now I got them all installed and that completed the interior of this beastie:

Image

Now I set that aside to dry and went to work on the engines....

What engines? There was only one piece to glue into the center of these cowls, so I cemented them in and got the propellers ready to go on after I painted the center of the cowls:

Image

That was quick, so I pulled out the wings and sanded them a bit; then I started to assembled the empennage for the tail:

Image

After this, the interior was all dried; so I got to work painting it. It is impossible to tell, but I shot a coat of light grey paint on these sections of the interior, as well as the tail which isn't in the pic:

Image

After that dried, I started to paint all the details. These will later be drybrushed to bring them out; even though they won't necessarily be seen again once the fuselage closes up:

Image

There's also some decals for the instrument panel that will go on this too.

Next I moved on to my two SCUDs. First I assembled most of the rear sections where the missile carriage is raised:

Image

You can see there's some pretty prominent seams on these parts that got the Mr. Surfacer 500 treatment. I'll get those sanded smooth before I assemble these parts further.

Next I assembled most of the center section of these vehicles. I left off the outer panels so I could paint the interiors. Most of it won't be seen, but some might be seen through the small, round windows on the doors:

Image

Look at all this sweet detail inside this section:

Image

Too bad it's going to be hidden, but I have no room on my shelves for vehicles with doors swung open. Oh well, some of it might be seen through the little round windows....

Just for fun, here's a shot of everything all snapped together and sitting on the chassis:

Image

These are really gonna look great!

Okay, moving right along, my final project on this post is my M1A2 Abrams SEP TUSK. I started out bypassing the part of the instructions where they say to add all the semi-clear parts to all the windows and periscopes on this model. Instead I went straight to assembling all four parts of the lower hull. Then I assembled the upper hull and put the two together:

Image

Image

Then I went and assembled the main gun:

Image

Finally, since I had the main gun; I needed a turret to mount it in:

Image

Wow, that looks so basic. Time to add all the goodies to this and make it look good:

Image

All that's left to do with this is to add all the windows to the parts that need them; assemble the TUSK portions of the hatches and then I can paint this. I'll add all the breakable fiddly bits later on when this is mostly done. On the lower hull, all that is needed is to add the wheels and tracks and then I can paint it too.


In closing, I'll leave you with a shot of this tank all dry-fit together so far. Enjoy:

Image

That's all I have for now. I'm gonna have a very busy weekend so I doubt I'll get anything more done until next week. Stay tuned for more and until then, comments are welcome. Thanks for looking in.
The Duke
Virtuoso of Miniatures

"Do you know what the chain of command is? It's the chain I get and beat you with 'till you understand who's in ruttin' command!"
-Jayne Cobb, Firefly Episode 2 "The Train Job"

We are modelers - the same in spirit, in hunger to insanely buy newly released kits, hustlers in hiding our stash from our better halves and experts in using garbage as replacements for after-market parts.
User avatar
BsYamato
Addicted Member
Posts: 1149
Joined: Mon Apr 07, 2014 3:20 pm

Re: Maddog Manufacturing 2015 Factory is Open

Post by BsYamato »

So many updates Duke.. the madge is fabulous but.. these engines!!! seems from another kit :DH: why so accurate inside and a so poor front engine :( I have two engines from the C-97 to replace the vebplastic kit engines
Image
User avatar
KSaarni
Elite Member
Posts: 5308
Joined: Sun Apr 06, 2014 7:13 am
Location: Gent, Belgium
Contact:

Re: Maddog Manufacturing 2015 Factory is Open

Post by KSaarni »

Great projects ongoing there Duke!

Agree with Bsy, amazing that the level of details inside the fuselage is so great, but the engines totally the opposite!

Regarding the Huey... looks like a marshmallow would have exploded inside it ! :-)

- Kari
---
On the bench:
Tamiya F-4B Phantom II 1/48
Kinetic F-16A (new tool) 1/48


https://www.facebook.com/GrundAsk-Scale ... 721218708/
User avatar
Duke Maddog
Elite Member
Posts: 7088
Joined: Tue Jun 03, 2014 11:22 am
Location: Rowland Heights, CA

Re: Maddog Manufacturing 2015 Factory is Open

Post by Duke Maddog »

Thanks guys! I also don't know why the engines are so 'basic'. I have seen pics of the eBe-6 and the engines are a bit hard to see, so maybe Trumpeter did this because in this scale you couldn't see it well. Then again, you won't be able to see most of the interior detail as well, so maybe they just got lazy.

I'll go ahead and build this as it is; I haven't the time or money to get any aftermarket engines for this.

Thanks for the humorous comment about the Huey Kari! I stuffed a load of paper towel in there to mask it. Hmm, humorous diorama idea: make it crashed with an excessive air bag deployment! LOL!
The Duke
Virtuoso of Miniatures

"Do you know what the chain of command is? It's the chain I get and beat you with 'till you understand who's in ruttin' command!"
-Jayne Cobb, Firefly Episode 2 "The Train Job"

We are modelers - the same in spirit, in hunger to insanely buy newly released kits, hustlers in hiding our stash from our better halves and experts in using garbage as replacements for after-market parts.
User avatar
LyleW
Admin
Posts: 13655
Joined: Fri Dec 13, 2013 7:25 am
Location: Mt. Washington KY

Re: Maddog Manufacturing 2015 Factory is Open

Post by LyleW »

I really look forward to your updates. So much going on done so well!
To make each build less crappy than the last one. Or, put another way, "Better than the last one, not as good as the next one!"..
User avatar
Duke Maddog
Elite Member
Posts: 7088
Joined: Tue Jun 03, 2014 11:22 am
Location: Rowland Heights, CA

Re: Maddog Manufacturing 2015 Factory is Open

Post by Duke Maddog »

Thanks Lyle! I got a busy weekend so I doubt I'll have much to update for the next few days. Hopefully a small update near the end of the week.
The Duke
Virtuoso of Miniatures

"Do you know what the chain of command is? It's the chain I get and beat you with 'till you understand who's in ruttin' command!"
-Jayne Cobb, Firefly Episode 2 "The Train Job"

We are modelers - the same in spirit, in hunger to insanely buy newly released kits, hustlers in hiding our stash from our better halves and experts in using garbage as replacements for after-market parts.
User avatar
BlackSheep214
Elite Member
Posts: 10414
Joined: Sun Apr 06, 2014 8:47 pm

Re: Maddog Manufacturing 2015 Factory is Open

Post by BlackSheep214 »

KSaarni wrote:Great projects ongoing there Duke!

Agree with Bsy, amazing that the level of details inside the fuselage is so great, but the engines totally the opposite!

Regarding the Huey... looks like a marshmallow would have exploded inside it ! :-)

- Kari
More like Hero 6 exploded out of his armor suit. LOL!
“Who controls the skies, controls the fate of this Earth”

Author unknown- 352nd Fighter Group, Blue-Nosed Bastards of Bodney

“Send one plane it’s a sortie; send two planes it’s a flight; send four planes it’s a test of airpower. - Richard Kohn
User avatar
Duke Maddog
Elite Member
Posts: 7088
Joined: Tue Jun 03, 2014 11:22 am
Location: Rowland Heights, CA

Re: Maddog Manufacturing 2015 Factory is Open

Post by Duke Maddog »

BlackSheep214 wrote:
KSaarni wrote:Great projects ongoing there Duke!

Agree with Bsy, amazing that the level of details inside the fuselage is so great, but the engines totally the opposite!

Regarding the Huey... looks like a marshmallow would have exploded inside it ! :-)

- Kari
More like Hero 6 exploded out of his armor suit. LOL!

LOL! I love that movie! Right on!

Hmmmm, Maybe if I make one crashed, that could be the reason for the crash.... How hilarious would that be!
The Duke
Virtuoso of Miniatures

"Do you know what the chain of command is? It's the chain I get and beat you with 'till you understand who's in ruttin' command!"
-Jayne Cobb, Firefly Episode 2 "The Train Job"

We are modelers - the same in spirit, in hunger to insanely buy newly released kits, hustlers in hiding our stash from our better halves and experts in using garbage as replacements for after-market parts.
User avatar
Duke Maddog
Elite Member
Posts: 7088
Joined: Tue Jun 03, 2014 11:22 am
Location: Rowland Heights, CA

Re: Maddog Manufacturing 2015 Factory is Open

Post by Duke Maddog »

This week, due to a heavy schedule; I could only work on my models on Friday and Saturday for half of each day, so this is going to be a short update. Almost all this progress was done on Hobby Day Friday and Saturday; the rest was done during the hour or so I had today.

I'll start with my Aircraft.


This first one..... *sigh* It just does not want to be finished. I sealed the underside with three coats of clear before masking and the paint still peeled off. On top of that, the horizontal stabilizer broke again:

Image

One step forward; two steps backward with that one....


On to something better. On my Madge, I managed to get the interior done. I added the instrument panel decal and dry-brushed the rest of the instrumentation inside the compartments. None of this will be seen once it's closed up but it sure looks great here:

Image

Image

I also did the center compartment of this interior:

Image

After all that was done, I decided to test-fit this inside one side of the fuselage. I was pleasantly surprised to see how well it snapped right into place:

Image

I've already painted the interior of the fuselage halves so this beastie is almost ready to close up. All I need to do is add the windows to the sides of the fuselage halves and put in some last little detail parts. That being said, I went ahead and assembled the empennage assembly:

Image

This thing lined up so perfectly; I was really pleased at how easy Trumpeter has made this so far!

I also got decals on my Huey, but apparently didn't get pics of it. Oh well, next update...


Now for my armor.


I started out applying decals to those models that were ready for them. First off was the Diamond T truck:

Image

Image

Next I applied the decals to the T-54B tank as well:

Image

That was quick and easy, so I painted the tracks and added them to the lower hull:

Image

This beastie will be finished and weathered very soon; provided I get the time.

Also, someone asked if my Tiger Models Abrams SEP TUSK had photo-etch. Yes it does; it is added to the bottom of the stowage racks. Here's a shot of it already installed:

Image

The brass color sure blends with the bare color of this model.

Moving along, I decided to get further along on my Russian Armored trains. I had wanted to get started on the photo-etch for them, but was too short of time. So I pulled out the little BT-7 tank and added the last pieces:

Image

Since there were only a few photo-etch parts for this tank, I added them to it to finish this little tank:

Image

Image

Now I've seen a few different pictures of how they stack the tracks on the fender when they remove them. I need to research a little more to determine how I want to add the tracks to the tops of the fenders on this model after I paint it. Meanwhile, I also finished the last of the long flatcars I had still to do. I finally found all the parts so now this last one is done except for the bumpers and photo-etch:

Image

Just for fun, here's how these two will look on the train:

Image

My final project I was able to make progress on was my two SCUDS. I moved on and assembled the driver's cab in the front. I left off the sides of each cab so I could paint the interior and add the windows later:

Image

Here's how the cabs look all together:

Image

Of course, I made two for both of these SCUDS:

Image

Next I moved on and assembled the sections behind the driver's cabs:

Image

Now for the fun part; putting everything together to see how these look so far. I had added some final parts and sanded the rear boxes that had been filled before and now here is where these stand:

Image

Image

I had wanted to get the launcher cradles started, but ran out of time. Oh well, this gives me something to do the next time I have time for the bench.

That's all I got done so far; not bad for only a day and a half's work. I do hope I can get a few of these done soon.

Meanwhile, thanks all for looking in, comments are welcome.
The Duke
Virtuoso of Miniatures

"Do you know what the chain of command is? It's the chain I get and beat you with 'till you understand who's in ruttin' command!"
-Jayne Cobb, Firefly Episode 2 "The Train Job"

We are modelers - the same in spirit, in hunger to insanely buy newly released kits, hustlers in hiding our stash from our better halves and experts in using garbage as replacements for after-market parts.
User avatar
KSaarni
Elite Member
Posts: 5308
Joined: Sun Apr 06, 2014 7:13 am
Location: Gent, Belgium
Contact:

Re: Maddog Manufacturing 2015 Factory is Open

Post by KSaarni »

Oh my Duke,

where to start ? :-)

Sorry to hear about the paint peeling off, not to mention the broken stabilizer.. frustrating!

The Madge! The interior is just so superb, nice detailing, nice color nuances, again difficult to really believe we are looking at 1/72 scale plane.

I am really eager and curious to see the finalized build of the big train project.

Impressing detail quality of the both SCUDS

- Kari
---
On the bench:
Tamiya F-4B Phantom II 1/48
Kinetic F-16A (new tool) 1/48


https://www.facebook.com/GrundAsk-Scale ... 721218708/
Post Reply

Return to “Member's Gallery”