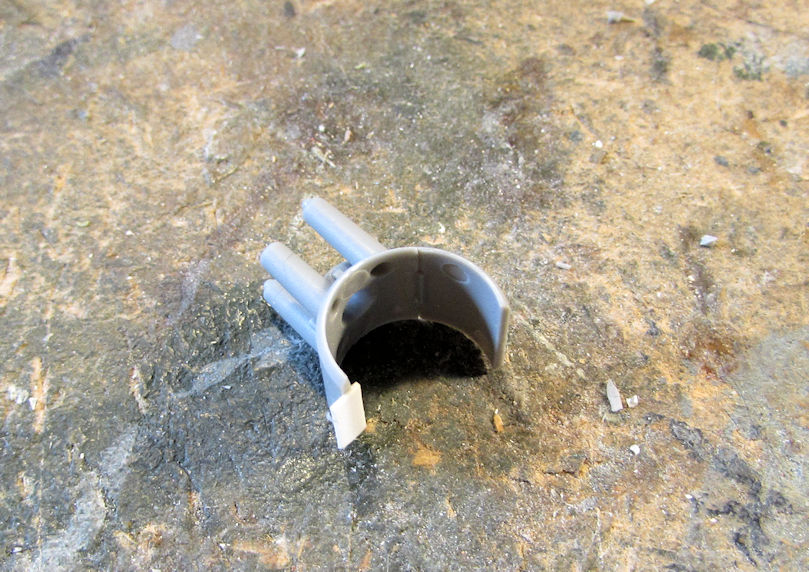
The implement on the back is called a parallelogram ripper, Mark. It is used to break up dirt to make it easier to work with the blade, among other things, or just break up hard soil so water can penetrate better, like a where there is a hardpan layer. Its name comes from the two frames that keep the shank of the ripper at the same angle no matter the height it is set at..Duke Maddog wrote:Continuing with the Shelf Queen theme,
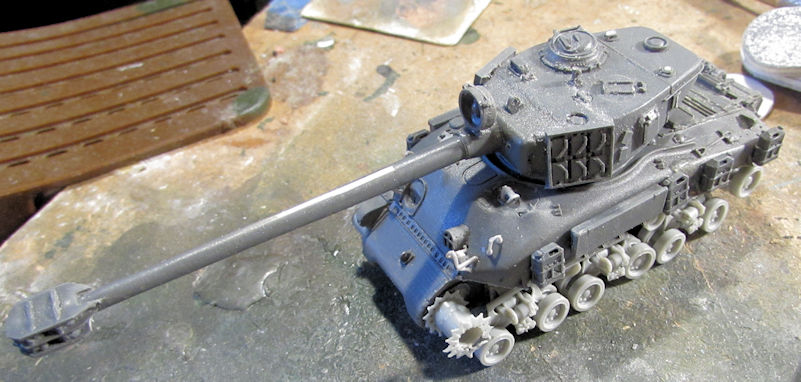
Finally, at least in my armor; I brought my D-9 Dozer forward a bit more.
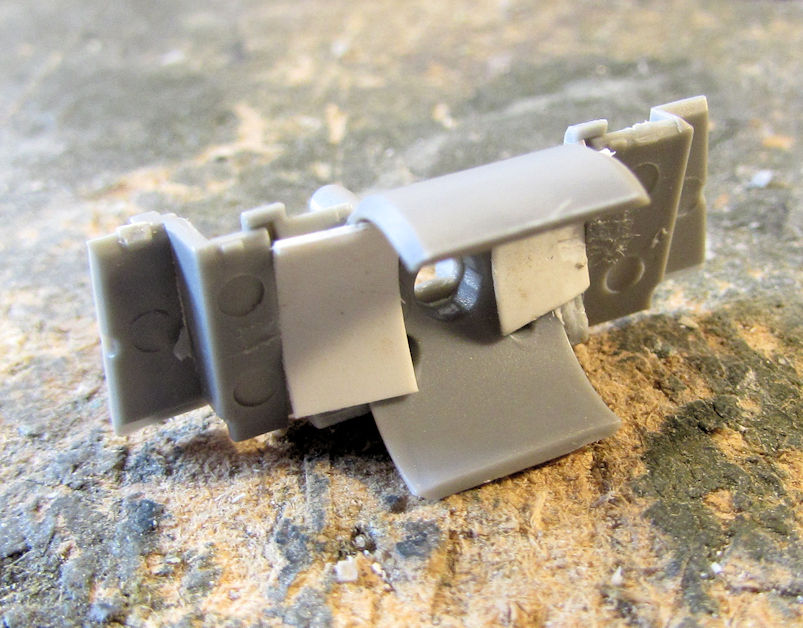
Here's a better shot of the rear assembly on this:
Looks like a trench digger. I don't know though.
.
Maddog Manufacturing 2020 Production
-
jeaton01

- Elite Member
- Posts: 2070
- Joined: Thu Apr 23, 2020 9:20 am
- Location: Northern California
- Contact:
Re: Maddog Manufacturing 2020 Production
-
Stikpusher

- Moderator
- Posts: 18869
- Joined: Sat Apr 05, 2014 8:37 pm
- Location: Ceti Alpha 5
Re: Maddog Manufacturing 2020 Production
My guess about that parallelogram ripper, after watching the combat engineers do their job on numerous field exercises, is that it is used for preparing the ground for anti tank mines in an obstacle area.
"Surely I have made my meaning plain? I intend to avenge myself upon you, Admiral. I have deprived your ship of power, and when I swing 'round, I intend to deprive you of your life."
FLSM
FLSM
-
Duke Maddog

- Elite Member
- Posts: 7088
- Joined: Tue Jun 03, 2014 11:22 am
- Location: Rowland Heights, CA
Re: Maddog Manufacturing 2020 Production
Thanks for the information guys! It is most helpful.
"for the wife..." LOL! I love it! Imagine having her in there to tell you that the dirt isn't piling up right!
"for the wife..." LOL! I love it! Imagine having her in there to tell you that the dirt isn't piling up right!
The Duke
Virtuoso of Miniatures
"Do you know what the chain of command is? It's the chain I get and beat you with 'till you understand who's in ruttin' command!"
-Jayne Cobb, Firefly Episode 2 "The Train Job"
We are modelers - the same in spirit, in hunger to insanely buy newly released kits, hustlers in hiding our stash from our better halves and experts in using garbage as replacements for after-market parts.
-
Duke Maddog
- Elite Member
- Posts: 7088
- Joined: Tue Jun 03, 2014 11:22 am
- Location: Rowland Heights, CA
Re: Maddog Manufacturing 2020 Production
Well, despite numerous demands on my time, I still managed to get the following work done. Most of this happened at our recent limited Hobby Day; thank God we got to do that again! I had loads of time to move forward on a lot of my models. So, climb aboard the tram and lets get started! Remember to keep all hands and feet inside the tram at all times. Thank you. On with the tour....
Let's start with the aircraft line....
I pulled the A-400 down since I was tired of it sitting for so long. I added the landing gear inside the main landing gear sponsons and forward landing gear bay:
Later I added the wheels to the landing gear and the lower covers to the sponsons. I only glued the outer edges first to make them secure, hence the gaps you see on the inside. I'll come back and close those up later:
While that was drying, I also got more done on the An-124. The instructions don't tell you to, but I needed to cut out these shoulder sections to fit the indented covers that go there:
Later I got the plastic parts glued into place:
With that finally done, I was finally able to get this horse primed! Here it is after about four coats of primer and one of a gloss coat that ended up semi-gloss again:
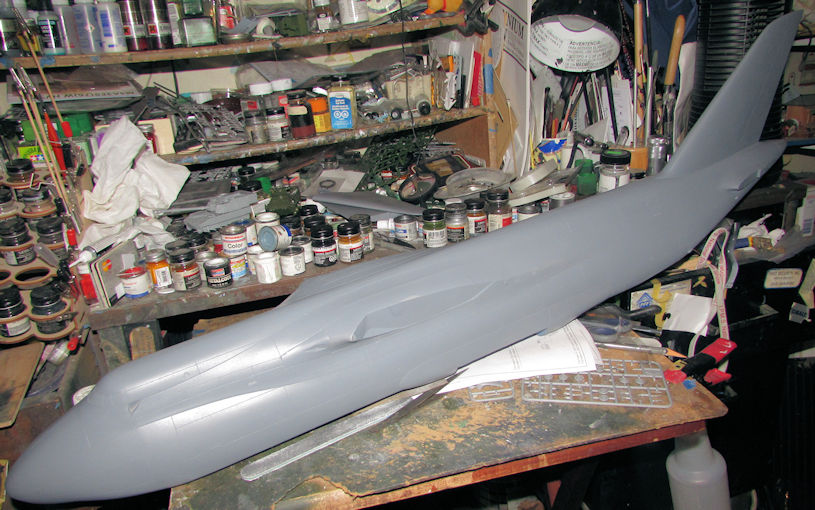
There's a few minor issues still to correct, but this is moving forward better than I hoped. I do hope that the momentum continues....
Now lets look at the armor line...
Most of this is models I advanced closer to the painting stage, but there are a few models I started too. I'll start with those first.
This first one is a German staff car I got from a friend. I'd gotten this far before I realized I hadn't shot pics of it yet! This is a car I'd built before so this one is being built with the top down:
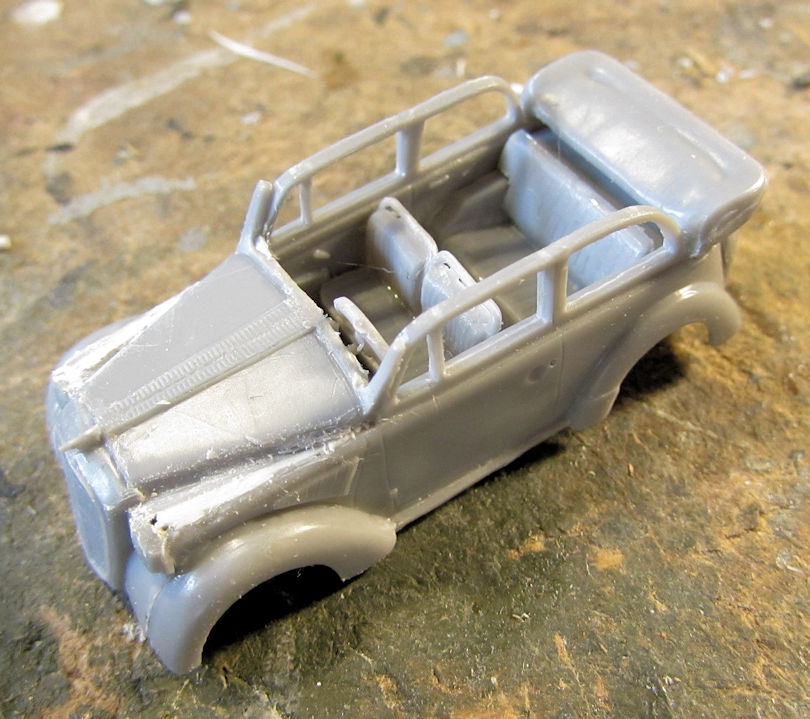
You can see where I added strip styrene on each side of the hood cover; the fit was just a bit too loose...
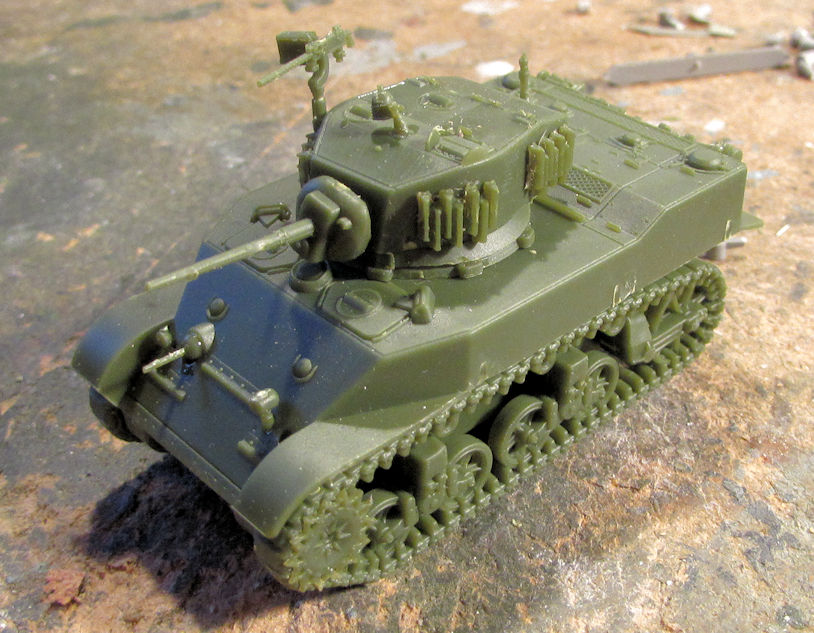
The next one I did was an S-Models M-5 Stuart. I don't have any of these in the collection so it was time to get it built. This kit has two models in it, so one will be US Army the other will be a French tank. This one is currently ready for paint:
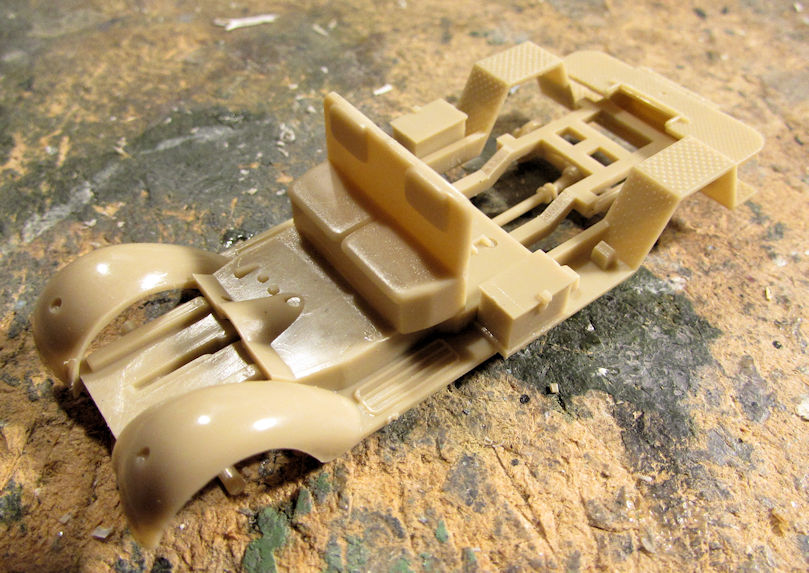
Another one I started was the Japanese fuel truck. I just felt like I wanted to do something simple and nostalgic. First was the chassis and interior:
I then built the cab:
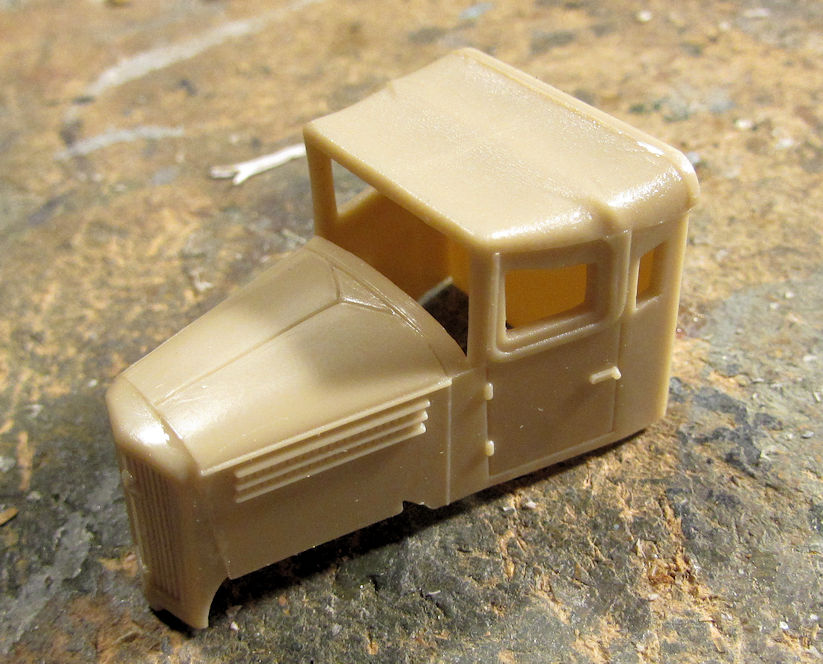
Then the tank behind it:
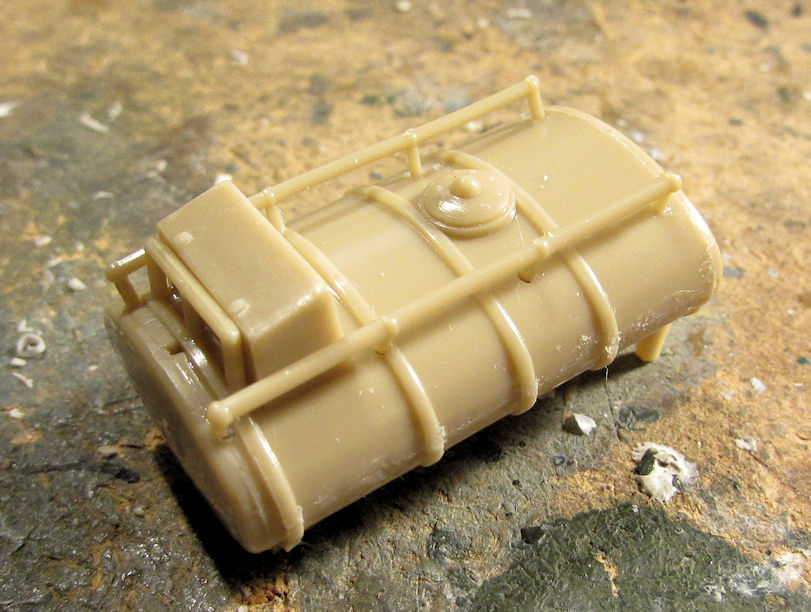
Here it is all together so far. I just have to paint the interior before I glue everything together. Then I can glue it together, add the detail parts and get it painted:

Now for the models I advanced further along.
First are the three Chieftains I had started. This is the Mk.5 sporting his new wheels:
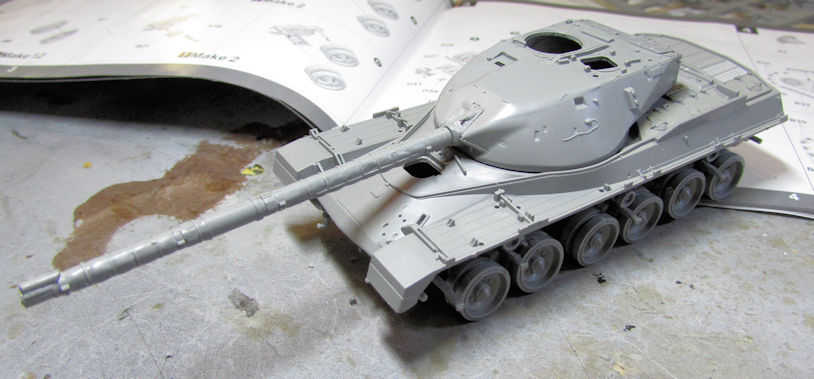
The drive sprocket and idler wheels will be used to form the track in the jig. I'm looking forward to trying that out.
Next I assembled the basic turret and added the wheels to the Mk.10:
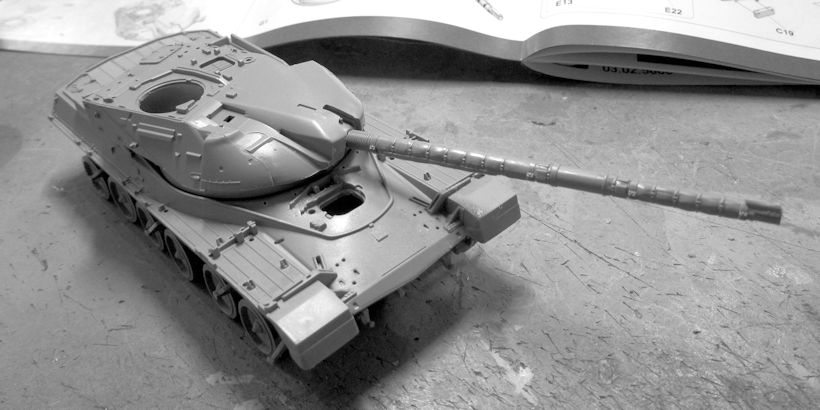
Followed by the same assemblies on the Mk.11:

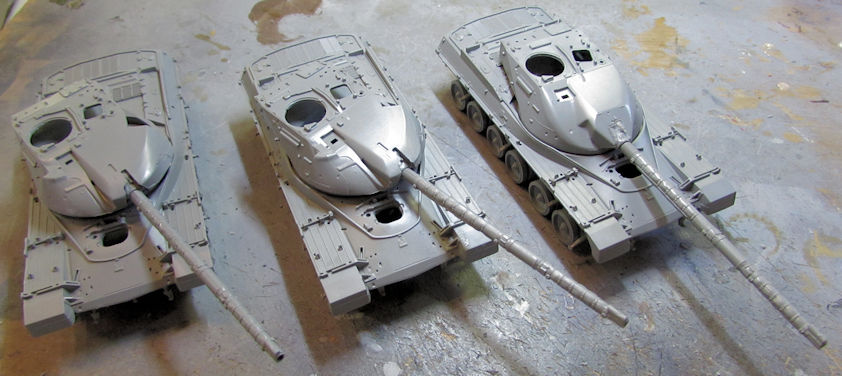
Here's all three side by side:
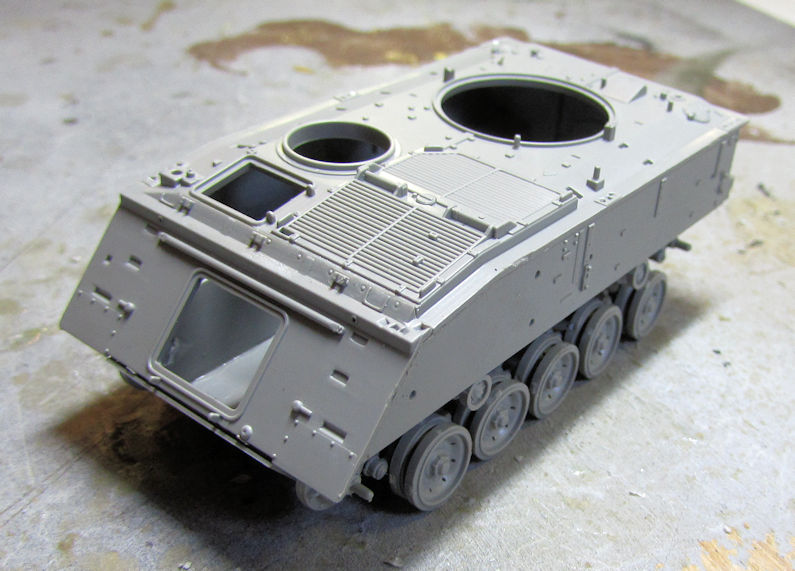
Next I added the wheels to the FV-432 since I had them on the Chieftains:
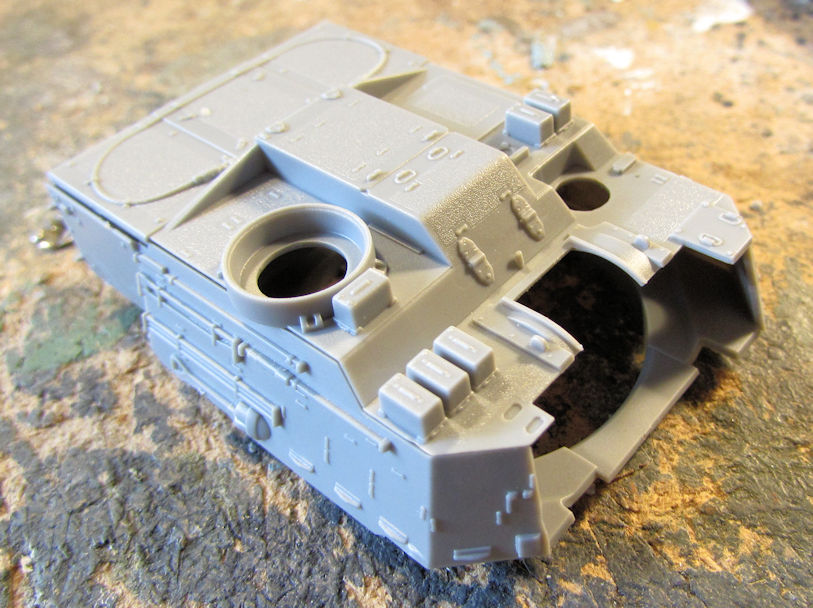
Moving on, I realized that the turret on my M-51 was extremely loose. I didn't know whether I was supposed to file down the turret plug to the hole in the hull; or add a plug the same size as the hole. I opted for the easier solution:
Now this sits perfectly on the hull without moving:
I don't know if the turret sits too high or not, but it is staying like it is. Trying to remove all that resin from the sides of the plug is just a bit beyond my capabilities right now.
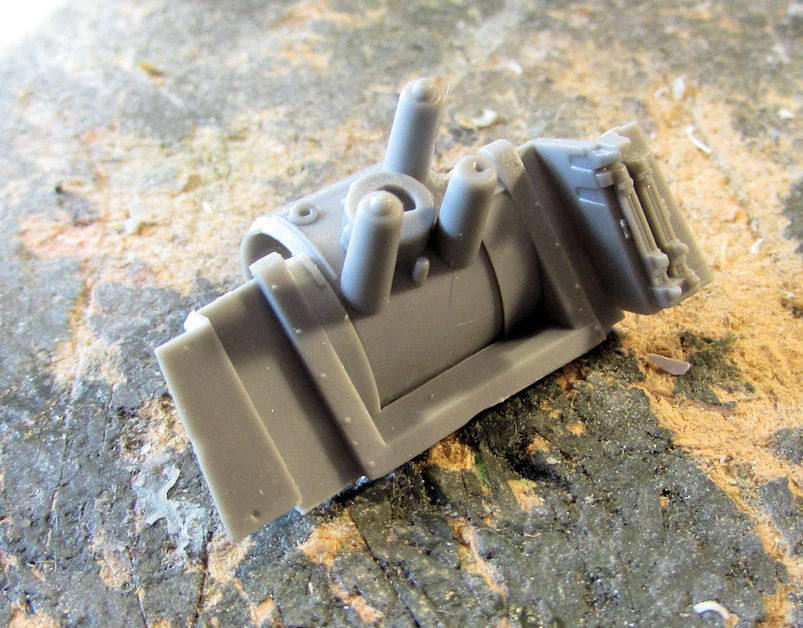
Next I finished off the cab for the D-9 Dozer, starting with the basic assembly:
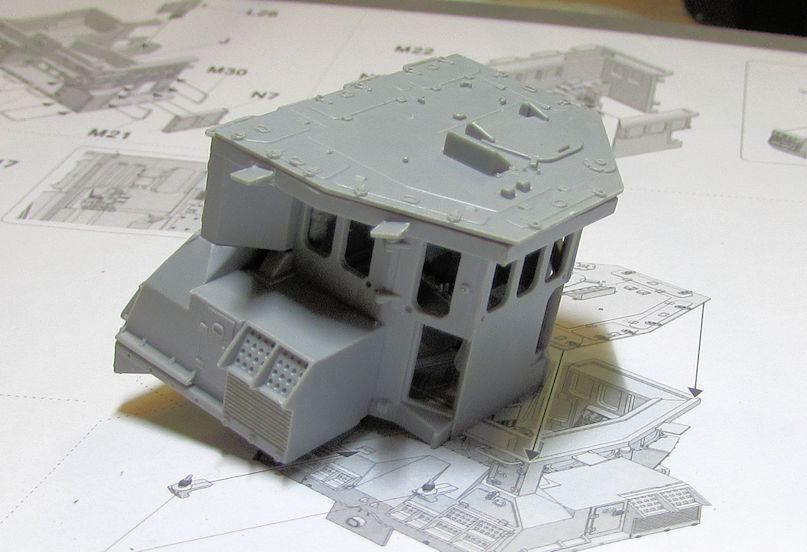
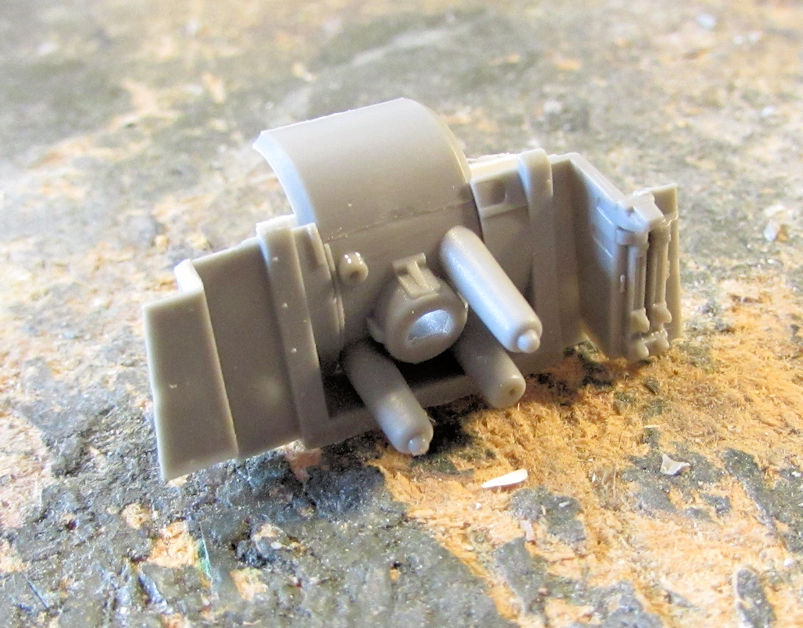
After adding some of the interior parts to this, I dry-fit that to the main hull:
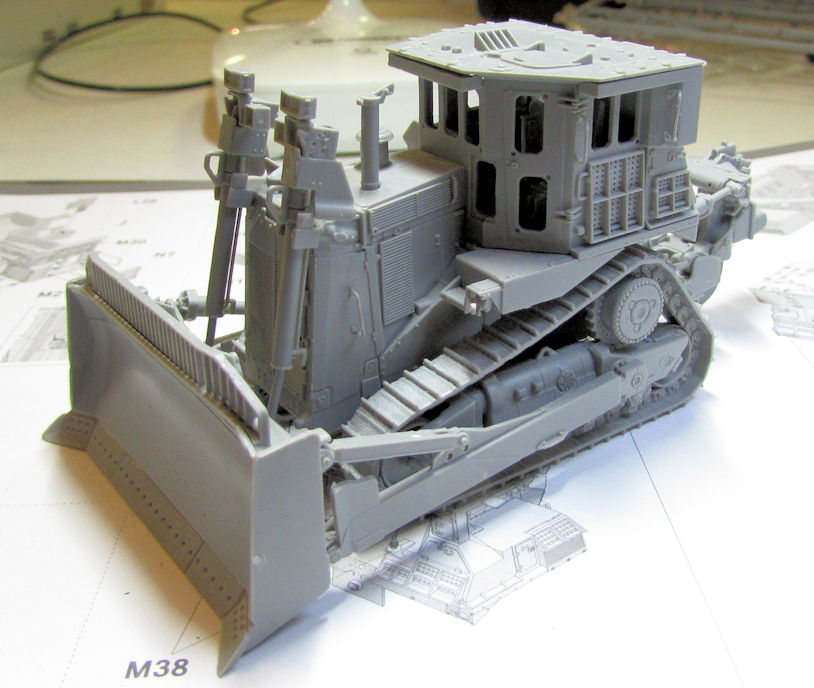
The top is just placed there for show; I left it off to better paint some of the interior details. Then I can get the exterior painted.
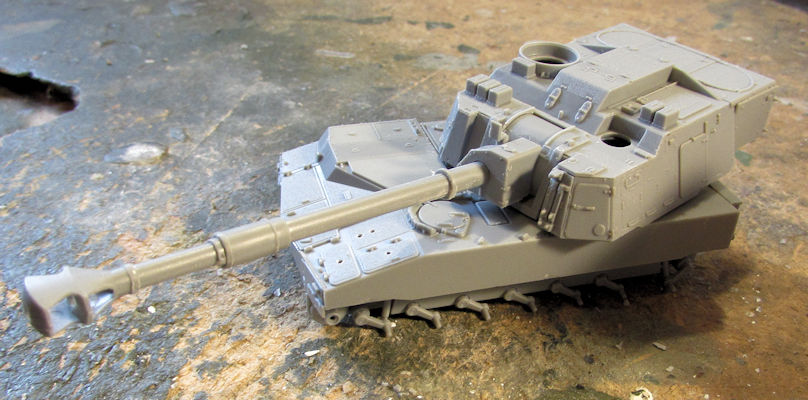
Earlier I'd found the second kit of the M-109A6 from Riich Models that I'd bought by mistake. It was a fortuitous mistake as I was able to finally assemble the main gun mantlet with the replacement part from the second kit:
Now, I studied the instructions and realized with a little extra plastic, I could make this gun elevate. So, I added some strip styrene to either side of the inside of the turret front, leaving a gap for the sides of the gun mantlet to slide into:
I then added a small stop to the bottom of the mantlet so it wouldn't slide out:
After a bit of trimming, it fit right in:
Here it is, up and down:
Later I assembled the rest of the turret. In this pic, I had started to glue the front and gradually I glued down the rest to insure the fit was right and complete:
I then added that big honkin' gun and checked it out. Down...:
...then up:
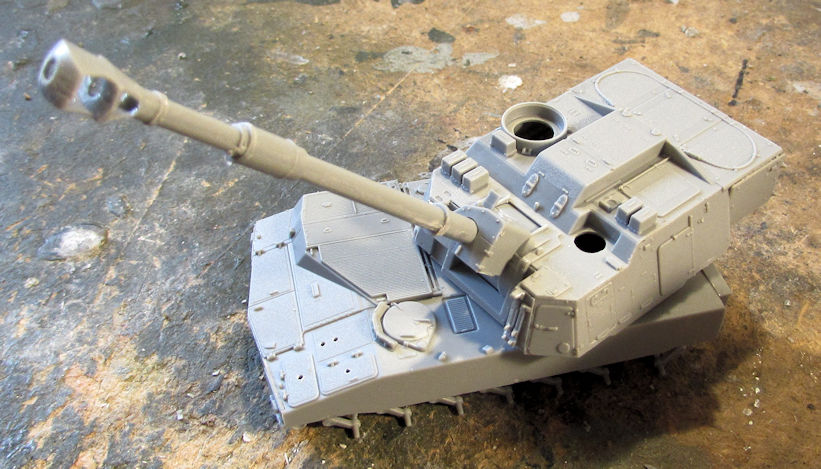
Now to do all the detail parts and possibly the tracks and then I can paint this beastie.
Well that completes this tour of the latest progress at Maddog Manufacturing. Thanks all for looking in, comments are always welcome.
Let's start with the aircraft line....
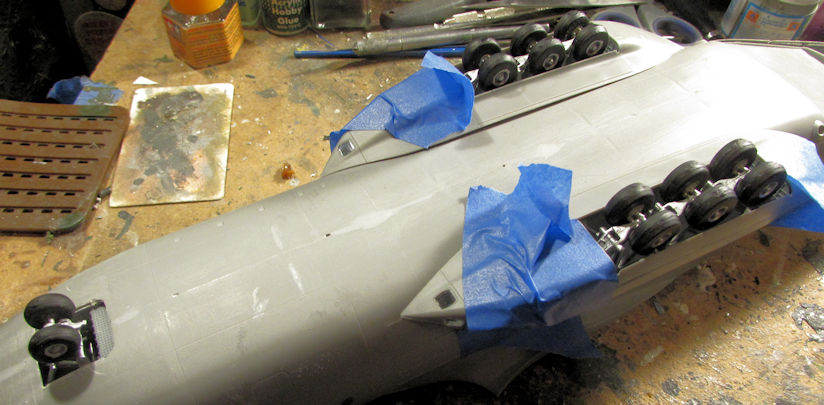
I pulled the A-400 down since I was tired of it sitting for so long. I added the landing gear inside the main landing gear sponsons and forward landing gear bay:
Later I added the wheels to the landing gear and the lower covers to the sponsons. I only glued the outer edges first to make them secure, hence the gaps you see on the inside. I'll come back and close those up later:
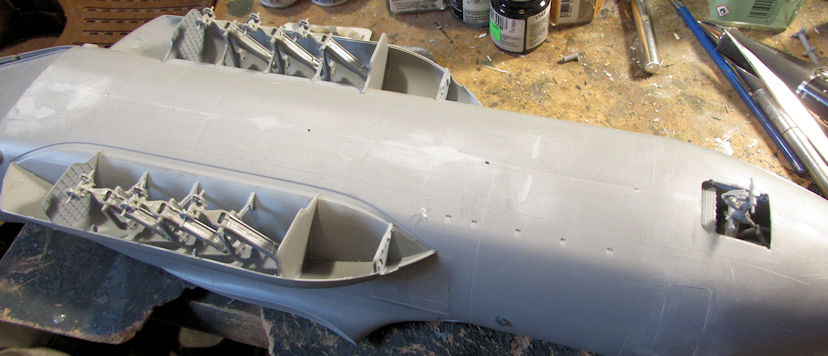
While that was drying, I also got more done on the An-124. The instructions don't tell you to, but I needed to cut out these shoulder sections to fit the indented covers that go there:
Later I got the plastic parts glued into place:
With that finally done, I was finally able to get this horse primed! Here it is after about four coats of primer and one of a gloss coat that ended up semi-gloss again:
There's a few minor issues still to correct, but this is moving forward better than I hoped. I do hope that the momentum continues....
Now lets look at the armor line...
Most of this is models I advanced closer to the painting stage, but there are a few models I started too. I'll start with those first.
This first one is a German staff car I got from a friend. I'd gotten this far before I realized I hadn't shot pics of it yet! This is a car I'd built before so this one is being built with the top down:
You can see where I added strip styrene on each side of the hood cover; the fit was just a bit too loose...
The next one I did was an S-Models M-5 Stuart. I don't have any of these in the collection so it was time to get it built. This kit has two models in it, so one will be US Army the other will be a French tank. This one is currently ready for paint:
Another one I started was the Japanese fuel truck. I just felt like I wanted to do something simple and nostalgic. First was the chassis and interior:
I then built the cab:
Then the tank behind it:
Here it is all together so far. I just have to paint the interior before I glue everything together. Then I can glue it together, add the detail parts and get it painted:
Now for the models I advanced further along.
First are the three Chieftains I had started. This is the Mk.5 sporting his new wheels:
The drive sprocket and idler wheels will be used to form the track in the jig. I'm looking forward to trying that out.
Next I assembled the basic turret and added the wheels to the Mk.10:
Followed by the same assemblies on the Mk.11:
Here's all three side by side:
Next I added the wheels to the FV-432 since I had them on the Chieftains:
Moving on, I realized that the turret on my M-51 was extremely loose. I didn't know whether I was supposed to file down the turret plug to the hole in the hull; or add a plug the same size as the hole. I opted for the easier solution:
Now this sits perfectly on the hull without moving:
I don't know if the turret sits too high or not, but it is staying like it is. Trying to remove all that resin from the sides of the plug is just a bit beyond my capabilities right now.
Next I finished off the cab for the D-9 Dozer, starting with the basic assembly:
After adding some of the interior parts to this, I dry-fit that to the main hull:
The top is just placed there for show; I left it off to better paint some of the interior details. Then I can get the exterior painted.
Earlier I'd found the second kit of the M-109A6 from Riich Models that I'd bought by mistake. It was a fortuitous mistake as I was able to finally assemble the main gun mantlet with the replacement part from the second kit:
Now, I studied the instructions and realized with a little extra plastic, I could make this gun elevate. So, I added some strip styrene to either side of the inside of the turret front, leaving a gap for the sides of the gun mantlet to slide into:
I then added a small stop to the bottom of the mantlet so it wouldn't slide out:
After a bit of trimming, it fit right in:
Here it is, up and down:
Later I assembled the rest of the turret. In this pic, I had started to glue the front and gradually I glued down the rest to insure the fit was right and complete:
I then added that big honkin' gun and checked it out. Down...:
...then up:
Now to do all the detail parts and possibly the tracks and then I can paint this beastie.
Well that completes this tour of the latest progress at Maddog Manufacturing. Thanks all for looking in, comments are always welcome.
The Duke
Virtuoso of Miniatures
"Do you know what the chain of command is? It's the chain I get and beat you with 'till you understand who's in ruttin' command!"
-Jayne Cobb, Firefly Episode 2 "The Train Job"
We are modelers - the same in spirit, in hunger to insanely buy newly released kits, hustlers in hiding our stash from our better halves and experts in using garbage as replacements for after-market parts.
Virtuoso of Miniatures
"Do you know what the chain of command is? It's the chain I get and beat you with 'till you understand who's in ruttin' command!"
-Jayne Cobb, Firefly Episode 2 "The Train Job"
We are modelers - the same in spirit, in hunger to insanely buy newly released kits, hustlers in hiding our stash from our better halves and experts in using garbage as replacements for after-market parts.
-
Modelcrazy

- Addicted Member
- Posts: 1429
- Joined: Sun Mar 19, 2017 12:01 pm
- Location: Sherman texas
Re: Maddog Manufacturing 2020 Production
Those are so awesome Mark.
My Lord, that 400 is massive! you could make an RC out of it.]
My Lord, that 400 is massive! you could make an RC out of it.]
Building a kit from your stash is like cutting the head off a Hydra, two more take it’s place.

https://www.youtube.com/results?search_ ... obby+bench
https://www.youtube.com/results?search_ ... obby+bench
-
Medicman71

- Elite Member
- Posts: 9715
- Joined: Mon Apr 07, 2014 9:32 am
- Location: Houston, Tx
Re: Maddog Manufacturing 2020 Production
Very cool Duke! The A400 and An-124 are really coming along.
Mike
Sponsored by Boeing, Lockheed Martin, Northrop Grumman, Saab, BAE, and Dassault
Sponsored by Boeing, Lockheed Martin, Northrop Grumman, Saab, BAE, and Dassault

Re: Maddog Manufacturing 2020 Production
Duke-ster, you are a well oiled machine. I stand amazed in the presence of greatness! My goodness.
To make each build less crappy than the last one. Or, put another way, "Better than the last one, not as good as the next one!"..

Re: Maddog Manufacturing 2020 Production
That M-109 is bloody awesome!
Great work Mark, You're a building machine!
Great work Mark, You're a building machine!
Stuart Templeton 'I may not be good but I'm slow...'
My blog: https://stuartsscalemodels.blogspot.com/
My blog: https://stuartsscalemodels.blogspot.com/
-
Duke Maddog
- Elite Member
- Posts: 7088
- Joined: Tue Jun 03, 2014 11:22 am
- Location: Rowland Heights, CA
Re: Maddog Manufacturing 2020 Production
LOL! Thanks for the fantastic replies guys!
MC, yeah that A-400 is huge, but not as huge as the An-124. It's gonna be interesting sitting those two side by side when they are done.
Thanks Medic! Yeah, I wish they'd move faster, but I am happy to make any kind of progress on them.
Lyle, I appreciate that more than you can know. I do feel like this 'machine' is a bit too squeaky; it could use a bit more oil!
Thank you Stuart! I like that M-109 too. It's a far better kit than the Revell one; this one is easier to make the gun elevate.
Now to actually finish something.
The Duke
Virtuoso of Miniatures
"Do you know what the chain of command is? It's the chain I get and beat you with 'till you understand who's in ruttin' command!"
-Jayne Cobb, Firefly Episode 2 "The Train Job"
We are modelers - the same in spirit, in hunger to insanely buy newly released kits, hustlers in hiding our stash from our better halves and experts in using garbage as replacements for after-market parts.
Virtuoso of Miniatures
"Do you know what the chain of command is? It's the chain I get and beat you with 'till you understand who's in ruttin' command!"
-Jayne Cobb, Firefly Episode 2 "The Train Job"
We are modelers - the same in spirit, in hunger to insanely buy newly released kits, hustlers in hiding our stash from our better halves and experts in using garbage as replacements for after-market parts.