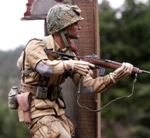
101st AIRBORNE AT CARENTAN, JUNE 1944
-
Medicman71

- Elite Member
- Posts: 9726
- Joined: Mon Apr 07, 2014 9:32 am
- Location: Houston, Tx
Re: 101st AIRBORNE AT CARENTAN, JUNE 1944
Can't wait to see this!
Mike
Sponsored by Boeing, Lockheed Martin, Northrop Grumman, Saab, BAE, and Dassault
Sponsored by Boeing, Lockheed Martin, Northrop Grumman, Saab, BAE, and Dassault
-
BlackSheep214

- Elite Member
- Posts: 10412
- Joined: Sun Apr 06, 2014 8:47 pm
Re: 101st AIRBORNE AT CARENTAN, JUNE 1944
Pics.... 
“Who controls the skies, controls the fate of this Earth”
Author unknown- 352nd Fighter Group, Blue-Nosed Bastards of Bodney
“Send one plane it’s a sortie; send two planes it’s a flight; send four planes it’s a test of airpower. - Richard Kohn
Author unknown- 352nd Fighter Group, Blue-Nosed Bastards of Bodney
“Send one plane it’s a sortie; send two planes it’s a flight; send four planes it’s a test of airpower. - Richard Kohn
Re: 101st AIRBORNE AT CARENTAN, JUNE 1944
Ya read my mind, HA! Slight delay as I relearn the airbrush and liquid masking. It's a bit frustrating, but it ain't gonna get done lookin at it, right?
Give Blood, Play Rugby, cause everyone knows football is for wimps!
Re: 101st AIRBORNE AT CARENTAN, JUNE 1944
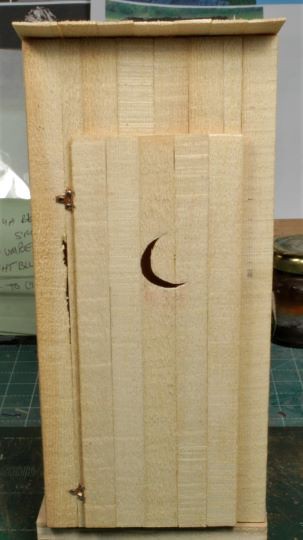
Loo, Kybo, Camode, Privy
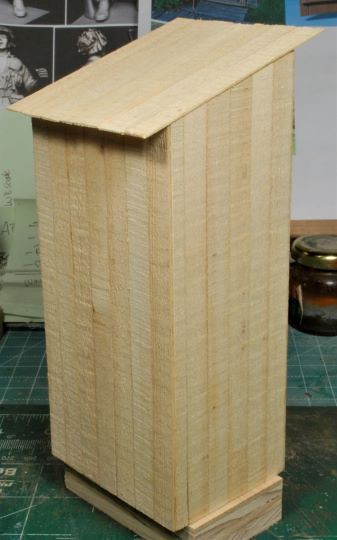
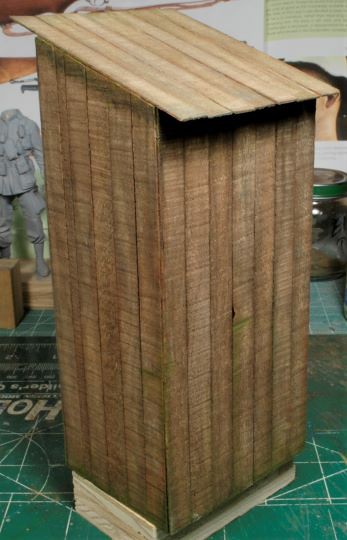
Or is it just an outhouse? There are many names for taking care of business, but I’m calling this an “outhouse”. This little insignificant addition should bring the scenario to life and help tell the story. A very simple build using ½”x1/16” strips of pine milled on the band saw, plus a few other square strips of various dimensions. The hardware was made form sheet copper with copper wire for hinge pins and sewing pins were cut to size for attachment bolts. This took only a few days to knock out and was a nice diversion.

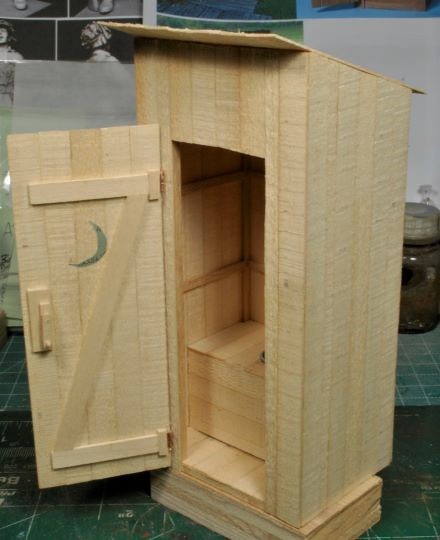
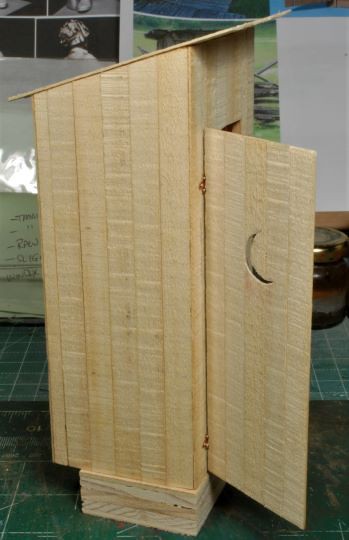
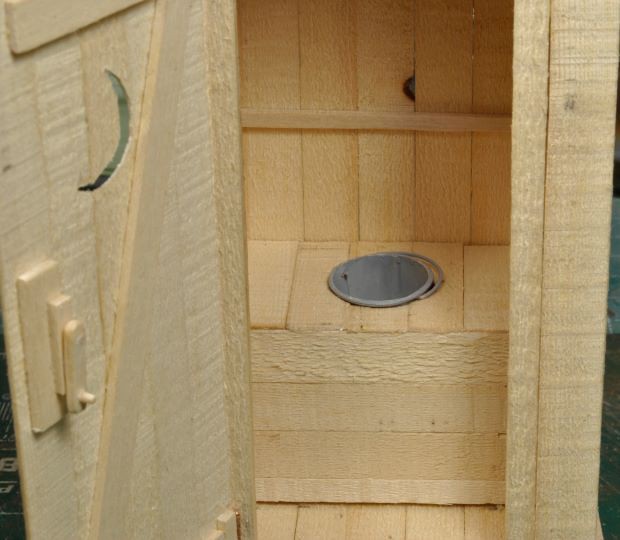
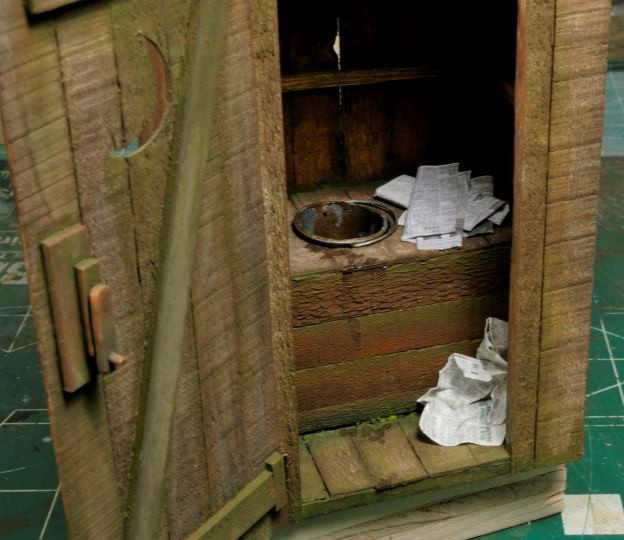
I made the potty bucket from sheet pewter and copper wire. Just a simple design since it won’t be seen up close.
After the structure was complete, I gave the entire build a wash of Burnt Sienna with a touch of Cadmium Orange oils. I coated all over, inside and out, to make sure the base tone was visible throughout. Next began the sun beat worn effect using Burnt Umber and Raw Sienna with Mig’s pigments, white or light tones only. Several Burnt Umber tinted washes were applied to slowly bring out a sun beat dusty appearance.
I had never done wood weathering with pigments in the past and found this method very simple with great results. It will now be a standard for my tool box of techniques.

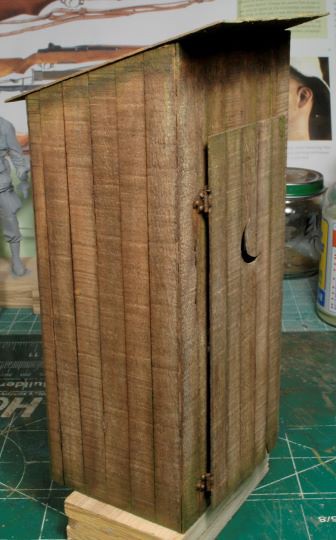
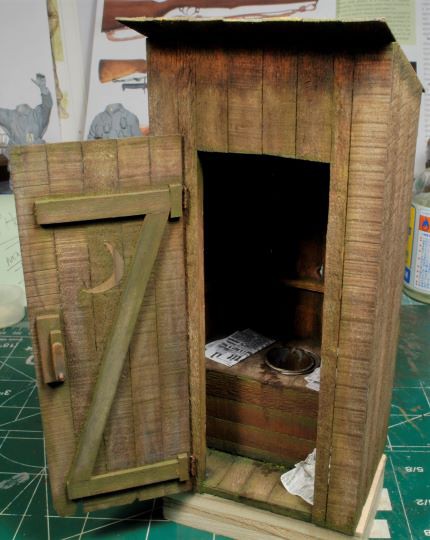
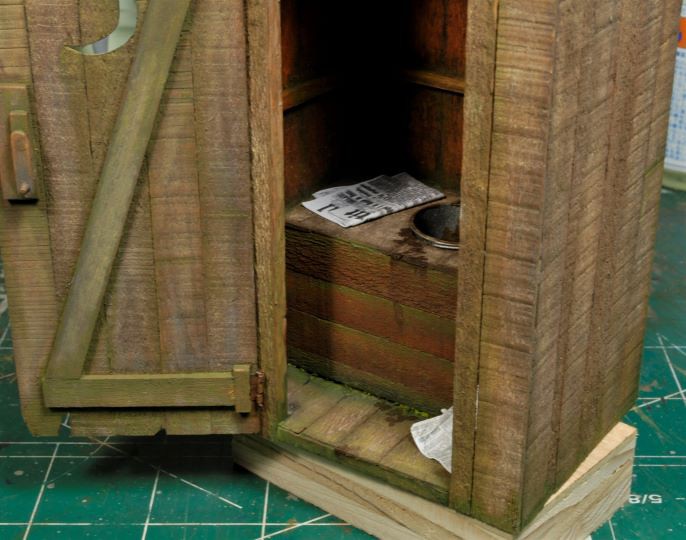
Since this outhouse is intended to appear well used and having been in service for some time, I had to beat it up just a little, but not too much. I also wanted to bring out the weathering often found in wetter climates such as areas in Northern France. I tried to not overdo it, but I think this will work out just fine. Mig’s Slimy Grime Light and Dark came in handy for the subtle mold and mossing effects.
No outhouse would be complete without a few newspapers inside, not only for reading material, but for taking care of business. Reading material was printed from photos of WWII French newspapers found on line.
Once the outhouse is attached to the base, I will add boot prints and a bit more dusting, but for now, it will be set aside awaiting final installation.
Thanks for watchin. Cheers, Ski.
Or is it just an outhouse? There are many names for taking care of business, but I’m calling this an “outhouse”. This little insignificant addition should bring the scenario to life and help tell the story. A very simple build using ½”x1/16” strips of pine milled on the band saw, plus a few other square strips of various dimensions. The hardware was made form sheet copper with copper wire for hinge pins and sewing pins were cut to size for attachment bolts. This took only a few days to knock out and was a nice diversion.
I made the potty bucket from sheet pewter and copper wire. Just a simple design since it won’t be seen up close.
After the structure was complete, I gave the entire build a wash of Burnt Sienna with a touch of Cadmium Orange oils. I coated all over, inside and out, to make sure the base tone was visible throughout. Next began the sun beat worn effect using Burnt Umber and Raw Sienna with Mig’s pigments, white or light tones only. Several Burnt Umber tinted washes were applied to slowly bring out a sun beat dusty appearance.
I had never done wood weathering with pigments in the past and found this method very simple with great results. It will now be a standard for my tool box of techniques.
Since this outhouse is intended to appear well used and having been in service for some time, I had to beat it up just a little, but not too much. I also wanted to bring out the weathering often found in wetter climates such as areas in Northern France. I tried to not overdo it, but I think this will work out just fine. Mig’s Slimy Grime Light and Dark came in handy for the subtle mold and mossing effects.
No outhouse would be complete without a few newspapers inside, not only for reading material, but for taking care of business. Reading material was printed from photos of WWII French newspapers found on line.
Once the outhouse is attached to the base, I will add boot prints and a bit more dusting, but for now, it will be set aside awaiting final installation.
Thanks for watchin. Cheers, Ski.
Give Blood, Play Rugby, cause everyone knows football is for wimps!

Re: 101st AIRBORNE AT CARENTAN, JUNE 1944
lol! That is bloody brilliant - probably the first 1/35 lavvy I've seen.
Stuart Templeton 'I may not be good but I'm slow...'
My blog: https://stuartsscalemodels.blogspot.com/
My blog: https://stuartsscalemodels.blogspot.com/
Re: 101st AIRBORNE AT CARENTAN, JUNE 1944
Thanks, Stuart. It's actually roughly 120mm in scale 
Give Blood, Play Rugby, cause everyone knows football is for wimps!
-
Medicman71
- Elite Member
- Posts: 9726
- Joined: Mon Apr 07, 2014 9:32 am
- Location: Houston, Tx
Re: 101st AIRBORNE AT CARENTAN, JUNE 1944
Damn that's insane!
Mike
Sponsored by Boeing, Lockheed Martin, Northrop Grumman, Saab, BAE, and Dassault
Sponsored by Boeing, Lockheed Martin, Northrop Grumman, Saab, BAE, and Dassault
Re: 101st AIRBORNE AT CARENTAN, JUNE 1944
Oops, I'm behind again, thanks, Medicman!
Give Blood, Play Rugby, cause everyone knows football is for wimps!
Re: 101st AIRBORNE AT CARENTAN, JUNE 1944
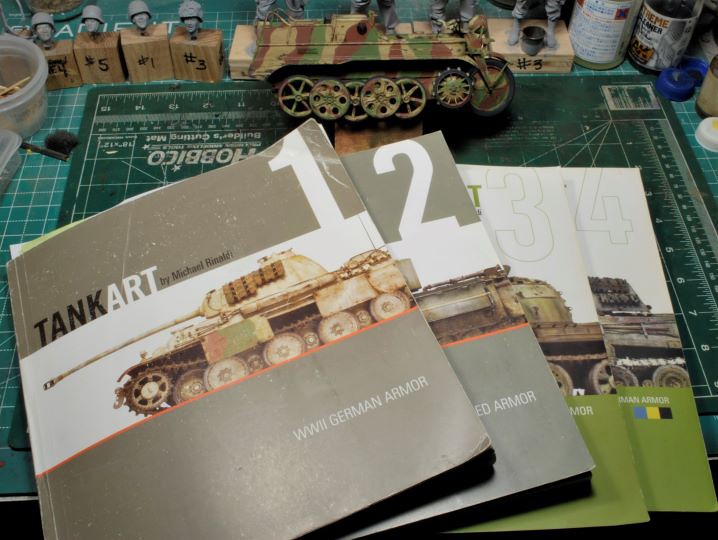
OPR, Oil Paint Rendering
This trac-bike has been on the bench for a few weeks now getting a work over. I won’t go into too much detail on this portion of the dio, but just a minor update on progress. The real issue with this kit is the forks and the tracks, they are weak, IMHO. No worries, the worst is past, now the fun part, painting and weathering.
Using Mike Rinaldi’s “Tank Art” book series I am stepping away from the traditional weathering approach and trying something new, or at least to me it is. Oil Paint Rendering, or OPR for short, which is very thoroughly explained in book #4, German Armor. The SBS sequence is located at the end of chapter in each book for quick reference making for a pretty slick arrangement of the steps to follow.
Being an oiler at figure painting already, this OPR method is right up my alley. This really is a simple process, but it just takes a bit of practice, like everything else in this “Sport”.
I picked up the first four books a few years back, so now I’m ready to give it a go and see if I can incorporate this OPR method to its fullest. Kudos to Mike for such a well written and illustrated set of what I would consider essential volumes for armor geeks. Mike’s books can be found here: https://www.rinaldistudiopress.com/
Off we go,……….. This current camo pattern is not exactly accurate, but close enough for my purposes. My airbrush talents are lacking, so a true hand sprayed on pattern would have been a dismal disaster. I’ll run with this one and carry on. I did use elastic masking putty from AK Interactive. This stuff is great, my first time using it, but it’s rather tricky in tight spaces or on delicate details, so be aware of that if you’ve never used it. I also used the hairspray method for the chipping sequence. I still have a long way to go to feel comfortable with this method, but the possibilities are incredible. The biggest issue being “less is more” when it comes to chipping. It’s too easy to get carried away with the process and trash all that prior work only to end up with a redo.

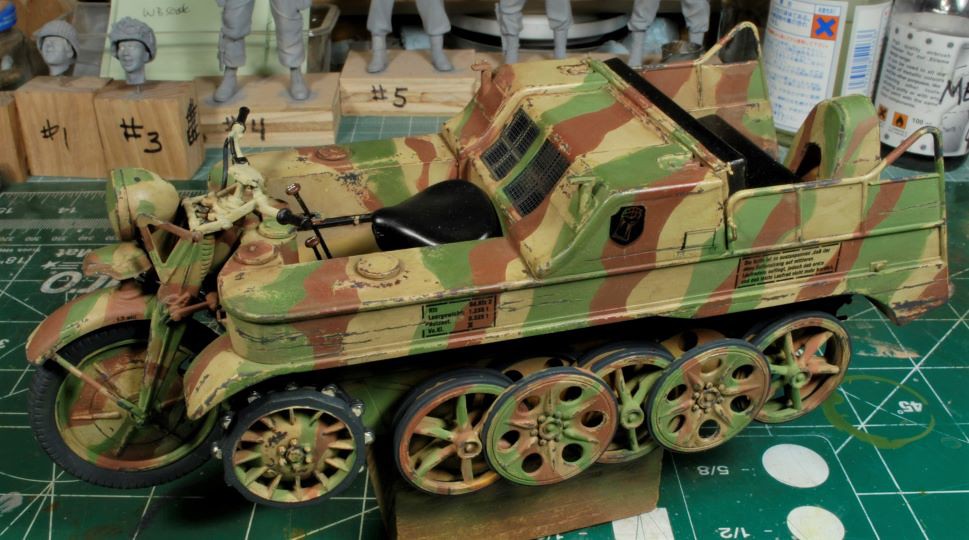
So, as you can see there has been appreciable progress, but’s it’s slow going, especially learning a new technique and not wanting to jack it up, lol. I will use some pigments for mud work, but not much. I want to blend and fade using the oils and get the rust and dirt streaks down correctly. I’ll post the end results when it’s finished, but remember, I’m working to get to the AB figures, this is just a necessary next step to reach that goal.
Thanks for watchin. Cheers, Ski.
This trac-bike has been on the bench for a few weeks now getting a work over. I won’t go into too much detail on this portion of the dio, but just a minor update on progress. The real issue with this kit is the forks and the tracks, they are weak, IMHO. No worries, the worst is past, now the fun part, painting and weathering.
Using Mike Rinaldi’s “Tank Art” book series I am stepping away from the traditional weathering approach and trying something new, or at least to me it is. Oil Paint Rendering, or OPR for short, which is very thoroughly explained in book #4, German Armor. The SBS sequence is located at the end of chapter in each book for quick reference making for a pretty slick arrangement of the steps to follow.
Being an oiler at figure painting already, this OPR method is right up my alley. This really is a simple process, but it just takes a bit of practice, like everything else in this “Sport”.
I picked up the first four books a few years back, so now I’m ready to give it a go and see if I can incorporate this OPR method to its fullest. Kudos to Mike for such a well written and illustrated set of what I would consider essential volumes for armor geeks. Mike’s books can be found here: https://www.rinaldistudiopress.com/
Off we go,……….. This current camo pattern is not exactly accurate, but close enough for my purposes. My airbrush talents are lacking, so a true hand sprayed on pattern would have been a dismal disaster. I’ll run with this one and carry on. I did use elastic masking putty from AK Interactive. This stuff is great, my first time using it, but it’s rather tricky in tight spaces or on delicate details, so be aware of that if you’ve never used it. I also used the hairspray method for the chipping sequence. I still have a long way to go to feel comfortable with this method, but the possibilities are incredible. The biggest issue being “less is more” when it comes to chipping. It’s too easy to get carried away with the process and trash all that prior work only to end up with a redo.
So, as you can see there has been appreciable progress, but’s it’s slow going, especially learning a new technique and not wanting to jack it up, lol. I will use some pigments for mud work, but not much. I want to blend and fade using the oils and get the rust and dirt streaks down correctly. I’ll post the end results when it’s finished, but remember, I’m working to get to the AB figures, this is just a necessary next step to reach that goal.
Thanks for watchin. Cheers, Ski.
Give Blood, Play Rugby, cause everyone knows football is for wimps!

Re: 101st AIRBORNE AT CARENTAN, JUNE 1944
This will be interesting.
To make each build less crappy than the last one. Or, put another way, "Better than the last one, not as good as the next one!"..