Needed my monthly fix on a good old Monogram kit!
SPAM Review - 1/48 Monogram C-47
-
Thomas_M

- Admin
- Posts: 4411
- Joined: Fri Dec 13, 2013 9:43 am
- Location: Bad Wurzach - Germany
- Contact:
Re: SPAM Review - 1/48 Monogram C-47
Happy to see your progress on this, Adam! 
Needed my monthly fix on a good old Monogram kit!
Needed my monthly fix on a good old Monogram kit!

Re: SPAM Review - 1/48 Monogram C-47
Adam, glad things have settled down! Life has an interesting way in keeping it interesting. She is looking good. Nice interior work, although not a lot will be seen, I suppose.
To make each build less crappy than the last one. Or, put another way, "Better than the last one, not as good as the next one!"..

Re: SPAM Review - 1/48 Monogram C-47
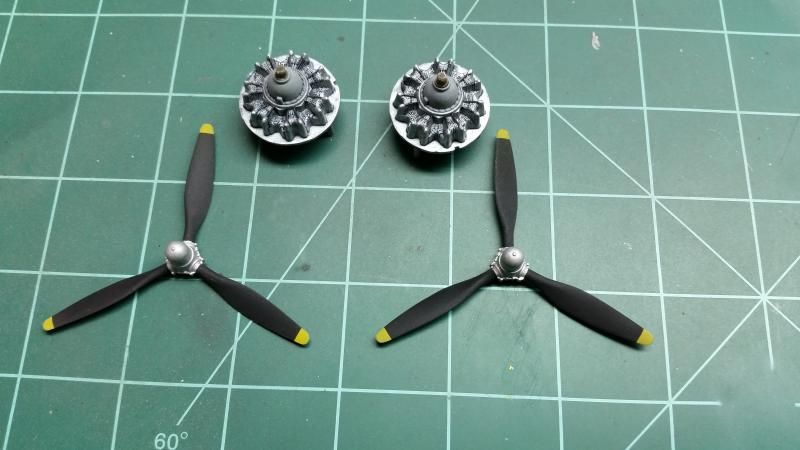
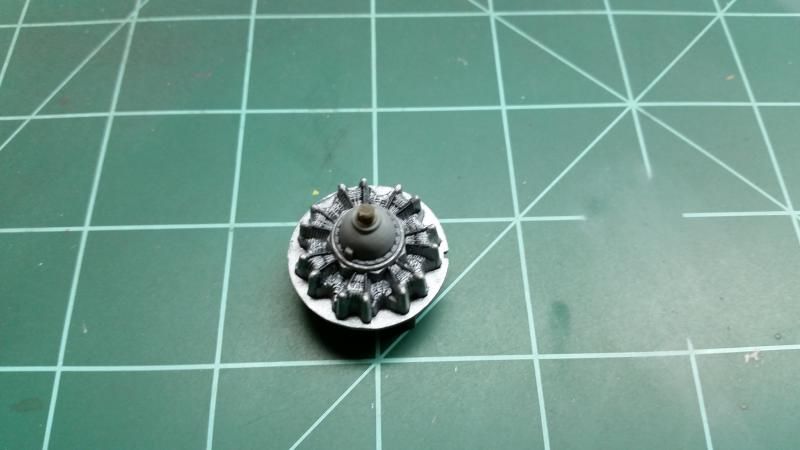
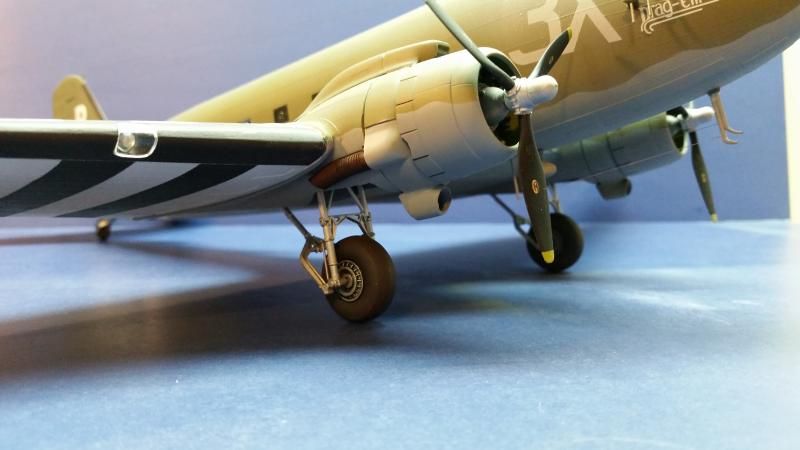
I went ahead and did the engines and props. The engines don't look so bad under some paint and a wash as they did when they were just in the olive plastic.
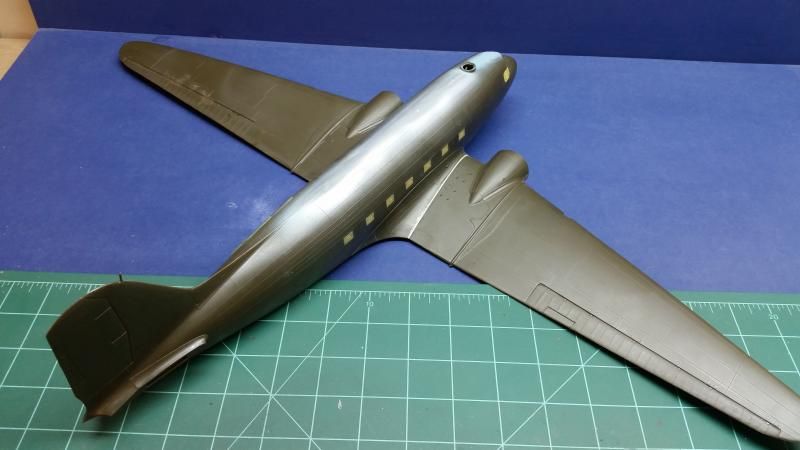
The majority of my time so far has been dealing with the fit of all the major pieces... or I should say the lack thereof. I had some major gaps to deal with. Notice the 1mm shims all along the wing root on both sides. In retrospect a couple pieces of sprue installed as fuselage spreaders would probably have taken care of this problem. The underside was another story all together. There were some nasty gaps where the underside of the wing met the fuselage both front and rear. Maybe it's just me but I don't see any other way I could have gone about fixing this other than filling and sanding the ever loving joy right out of it. This took numerous sessions of filling and sanding. As careful as I tried to be, most of the raised detail in these areas was obliterated. Here are the photos of how it looked before I finally primed it.
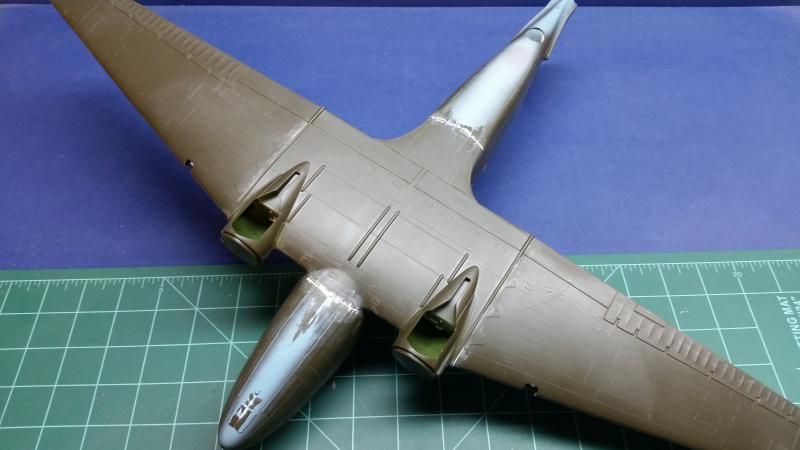
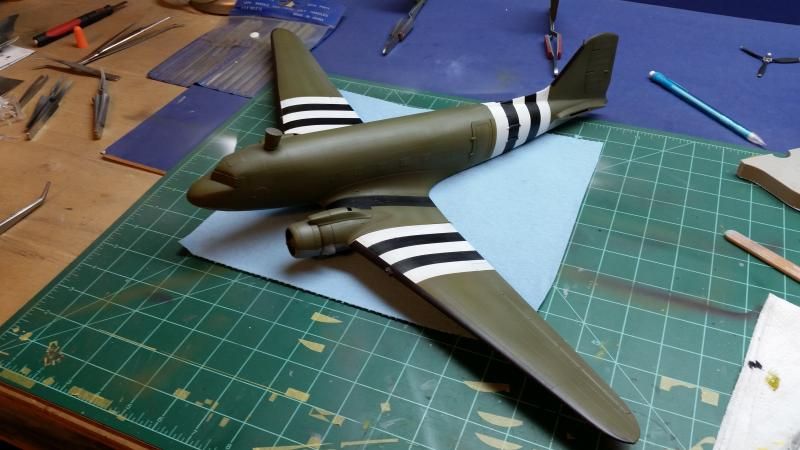
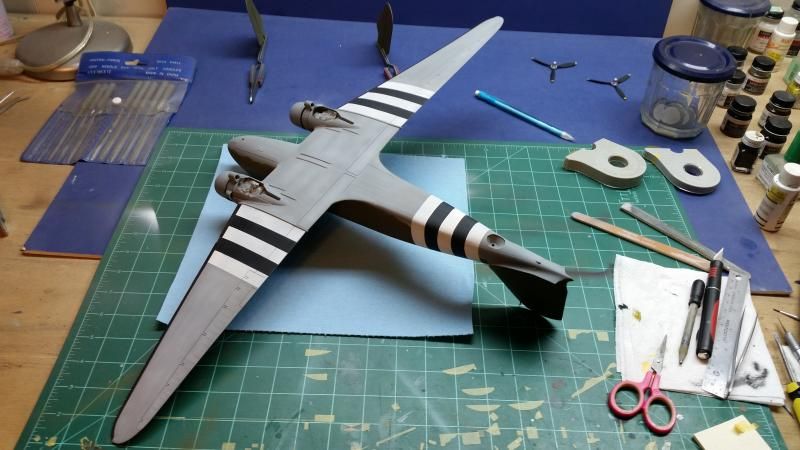
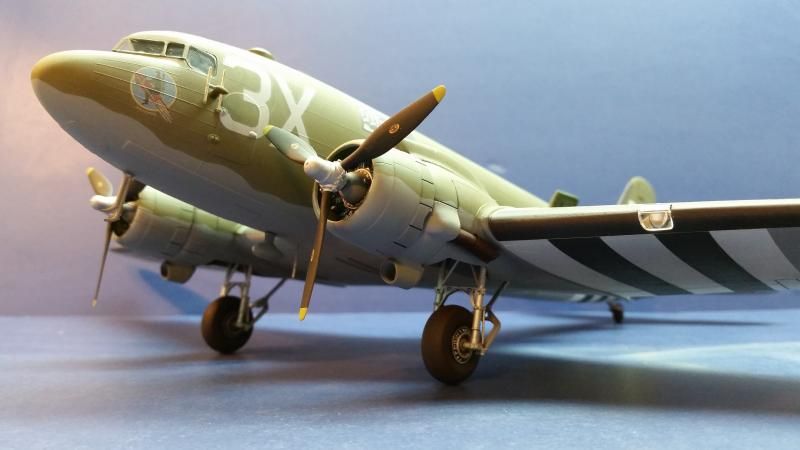
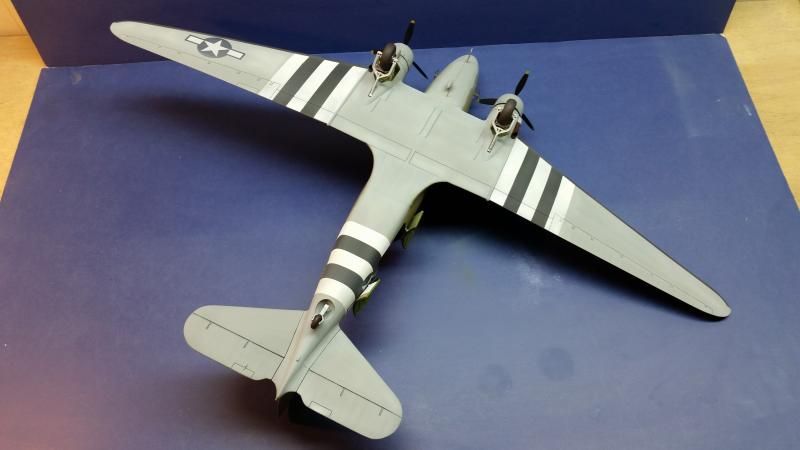
Next it was on to the paint booth. I primed the entire model with Model Master Gray Primer. I really like that stuff. I should mention that even with the big cup on my Krome I had to refill it about 8 times to cover the entire model. It's just so dang big. After that it was it was time for some color. Masking the deicing boots and the invasions stripes and the demarcation line and just the over all size of the model I probably used about 10 pounds of Tamiya tape. All paints used were Model Master enamels.
Up next we'll go over decaling, final assembly, and my conclusions.
The majority of my time so far has been dealing with the fit of all the major pieces... or I should say the lack thereof. I had some major gaps to deal with. Notice the 1mm shims all along the wing root on both sides. In retrospect a couple pieces of sprue installed as fuselage spreaders would probably have taken care of this problem. The underside was another story all together. There were some nasty gaps where the underside of the wing met the fuselage both front and rear. Maybe it's just me but I don't see any other way I could have gone about fixing this other than filling and sanding the ever loving joy right out of it. This took numerous sessions of filling and sanding. As careful as I tried to be, most of the raised detail in these areas was obliterated. Here are the photos of how it looked before I finally primed it.
Next it was on to the paint booth. I primed the entire model with Model Master Gray Primer. I really like that stuff. I should mention that even with the big cup on my Krome I had to refill it about 8 times to cover the entire model. It's just so dang big. After that it was it was time for some color. Masking the deicing boots and the invasions stripes and the demarcation line and just the over all size of the model I probably used about 10 pounds of Tamiya tape. All paints used were Model Master enamels.
Up next we'll go over decaling, final assembly, and my conclusions.
Last edited by Adam on Fri Dec 19, 2014 2:57 pm, edited 1 time in total.
It's up to you how much money you want to spend and how many new words you want to create "correcting" something.
Re: SPAM Review - 1/48 Monogram C-47
She is looking might nice, Adam. I have yet to think of adding a couple of spreaders on any build. That would likely have done the trick. I, too, obliterated much of he belly detail. Just starting on the de-icing boots.
Keep the pictures coming.
Keep the pictures coming.
To make each build less crappy than the last one. Or, put another way, "Better than the last one, not as good as the next one!"..
Re: SPAM Review - 1/48 Monogram C-47
You want it you got it Lyle.
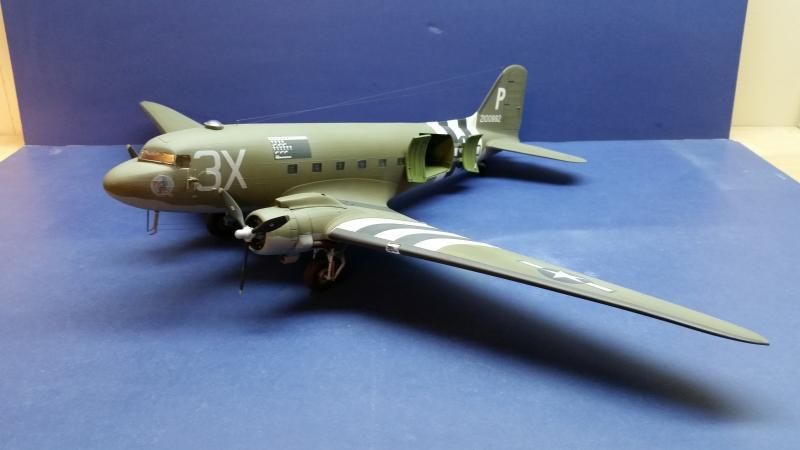
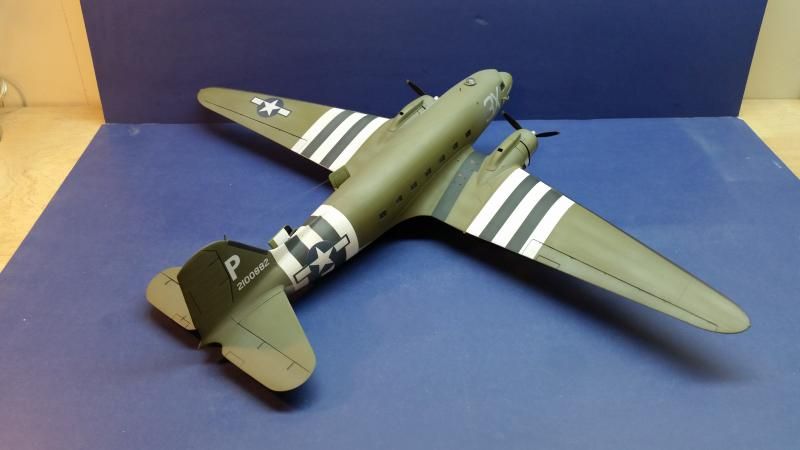
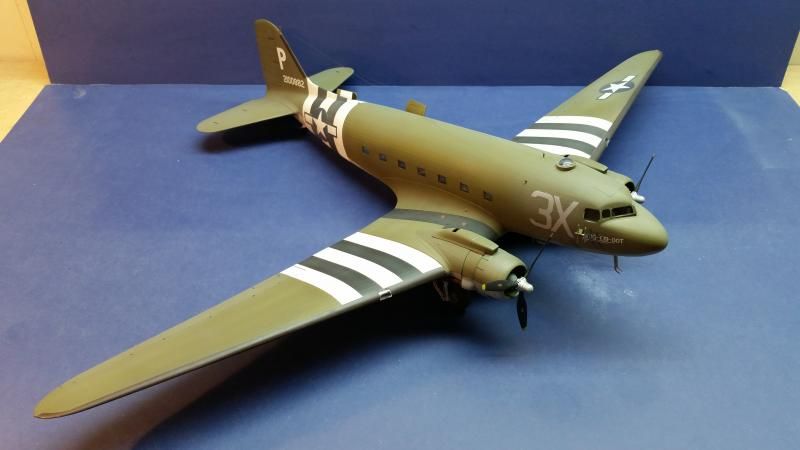
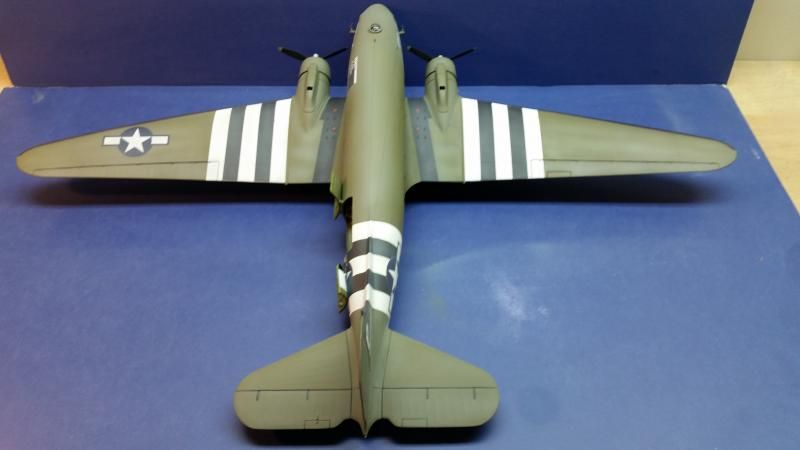
Next up were the decals. Although there is a pretty full suite of service stencils provided on the sheet there are no placement instructions. A glaring omission and my model just didn't get them then. I was worried because the decals seemed pretty thick but they went on just fine with my new favorite solution: Mr Mark Softener. The white on the national insignia is very opaque and where they go over the invasion stripes on both sides of the airplane, the white backer supplied in the decal sheet must be used if you don't want the invasion stripes showing through your stars. The only other issue I ran into with the decals was on the two large 3X's. These come with a ridiculous amount of carrier film on them and this needs to be trimmed away to avoid large portions of the clear film silvering or bubbling or both. I didn't do it on one side and was sorry. I should mention here that I did not use the VERY large decals for the invasion stripes or the black wing walk areas. I honestly think these would probably be unusable and would be an absolute mess. Going over all those compound curves and raised detail would be a nightmare.
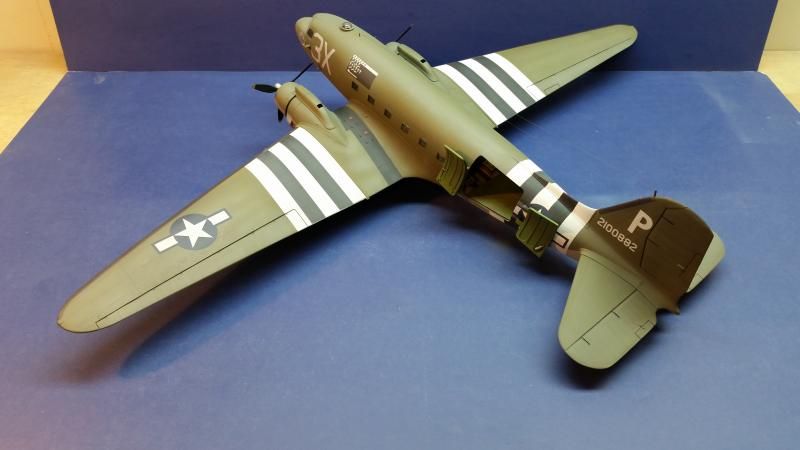
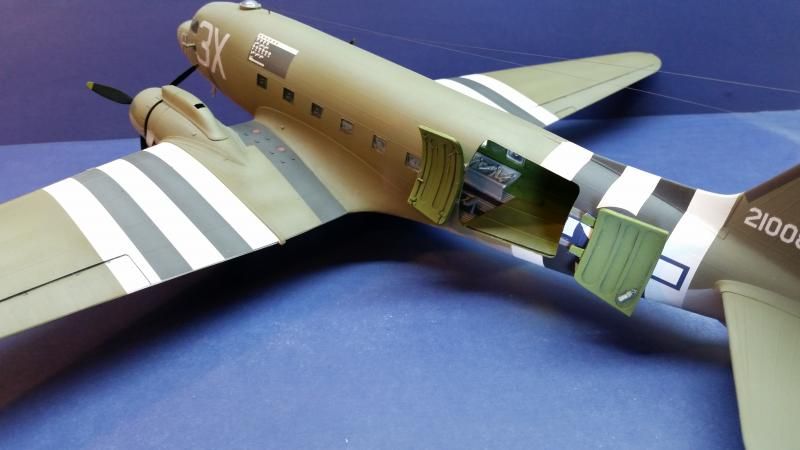
After the decals all the recessed areas of the model were given a wash and a flat coat was then applied to seal everything in. Final assembly then consisted of installing the landing gear, posing the cargo doors open, and installing all the sticky outy bits and bobs and rigging up the aerials.
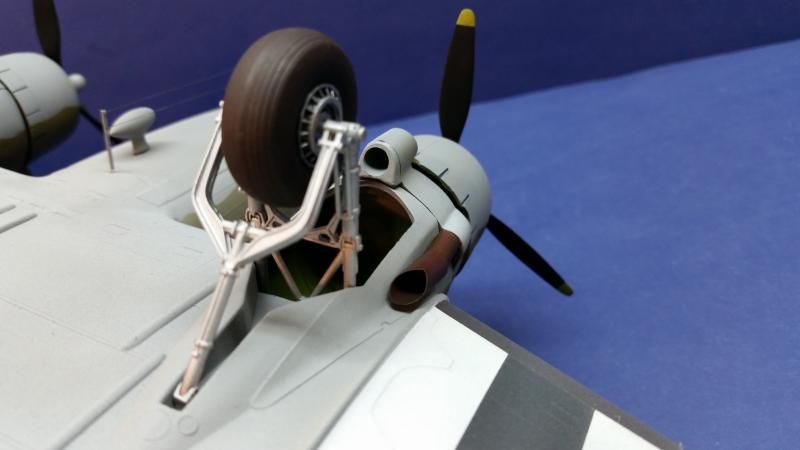
The landing gear went in with little fuss and once everything is glued up it is a pretty strong assembly. Posing the doors open requires you to cut the hinges in half with a saw and then glue them back in the open position. Not hard to do at all and the instructions are very clear on this. After that it was time to install all the little antennas and pitot tubes and stuff like that. This is where the instructions really started to let me down. There are no clear installation instructions for any of this stuff. All of the holes in the center fuselage seam had been filled up with the required 46 sessions of filling and sanding. Ok so that's my fault. The rest of the stuff doesn't have any holes to stick any of the stuff in and the instructions are very vague as there where exactly they go. There isn't even a mention of any of the very prominent aerial wires anywhere. So it was at this time I consulted the Osprey book on the matter and that's when I noticed some other faults with the instructions. Firstly the markings pages do not show the rubber deicing boots that the horizontal stabilizers had on them. Secondly the particular aircraft I am modeling had the small early air intakes on it yet it is shown in the instructions with the late intakes installed. I made a brief mention of this earlier in my review too. Thirdly there is a plethora of different combinations of all the various antennas the C-47 carried and apparently the instructions just give you a very generic and not at all accurate version. After using the Osprey book as a guide on where to stick everything, I was just about done. I unmasked the clear parts. I'm still not too happy with the fit of the windscreen but I will live with it. The astrodome popped right in and is not even glued. And that was it! It was done and I breathed a deep sigh of relief.
Conclusion:
The instructions could be a LOT better. That being said I think this is a fine kit. You simply can't compare something like this to a modern kit. It certainly didn't fall right together and I wouldn't recommend it to a novice. I got frustrated filling and sanding and walked away a few times. Hey to me that's modeling though. I enjoyed myself and had fun and have something nice to look at as a result and that's what really matters. The whole of this kit I think is greater than the sum of it's copyright year 1967 parts. Honestly though it so big I really have no idea where I am going to put it now!
Thanks everyone for following along and Thanks to Lyle, SPAM, and Revell for the kit!
Next up were the decals. Although there is a pretty full suite of service stencils provided on the sheet there are no placement instructions. A glaring omission and my model just didn't get them then. I was worried because the decals seemed pretty thick but they went on just fine with my new favorite solution: Mr Mark Softener. The white on the national insignia is very opaque and where they go over the invasion stripes on both sides of the airplane, the white backer supplied in the decal sheet must be used if you don't want the invasion stripes showing through your stars. The only other issue I ran into with the decals was on the two large 3X's. These come with a ridiculous amount of carrier film on them and this needs to be trimmed away to avoid large portions of the clear film silvering or bubbling or both. I didn't do it on one side and was sorry. I should mention here that I did not use the VERY large decals for the invasion stripes or the black wing walk areas. I honestly think these would probably be unusable and would be an absolute mess. Going over all those compound curves and raised detail would be a nightmare.
After the decals all the recessed areas of the model were given a wash and a flat coat was then applied to seal everything in. Final assembly then consisted of installing the landing gear, posing the cargo doors open, and installing all the sticky outy bits and bobs and rigging up the aerials.
The landing gear went in with little fuss and once everything is glued up it is a pretty strong assembly. Posing the doors open requires you to cut the hinges in half with a saw and then glue them back in the open position. Not hard to do at all and the instructions are very clear on this. After that it was time to install all the little antennas and pitot tubes and stuff like that. This is where the instructions really started to let me down. There are no clear installation instructions for any of this stuff. All of the holes in the center fuselage seam had been filled up with the required 46 sessions of filling and sanding. Ok so that's my fault. The rest of the stuff doesn't have any holes to stick any of the stuff in and the instructions are very vague as there where exactly they go. There isn't even a mention of any of the very prominent aerial wires anywhere. So it was at this time I consulted the Osprey book on the matter and that's when I noticed some other faults with the instructions. Firstly the markings pages do not show the rubber deicing boots that the horizontal stabilizers had on them. Secondly the particular aircraft I am modeling had the small early air intakes on it yet it is shown in the instructions with the late intakes installed. I made a brief mention of this earlier in my review too. Thirdly there is a plethora of different combinations of all the various antennas the C-47 carried and apparently the instructions just give you a very generic and not at all accurate version. After using the Osprey book as a guide on where to stick everything, I was just about done. I unmasked the clear parts. I'm still not too happy with the fit of the windscreen but I will live with it. The astrodome popped right in and is not even glued. And that was it! It was done and I breathed a deep sigh of relief.
Conclusion:
The instructions could be a LOT better. That being said I think this is a fine kit. You simply can't compare something like this to a modern kit. It certainly didn't fall right together and I wouldn't recommend it to a novice. I got frustrated filling and sanding and walked away a few times. Hey to me that's modeling though. I enjoyed myself and had fun and have something nice to look at as a result and that's what really matters. The whole of this kit I think is greater than the sum of it's copyright year 1967 parts. Honestly though it so big I really have no idea where I am going to put it now!
Thanks everyone for following along and Thanks to Lyle, SPAM, and Revell for the kit!
It's up to you how much money you want to spend and how many new words you want to create "correcting" something.

Re: SPAM Review - 1/48 Monogram C-47
Looks good muh man!!! 
I sidelined mine a couple few years ago (had fuse together as well as the wings)...it's at the bottom of the stash...I aint diggin it out any time soon! I think I gave the props away a couple years ago....oops!
I sidelined mine a couple few years ago (had fuse together as well as the wings)...it's at the bottom of the stash...I aint diggin it out any time soon! I think I gave the props away a couple years ago....oops!

Re: SPAM Review - 1/48 Monogram C-47
Nicely done. Great write-up and a very sweet build. Keeping the classics alive is too cool...

Re: SPAM Review - 1/48 Monogram C-47
Reminds me on the second episode of Band of Brothers. 101st to jump out into the sky of France...

militaryhistoryonline.com
When the sun of culture hangs low even dwarfs throw shadows.
-
Stikpusher

- Moderator
- Posts: 19020
- Joined: Sat Apr 05, 2014 8:37 pm
- Location: Ceti Alpha 5
Re: SPAM Review - 1/48 Monogram C-47
Nicely done sir! I built that kit as a new release way back when, and loved it... Just curious where you came up with the bare metal info for the troop seat area...

"Surely I have made my meaning plain? I intend to avenge myself upon you, Admiral. I have deprived your ship of power, and when I swing 'round, I intend to deprive you of your life."
FLSM
FLSM