Page 4 of 21
Re: SPAM Military Vehicle Group Build
Posted: Sun May 20, 2018 10:35 am
by Stuart
speedgraflex wrote:NIGHT WORK
 Soaking these four parts in a solution of baking soda diluted with water seems to improve the smell by removing whatever stinky release agent is on the plastic.
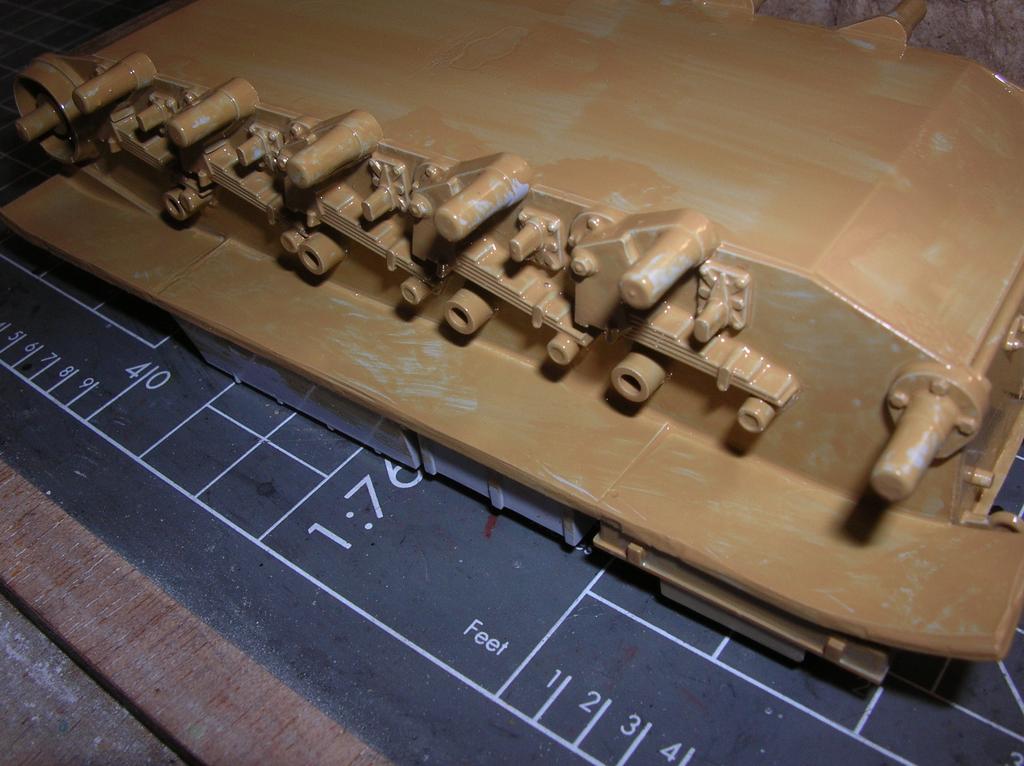
Really glad to hear that you got the lovely smell of flowers off the kit Bruce. That's a nice looking moulding to be sure - the turret is HUGE compared to the hull. So does this one have a full interior?
Well work at the templeton tank factory is moving along - I've got all the bit added to the turret and hull that I want to before paint, and commenced painting! (Humbrol 93 Desert Yellow Enamel).

And as you can see I've boxed on the large open areas on the undersides.
Cheers!
Re: SPAM Military Vehicle Group Build
Posted: Sun May 20, 2018 8:07 pm
by speedgraflex
Stuart!! Congratulations on the first layers of color. What is your technique? Are you filtering the color coat a bit... or is there some other magic happening? Re AFV Club M41: thank you I think? I am not a smell of flowers kind of guy (no, really not even a lil’ bit)... I basically like the smell of woodsmoke, coffee, fresh cut tobacco, apple pie and... popcorn. Those aromas are just so good.
Re: SPAM Military Vehicle Group Build
Posted: Sun May 20, 2018 8:49 pm
by Stikpusher
Bruce and Stuart, those are both looking good! Sort of an Alpha and Omega in 1/35 armor kits...
Re: SPAM Military Vehicle Group Build
Posted: Sun May 20, 2018 11:23 pm
by speedgraflex
 Carlos! Thank you for checking in. I am gonna roll through the instructions and ask a few questions if I may... first one being there is a black painting call out on step two... should I also prime and paint a body color at this point on the drive wheels?
Re: SPAM Military Vehicle Group Build
Posted: Sun May 20, 2018 11:30 pm
by speedgraflex
 Do I really paint the tracks in steel / tire black link by link......
Re: SPAM Military Vehicle Group Build
Posted: Mon May 21, 2018 3:06 am
by Thomas_M
Bruce,
there seem to be some rubber parts #R1 to go between the wheel halves. This possibly would allow you the get the assembled wheels on and off during painting. If it was me, I would pin those wheels on cocktail sticks, or whatever fits, then airbrush them off the hull. This way, it´s easier to get paint onto the lower hull sides.
On the tracks: no, you won´t have to paint each track piece first! I guess doing so would drive everybody totally nuts! Especially, as the contact points between the links should be free of paint for the cement! The drawing simply shows, which parts get what colour on the top and lower sides of the track.
Re: SPAM Military Vehicle Group Build
Posted: Mon May 21, 2018 1:31 pm
by speedgraflex
Thank you so much for your thoughts and explanations of both painting instructions, Thomas! I have been studying your AFV Club Churchill most intently for techniques as well as any issues; one of many reasons I am grateful to both you and SPA Modeler is the wonderful access—to be able to ask a question and have members experienced in kits from many subjects, eras as well as kits from many manufacturers and eras is simply incredible.
Cheers!
Re: SPAM Military Vehicle Group Build
Posted: Mon May 21, 2018 1:40 pm
by Stikpusher
Ok, some brief advice on the running gear:
Assemble the suspension, but do not added the road wheels, as Thomas suggests. Paint all that in OD except for the road wheel rims, which are rubber tires. Paint those separately in a faded black, then add them. The idler wheels have a steel rim, so paint that edge in a polished steel color, and the portions of the sprocket wheels that contact the tracks.
As for the tracks themselves:
Paint the inner surface in a light steel color, and the outer surface in a dirty steel color. After that dries, the rubber track pads should be painted in a faded black rubber, while the inner surface where the sprockets make contact and the guide teeth sides should also be painted the bright polished steel color
Re: SPAM Military Vehicle Group Build
Posted: Mon May 21, 2018 2:51 pm
by Stuart
Stikpusher wrote:Ok, some brief advice on the running gear:
Assemble the suspension, but do not added the road wheels, as Thomas suggests. Paint all that in OD except for the road wheel rims, which are rubber tires. Paint those separately in a faded black, then add them. The idler wheels have a steel rim, so paint that edge in a polished steel color, and the portions of the sprocket wheels that contact the tracks.
As for the tracks themselves:
Paint the inner surface in a light steel color, and the outer surface in a dirty steel color. After that dries, the rubber track pads should be painted in a faded black rubber, while the inner surface where the sprockets make contact and the guide teeth sides should also be painted the bright polished steel color
Great tips - thanks Carlos!
Stikpusher wrote:Bruce and Stuart, those are both looking good! Sort of an Alpha and Omega in 1/35 armor kits...
lol! Just about - They are pretty opposite ends of the spectrum!
speedgraflex wrote:Stuart!! Congratulations on the first layers of color. What is your technique? Are you filtering the color coat a bit... or is there some other magic happening? Re AFV Club M41: thank you I think? I am not a smell of flowers kind of guy (no, really not even a lil’ bit)... I basically like the smell of woodsmoke, coffee, fresh cut tobacco, apple pie and... popcorn. Those aromas are just so good.
Coffee and woodsmoke mmmmmmm...
No plan as such Bruce, Just trying to get a good even coat without too many obvious brush strokes. It's being a bit awkward as the paint is supposed to be Matt and it's coming out satin - I must have a duff tin.
Re: SPAM Military Vehicle Group Build
Posted: Mon May 21, 2018 3:56 pm
by speedgraflex
Thanks, Carlos! I think you and Thomas both suggest the same way to paint the wheels (away from the body as separate steps) but he suggested the kit might have a removable wheel option, or perhaps I am “lost in English translation,” which is totally possible.
The reason I asked about Step 2 is usually with airplanes and spaceships a color call out for the overall fuse or hull is up front but I guess because the subjects have different greens (US OD, UVRN Dark Green) there is no pointer given up front. I would rather be pointed toward the kit options at the beginning - hull or chassis in three colors - instead of at the end. Mainly because of my ignorance of tanks. I have seen “red wheels” on tanks which I assume are primered field repairs?
The reason I asked about Step 19 is definitely tracks! Thank you for your advice!!! I will follow this.