42nd Highland Infantry Regiment "Black Watch" at the Battle

Re: 42nd Highland Infantry Regiment "Black Watch" at the Bat
Just beautiful!
March as one, Don't look back
Odin's sons... Attack!
Unleash hell! Do not repent! Warfare grants us no lament
Let your weapons slash and tear This is no place for fear
Hold the lines! Move as one! In unity our victory's won
Our shields will form a mighty wall
United we shall never fall
Odin's sons... Attack!
Unleash hell! Do not repent! Warfare grants us no lament
Let your weapons slash and tear This is no place for fear
Hold the lines! Move as one! In unity our victory's won
Our shields will form a mighty wall
United we shall never fall
-
Medicman71

- Elite Member
- Posts: 9781
- Joined: Mon Apr 07, 2014 9:32 am
- Location: Houston, Tx
Re: 42nd Highland Infantry Regiment "Black Watch" at the Bat
Wow! Just wow! 
Mike
Sponsored by Boeing, Lockheed Martin, Northrop Grumman, Saab, BAE, and Dassault
Sponsored by Boeing, Lockheed Martin, Northrop Grumman, Saab, BAE, and Dassault
Re: 42nd Highland Infantry Regiment "Black Watch" at the Bat
Thanks, Stik, Mike, and Floki! Off to finish some more 
Give Blood, Play Rugby, cause everyone knows football is for wimps!
Re: 42nd Highland Infantry Regiment "Black Watch" at the Battle
Drummer Boy
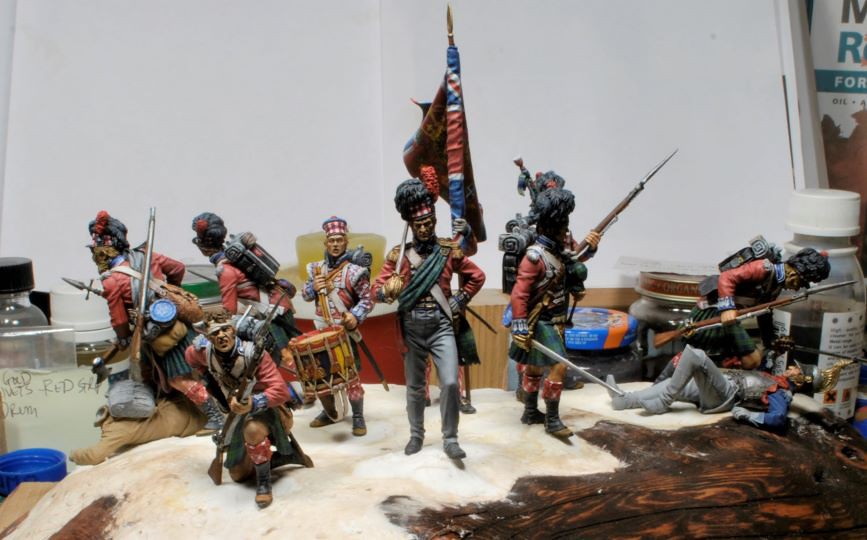
This lil feller can rattle away all he wants now, he’s done. The task of accurately depicting his sleeve details wasn’t as bad as I had expected, simply because they are not accurate, HA! I never got a reply from the Black Watch Museum in Scotland and some photos found online just weren’t clear enough for me to be sure exactly what these emblems are. I’ve had plenty of advisors tell me what they were, but I gotta see it for myself.
I did make several tempts to add fleur di lis’ to no avail, total failure. My brush work just wasn’t cutting it. The more I tried the worse they got, so I called “time out”. As I stated earlier, I hate being inaccurate if I can help it, especially on something so visible, but my brush talents had reached their limit. Ya just gotta know when to move on, so that is what I’ve done.
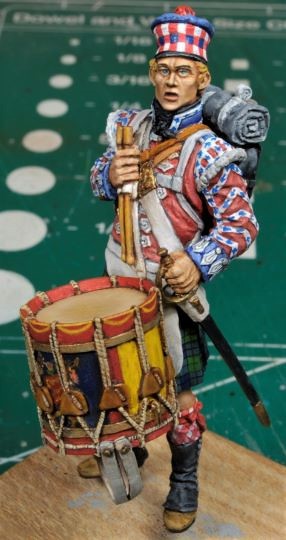
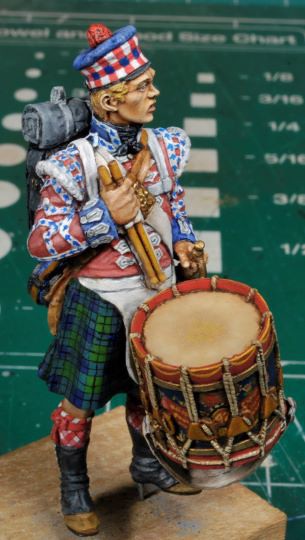
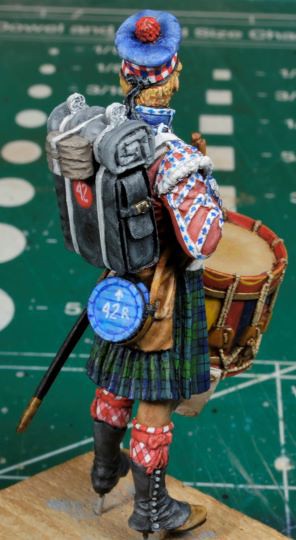
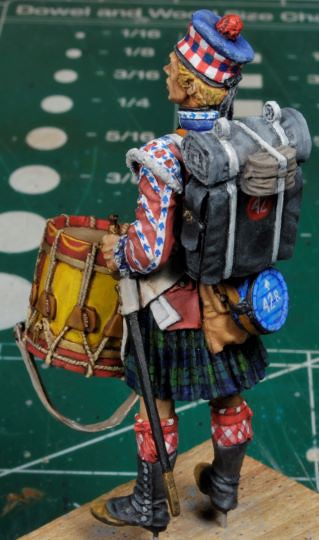
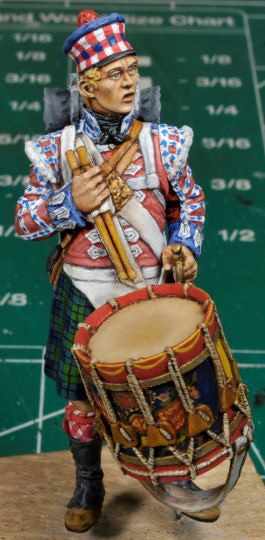
All of the techniques and processes for this lil guy are the same as all of the other Highlander figures, except one. I utilized a technique I’ve been studying lately, “stippling”, one used quite successfully by “Mike the Kiwi” in his new book “Modelling and Painting World War I Allied Figures”. It’s a new release and I just received my copy a few weeks back. I stippled the bonnet/cap on the Drummer Boy with oils. Yes, that’s right, oils. It can be done successfully with a bit of trial and error. I know this is such a minor attempt, but it gave me a good idea of just how this will work with oils, my preferred medium.
Next up, the Frenchmen, and what a relief, lol. I can’t say I won’t ever go back to the Napoleonic era; the colors are just too spectacular to pass up and the learning potential from working bright colors is astounding. I’m just not hip on the “Battle of the Tartans” enough to take on another fight like this one any time soon, HA!
Thanks for watching, all comments welcome. Cheers, Ski.
Mike Butler’s book is available here: https://www.crowood.com/products/modell ... 538c&_ss=r
Prime example of how Mike paints using the techniques he explains in his book: https://www.planetfigure.com/attachment ... pg.453840/
Now that is a goal to strive for, to say the least. You’d swear this figure was alive!
This lil feller can rattle away all he wants now, he’s done. The task of accurately depicting his sleeve details wasn’t as bad as I had expected, simply because they are not accurate, HA! I never got a reply from the Black Watch Museum in Scotland and some photos found online just weren’t clear enough for me to be sure exactly what these emblems are. I’ve had plenty of advisors tell me what they were, but I gotta see it for myself.
I did make several tempts to add fleur di lis’ to no avail, total failure. My brush work just wasn’t cutting it. The more I tried the worse they got, so I called “time out”. As I stated earlier, I hate being inaccurate if I can help it, especially on something so visible, but my brush talents had reached their limit. Ya just gotta know when to move on, so that is what I’ve done.
All of the techniques and processes for this lil guy are the same as all of the other Highlander figures, except one. I utilized a technique I’ve been studying lately, “stippling”, one used quite successfully by “Mike the Kiwi” in his new book “Modelling and Painting World War I Allied Figures”. It’s a new release and I just received my copy a few weeks back. I stippled the bonnet/cap on the Drummer Boy with oils. Yes, that’s right, oils. It can be done successfully with a bit of trial and error. I know this is such a minor attempt, but it gave me a good idea of just how this will work with oils, my preferred medium.
Next up, the Frenchmen, and what a relief, lol. I can’t say I won’t ever go back to the Napoleonic era; the colors are just too spectacular to pass up and the learning potential from working bright colors is astounding. I’m just not hip on the “Battle of the Tartans” enough to take on another fight like this one any time soon, HA!
Thanks for watching, all comments welcome. Cheers, Ski.
Mike Butler’s book is available here: https://www.crowood.com/products/modell ... 538c&_ss=r
Prime example of how Mike paints using the techniques he explains in his book: https://www.planetfigure.com/attachment ... pg.453840/
Now that is a goal to strive for, to say the least. You’d swear this figure was alive!
Give Blood, Play Rugby, cause everyone knows football is for wimps!
-
BlackSheep214

- Elite Member
- Posts: 10498
- Joined: Sun Apr 06, 2014 8:47 pm
Re: 42nd Highland Infantry Regiment "Black Watch" at the Battle
I am at a loss for words. Incredible work!
“Who controls the skies, controls the fate of this Earth”
Author unknown- 352nd Fighter Group, Blue-Nosed Bastards of Bodney
“Send one plane it’s a sortie; send two planes it’s a flight; send four planes it’s a test of airpower. - Richard Kohn
Author unknown- 352nd Fighter Group, Blue-Nosed Bastards of Bodney
“Send one plane it’s a sortie; send two planes it’s a flight; send four planes it’s a test of airpower. - Richard Kohn

Re: 42nd Highland Infantry Regiment "Black Watch" at the Battle
Thank you, Gents.
Sheesh, I've hit burnout today, don't even feel like messin with them Frenchies, HA! Ah, I'll get er done.
Sheesh, I've hit burnout today, don't even feel like messin with them Frenchies, HA! Ah, I'll get er done.
Give Blood, Play Rugby, cause everyone knows football is for wimps!
Re: 42nd Highland Infantry Regiment "Black Watch" at the Battle
Base Layout
We’re so close I had to forego the Frenchmen and get to work on the base. Honestly, it’s a bit of work to retool my brain right now, the bloomin tartans are still dancing in me head at night, HA! I really need to step back and study the French fellows a bit more before I move on anyways.
Being within a few miles of a huge lake it’s not hard to find drift wood, if you know where to look. I pulled a small chunk from my wife’s stash, with her approval of course, and did some trimming. I was actually a lot of fun making saw dust again, a break from the pattern grind, you could say.
These pics are not close up on purpose as they are only reference photos. I started out with a great chunk with the swirls and all, only to find they wouldn’t fit within the designated parameters of the layout. So, bandsaw to the rescue, with a little help from the joiner, and a miter saw, in business we are. Then it was all orbital sander from there on out. Some swirls are still visible under the Mahogany stain and they will show much better after about 5 coats of Tung Oil.
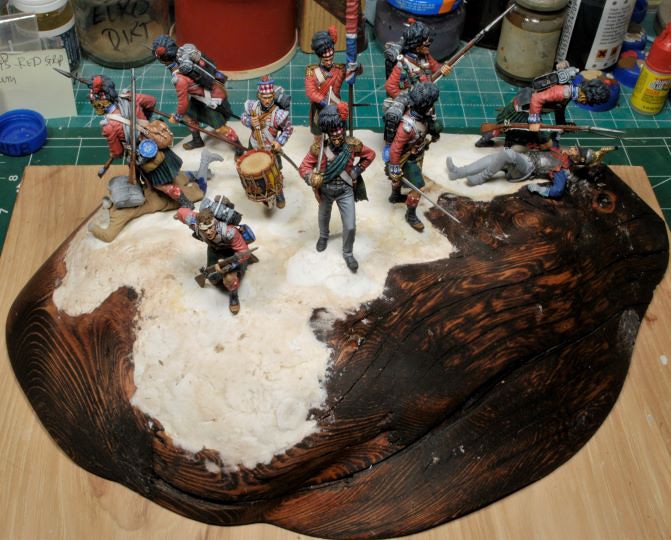
There’s a bit of blue construction foam under the air clay and all of it is glued massively with carpenter’s glue. I don’t expect any shifting within my lifetime. The figures will set with the clay drying overnight. All the locations have just been marked with a permanent marker so I can at least have an idea where each goes after the sanding. I’ll be using Hecky grass for the field work.
So, as you can tell by now, we are definitely seeing light at the end of the tunnel, and no, it ain’t no train.
Thanks for watching. Cheers, Ski.
We’re so close I had to forego the Frenchmen and get to work on the base. Honestly, it’s a bit of work to retool my brain right now, the bloomin tartans are still dancing in me head at night, HA! I really need to step back and study the French fellows a bit more before I move on anyways.
Being within a few miles of a huge lake it’s not hard to find drift wood, if you know where to look. I pulled a small chunk from my wife’s stash, with her approval of course, and did some trimming. I was actually a lot of fun making saw dust again, a break from the pattern grind, you could say.
These pics are not close up on purpose as they are only reference photos. I started out with a great chunk with the swirls and all, only to find they wouldn’t fit within the designated parameters of the layout. So, bandsaw to the rescue, with a little help from the joiner, and a miter saw, in business we are. Then it was all orbital sander from there on out. Some swirls are still visible under the Mahogany stain and they will show much better after about 5 coats of Tung Oil.
There’s a bit of blue construction foam under the air clay and all of it is glued massively with carpenter’s glue. I don’t expect any shifting within my lifetime. The figures will set with the clay drying overnight. All the locations have just been marked with a permanent marker so I can at least have an idea where each goes after the sanding. I’ll be using Hecky grass for the field work.
So, as you can tell by now, we are definitely seeing light at the end of the tunnel, and no, it ain’t no train.
Thanks for watching. Cheers, Ski.
Give Blood, Play Rugby, cause everyone knows football is for wimps!
Re: 42nd Highland Infantry Regiment "Black Watch" at the Battle
There's an enormous amount of work on that piece of driftwood! Look good
Thanks,
John
John
Re: 42nd Highland Infantry Regiment "Black Watch" at the Battle
Thanks, Keavdog.
Working the joiner without a guide or feather board was the only way to get it flat on the bottom. As you can see, the original color would not take stain so well and look worth a hoot, so it had to be sanded ruining a lot of the cool features I started with. I feel like it needs to be trimmed lower, just seems too high. However, if I attempt to lower the chunk it will lose integrity and denigrate on the joiner.
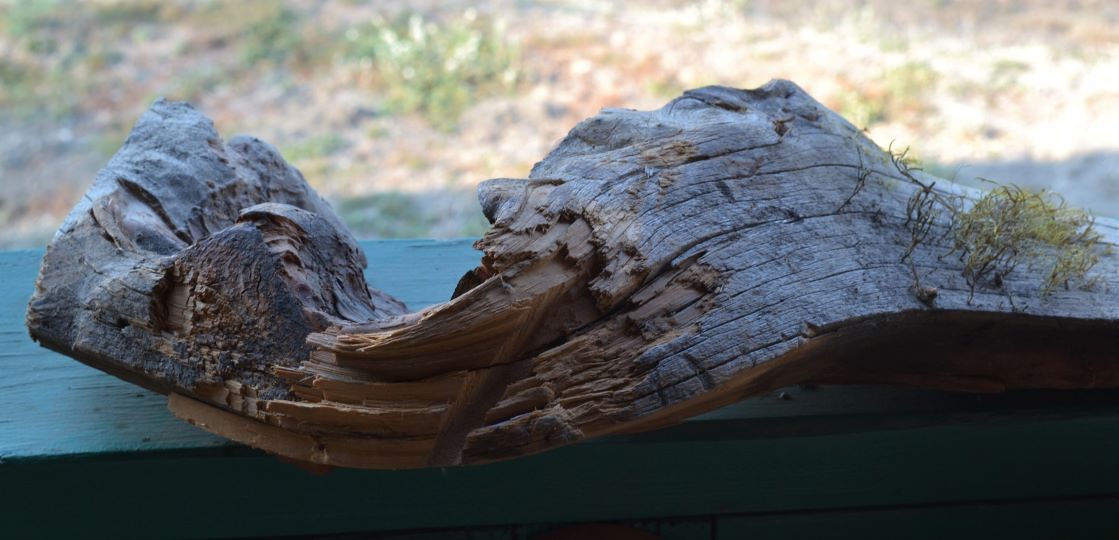
Working the joiner without a guide or feather board was the only way to get it flat on the bottom. As you can see, the original color would not take stain so well and look worth a hoot, so it had to be sanded ruining a lot of the cool features I started with. I feel like it needs to be trimmed lower, just seems too high. However, if I attempt to lower the chunk it will lose integrity and denigrate on the joiner.
Give Blood, Play Rugby, cause everyone knows football is for wimps!