Thank you CB!
Thank you TJ! Yeah, there certainly is a lot of plastic. Wait till you see the next tour!
Maddog Manufacturing Open for 2024
-
Duke Maddog

- Elite Member
- Posts: 7100
- Joined: Tue Jun 03, 2014 11:22 am
- Location: Rowland Heights, CA
Re: Maddog Manufacturing Open for 2024
The Duke
Virtuoso of Miniatures
"Do you know what the chain of command is? It's the chain I get and beat you with 'till you understand who's in ruttin' command!"
-Jayne Cobb, Firefly Episode 2 "The Train Job"
We are modelers - the same in spirit, in hunger to insanely buy newly released kits, hustlers in hiding our stash from our better halves and experts in using garbage as replacements for after-market parts.
-
BlackSheep214

- Elite Member
- Posts: 10492
- Joined: Sun Apr 06, 2014 8:47 pm
Re: Maddog Manufacturing Open for 2024
A couple of really big wingy thingys. I did the Concorde kit as a kid but not in 1/72 scale though. Fun iconic aircraft to build.
“Who controls the skies, controls the fate of this Earth”
Author unknown- 352nd Fighter Group, Blue-Nosed Bastards of Bodney
“Send one plane it’s a sortie; send two planes it’s a flight; send four planes it’s a test of airpower. - Richard Kohn
Author unknown- 352nd Fighter Group, Blue-Nosed Bastards of Bodney
“Send one plane it’s a sortie; send two planes it’s a flight; send four planes it’s a test of airpower. - Richard Kohn

Re: Maddog Manufacturing Open for 2024
Oh boy Mark, can only say, wouh & impressing ! :-)
- Kari
- Kari
---
On the bench:
Tamiya F-4B Phantom II 1/48
Kinetic F-16A (new tool) 1/48
https://www.facebook.com/GrundAsk-Scale ... 721218708/
On the bench:
Tamiya F-4B Phantom II 1/48
Kinetic F-16A (new tool) 1/48
https://www.facebook.com/GrundAsk-Scale ... 721218708/
-
Duke Maddog
- Elite Member
- Posts: 7100
- Joined: Tue Jun 03, 2014 11:22 am
- Location: Rowland Heights, CA
Re: Maddog Manufacturing Open for 2024
Thank you Kari! I have more progress to show, so stay tuned for the next tour!
The Duke
Virtuoso of Miniatures
"Do you know what the chain of command is? It's the chain I get and beat you with 'till you understand who's in ruttin' command!"
-Jayne Cobb, Firefly Episode 2 "The Train Job"
We are modelers - the same in spirit, in hunger to insanely buy newly released kits, hustlers in hiding our stash from our better halves and experts in using garbage as replacements for after-market parts.
Virtuoso of Miniatures
"Do you know what the chain of command is? It's the chain I get and beat you with 'till you understand who's in ruttin' command!"
-Jayne Cobb, Firefly Episode 2 "The Train Job"
We are modelers - the same in spirit, in hunger to insanely buy newly released kits, hustlers in hiding our stash from our better halves and experts in using garbage as replacements for after-market parts.
-
Duke Maddog
- Elite Member
- Posts: 7100
- Joined: Tue Jun 03, 2014 11:22 am
- Location: Rowland Heights, CA
Re: Maddog Manufacturing Open for 2024
Well, it's been nearly a month since the last tour, so we are due. As there has been quite a bit of progress during that time, this will be another two-part tour due to the extensive amount of things to show.
So, all aboard the trams for the latest tour!
The Hangar is the first stop as always and here is where the majority of the progress has been. Starting in this first bay, we have some Russian ordinance. This was a short run kit that I got in the Distressed Kit Auction some time back. These finally got some paint on them and since the stand to the flying one went on walkabout, we modified one to hold it:

Not too shabby...
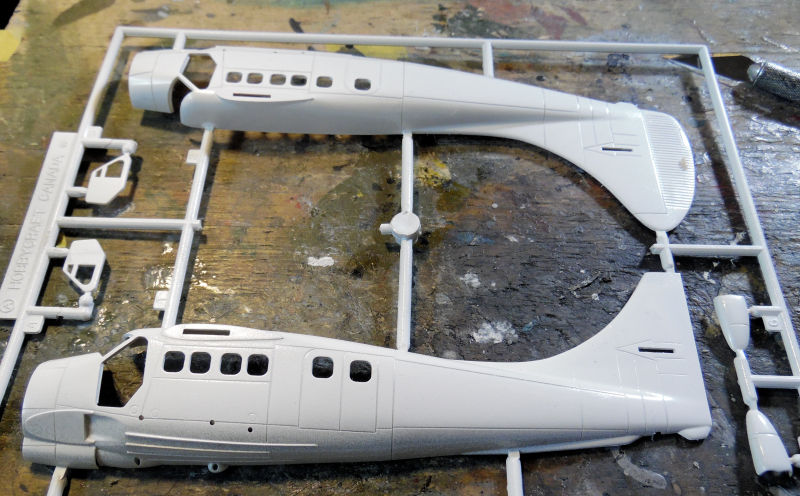
In the next bay is a project that got started because of all the white we were spraying on the Concorde. so, while I had the white out, we shot a white on the fuselage of this Canadian Otter to get a jump on it:
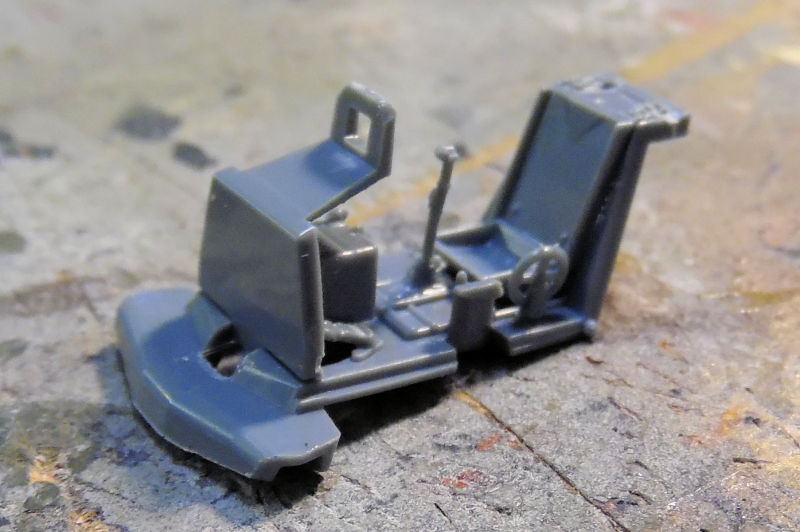
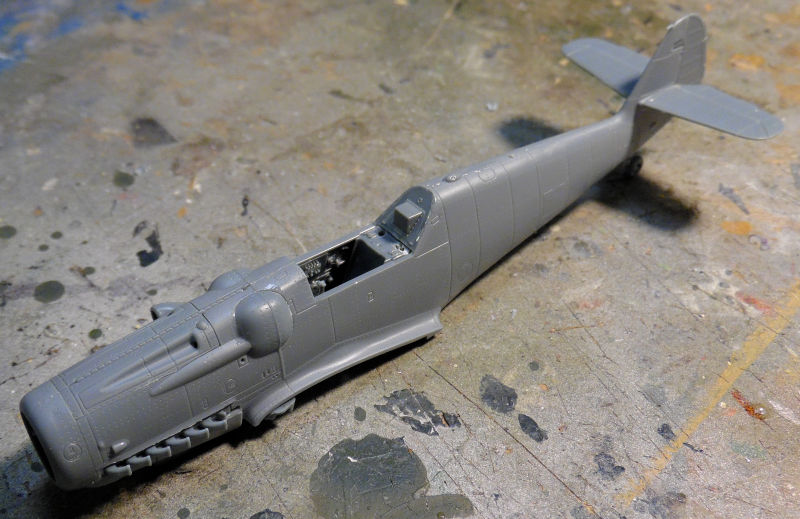
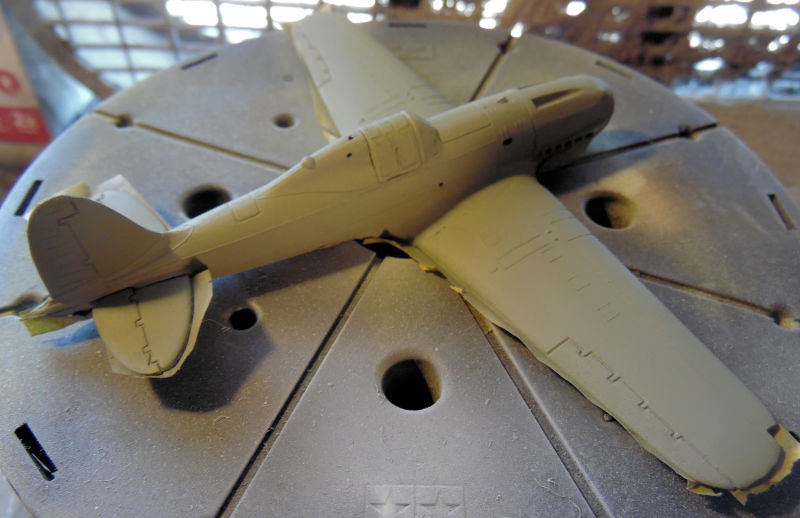
Now on to the next bay, we have another started project; something that had been crying out for me to start. This is the Eduard Profipak Israeli S-199. The cockpit sans instrument panel was started first:
After that the basic fuselage was assembled:
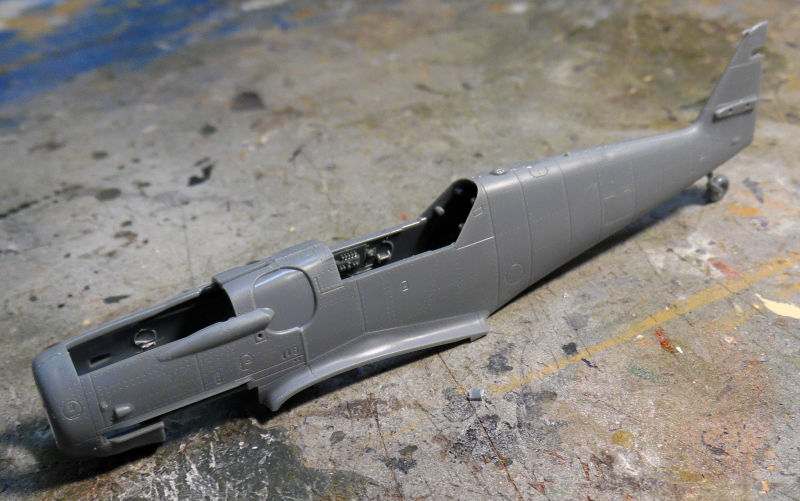
Then we completed the rest of the fuselage and slipped the cockpit sub-assembly inside to dry fit so we could see how it fit:
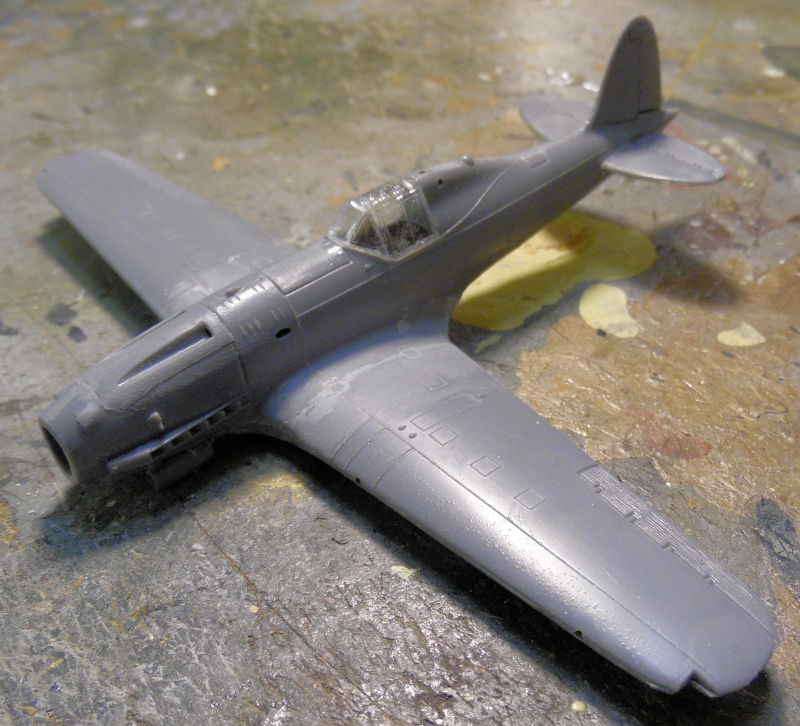
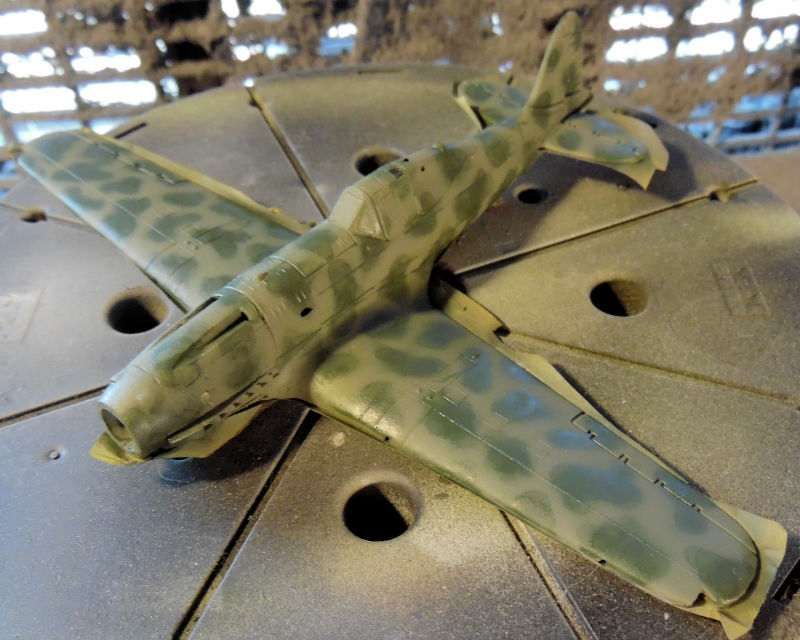
Looking pretty good so far. Next we worked more on the Italian Macchi C.205. The canopy went on after some more sanding had taken place:
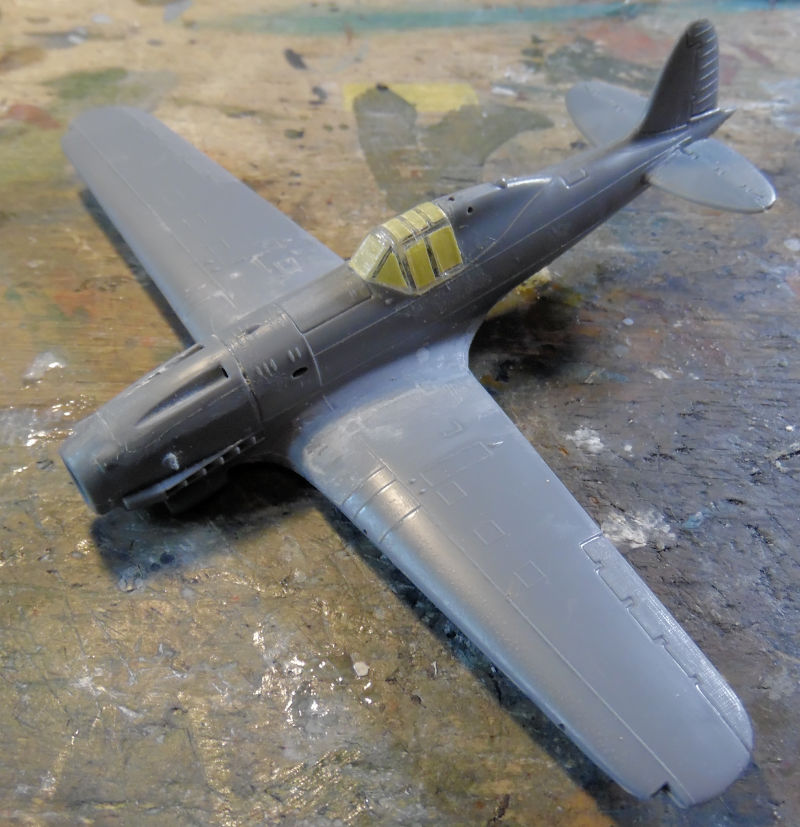
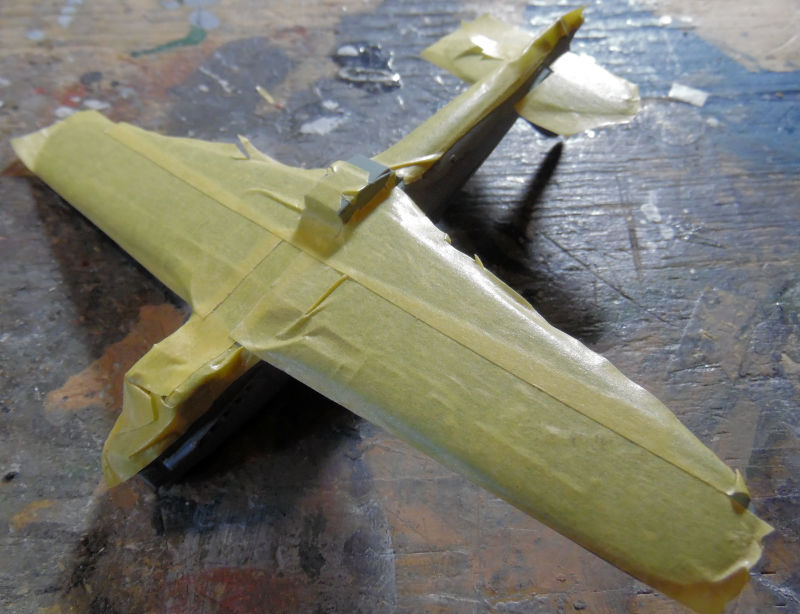
The the canopy was masked; it was easier to do it while installed on the aircraft:
Next stop was the paint station, where this got the undercoat. Once it was dry, we masked it off for the upper coat:
The upper coat went on after that:
Followed later by the darker green splotches since we still had that color in the color cup after spraying the T-34:
Moving along, we got some more progress done on the two Reapers (that I mislabeled as "Predators") shooting a base coat of Light Ghost Grey over them both:
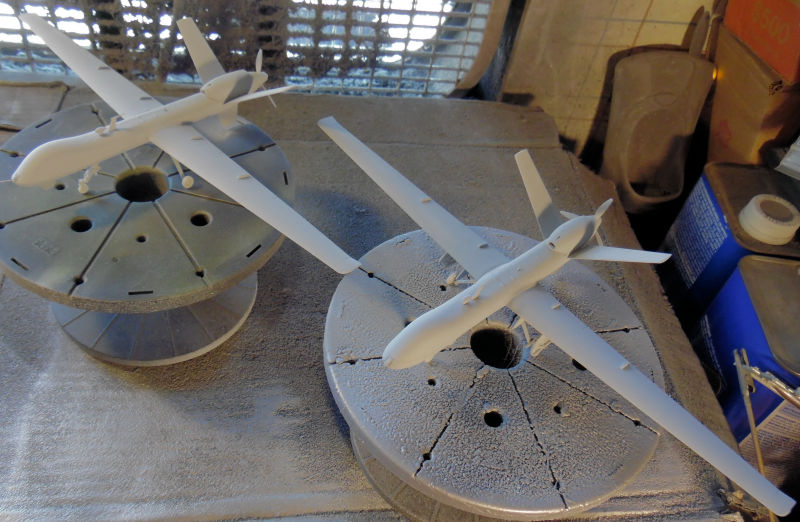
Once that was dry, a gloss coat was sprayed and we got the decals down on the British Reaper:
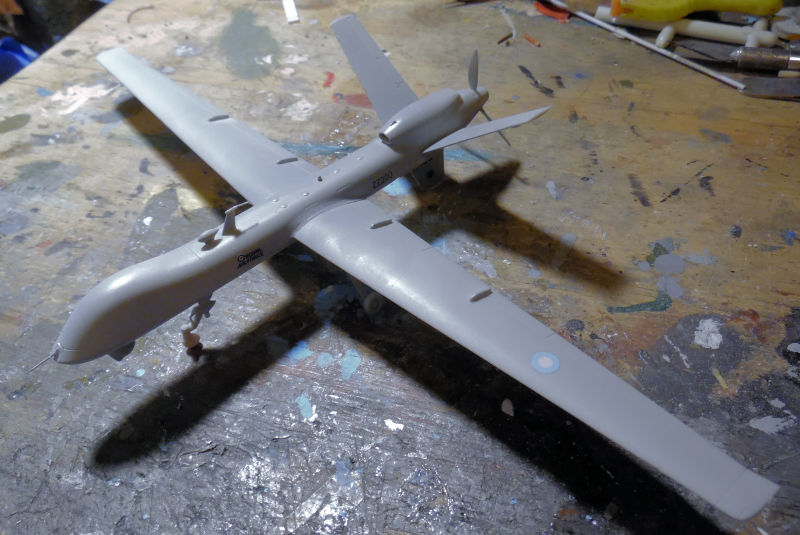
I'm waiting for word from my nephew to see if he knows a particular drone he's flown the most so I can model it.
Now for the larger stuff. In this bay we have another attempt at shooting a gloss coat on the Concorde:
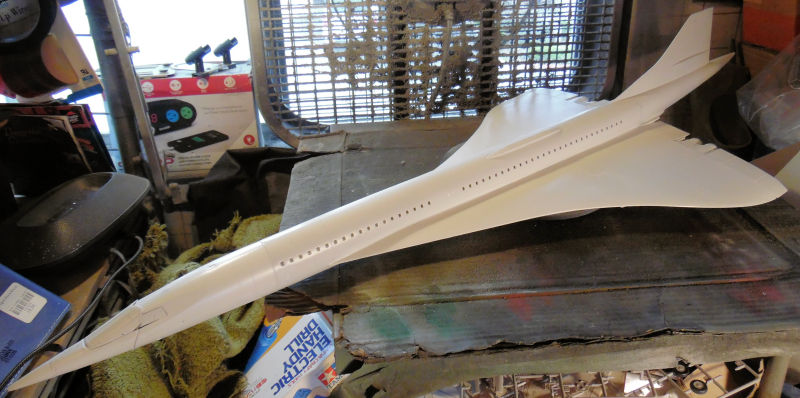
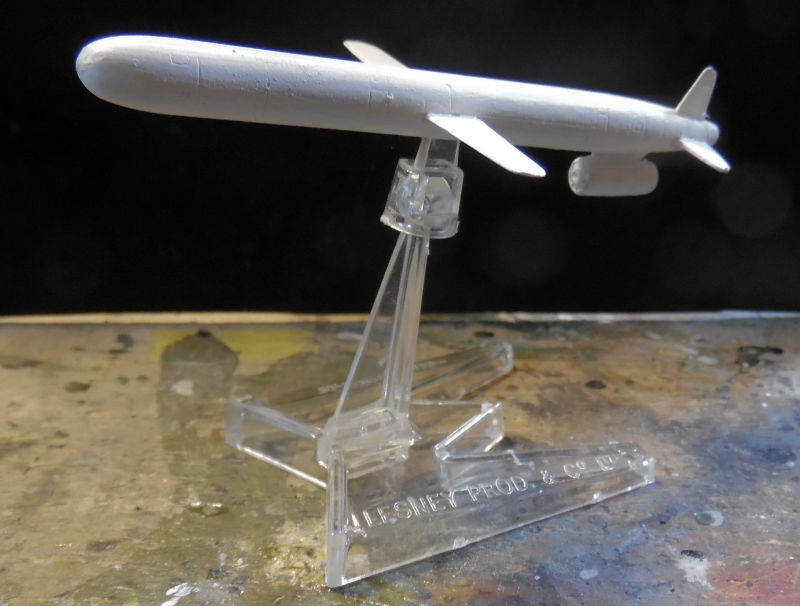
I was not satisfied with the joint between the tail and the main fuselage. However, to facilitate things we did what I should have done long before: we built the stand that came in the kit:
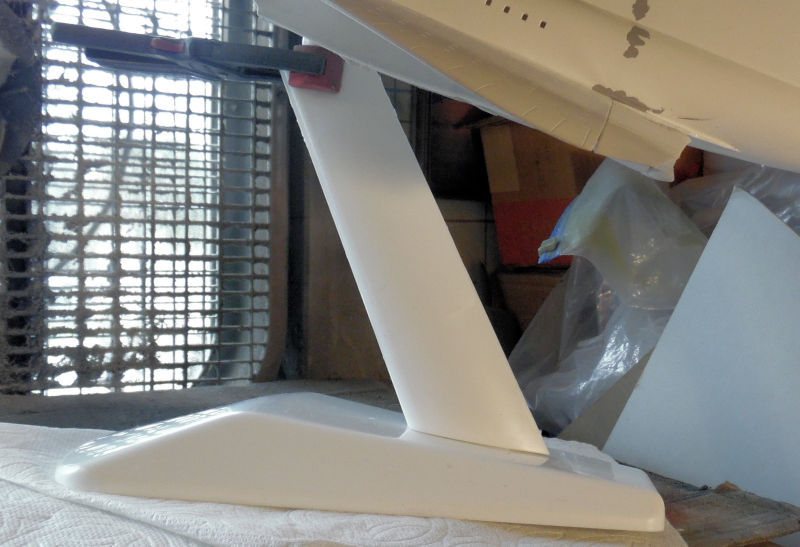
Now this is much easier to maneuver without having to touch it and dirty up the white! It also made it easier to add the additional Mr. Surfacer to try and smooth out the troublesome joint again:
Moving on while that dried, we have in this next bay both of the T-16 Badgers under construction. Both cockpit modules had the clear parts masked off to prepare for paint:
The engines were added to the main fuselages of both planes and the main fuselage halves were cemented together. You can see one of them had already got the cockpit module attached:
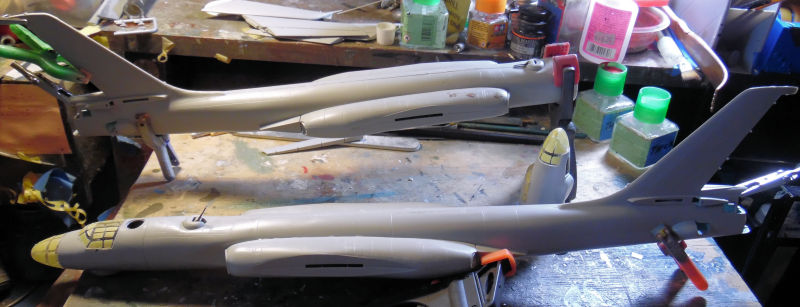
Afterward, the other cockpit module was attached and the wings were installed on both planes:
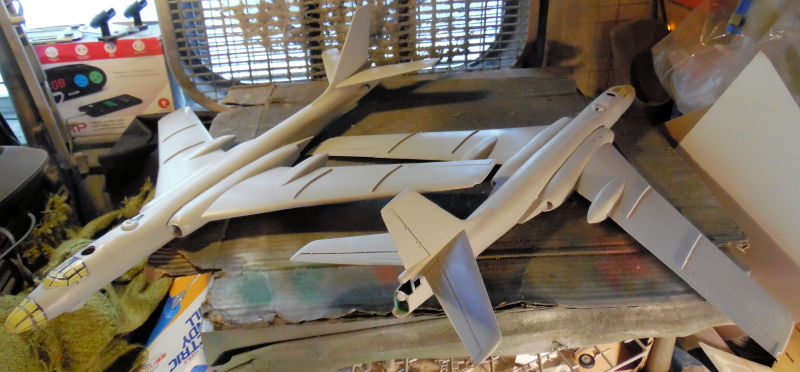
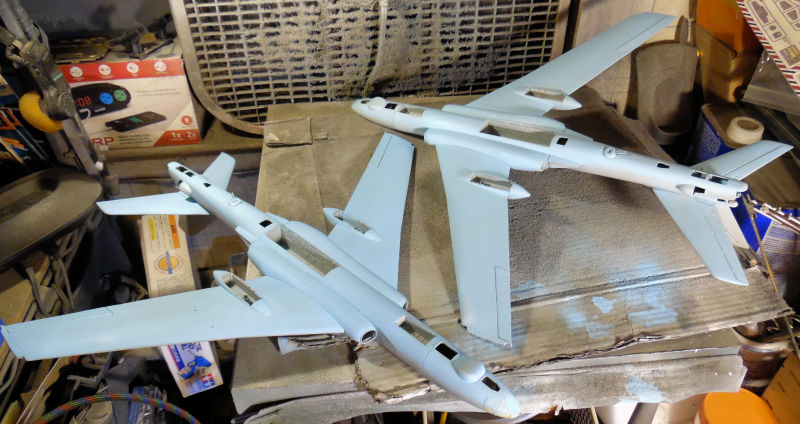
Later their first color went on. I'm not exactly happy with this shade and I may re-shoot another one....or not:
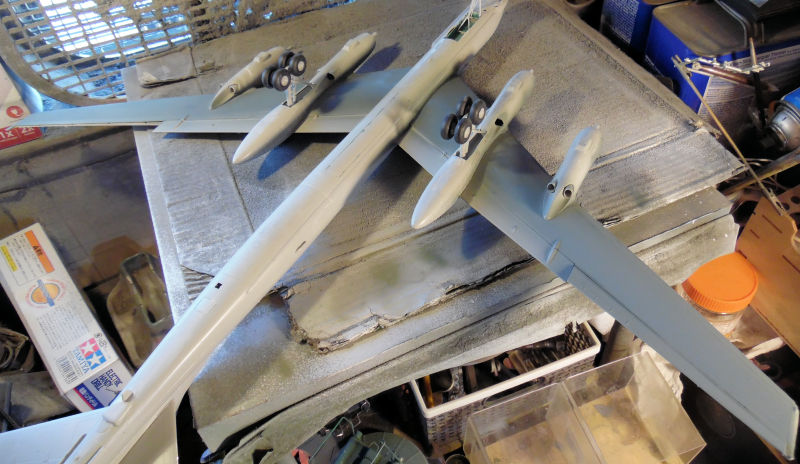
Now for the next big model, we go to this next bay where the Tu-95H (also mislabeled as the "Tu-142) is being built. I wasn't happy with the way the inside nacelle on one wing was sitting; there were too many large gaps along the nacelle and wing. The only thing to do was to remove it and re-set it correctly so that that the gaps are gone:
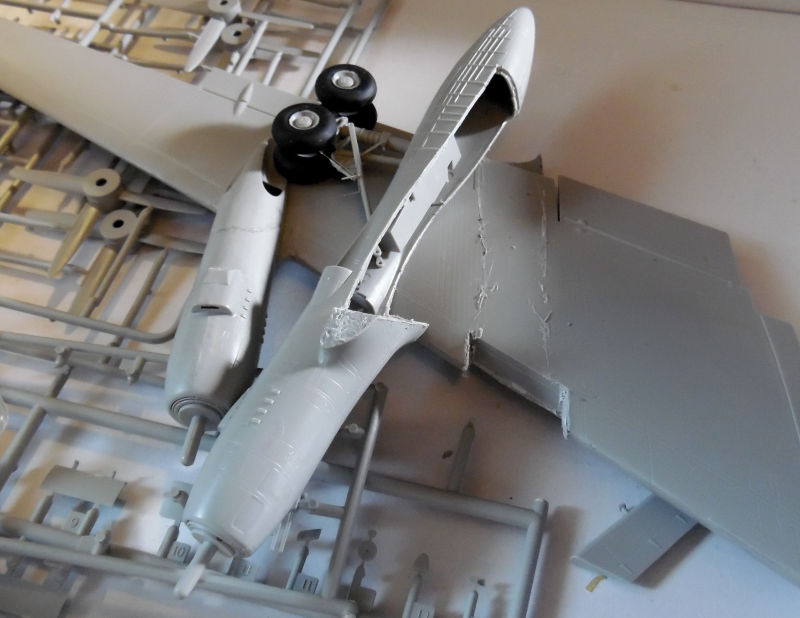
Once re-set there was still a bit of putty needed at the top joint where the nacelle meets the wing:
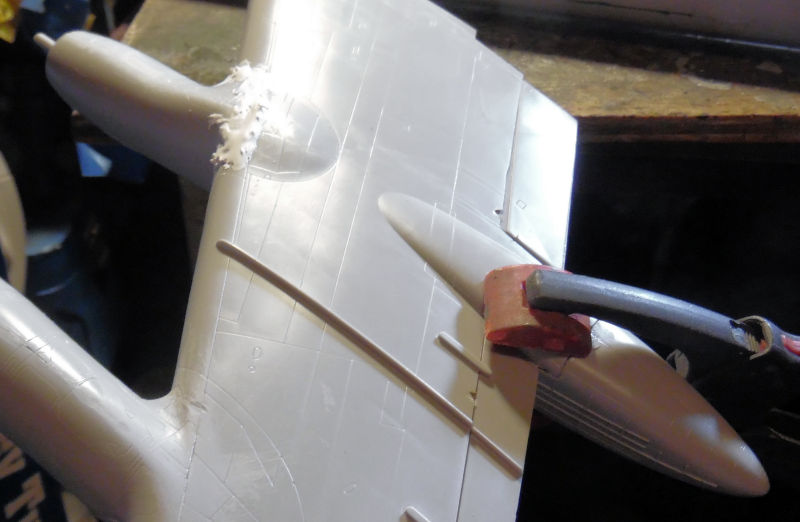
Naturally doing all that caused the main landing gear to break, so this was fixed to dry along with everything else:
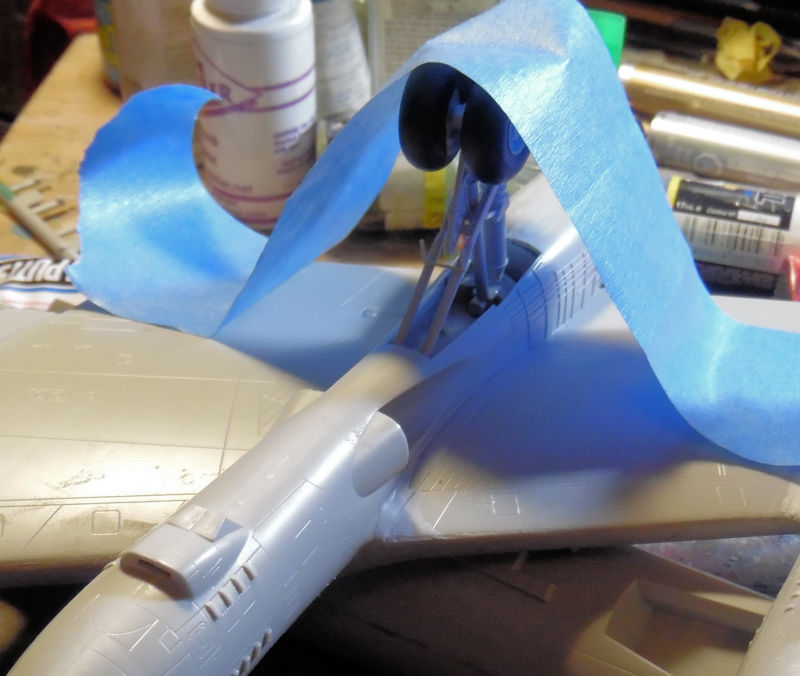
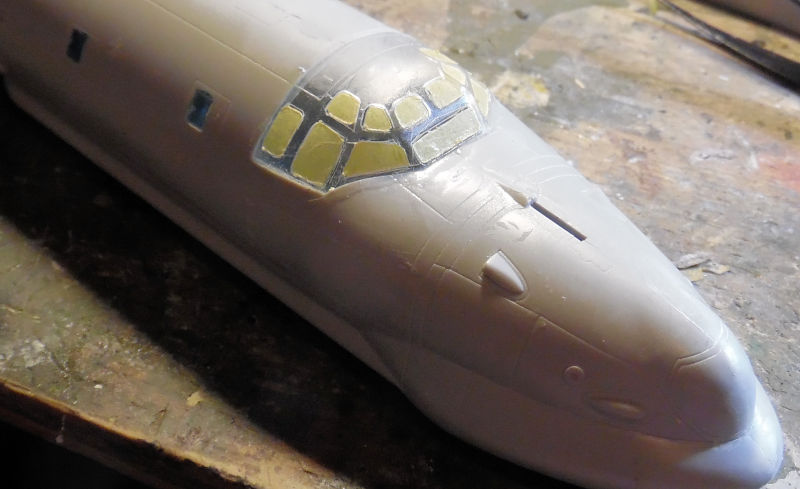
While that was drying we moved on to the front fuselage section where the canopy was installed:
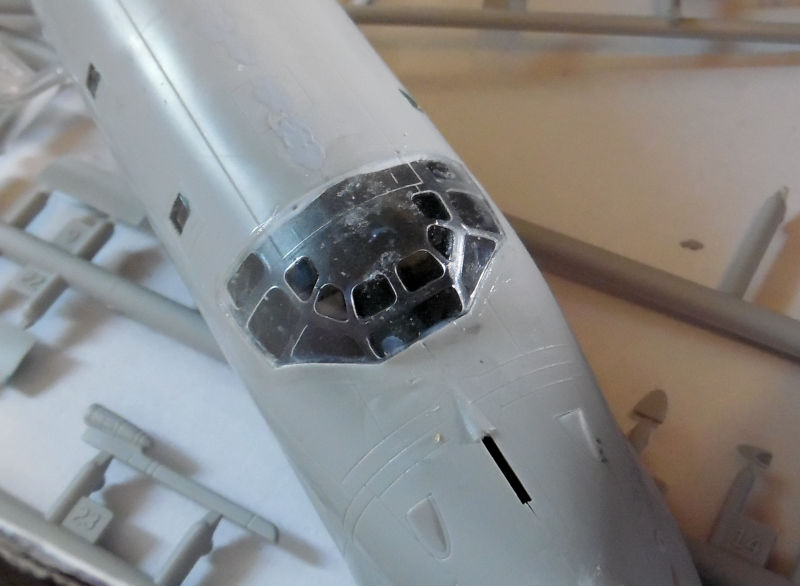
This was then masked when it was dry:
After that, the rear fuselage and the front fuselage were joined together. Now you can get some idea of how big this thing is as it is sitting on a standard tray table:
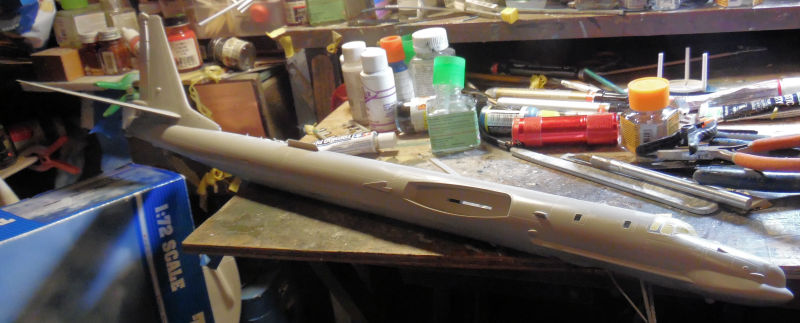
Naturally you'll be able to see how incredibly messy my bench is, but hey, it can't be helped....
Moving on, we then installed the wings:
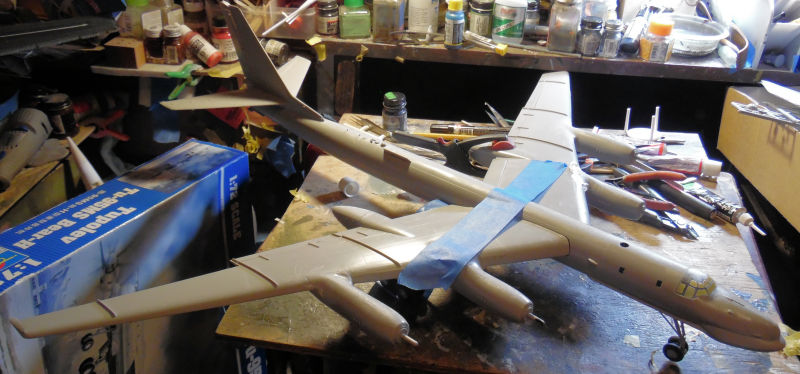
I had to pull the entire tray table out to fit that thing! Here's another view of this thing on the tray table:
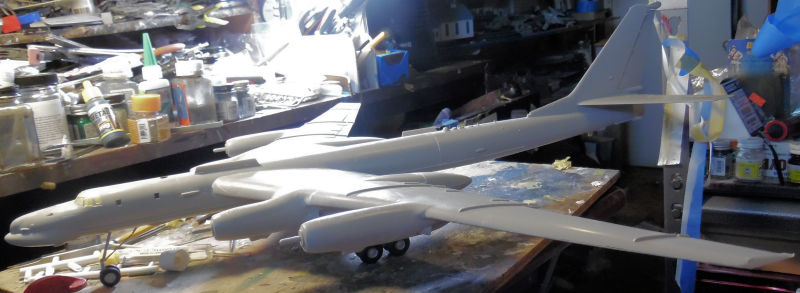
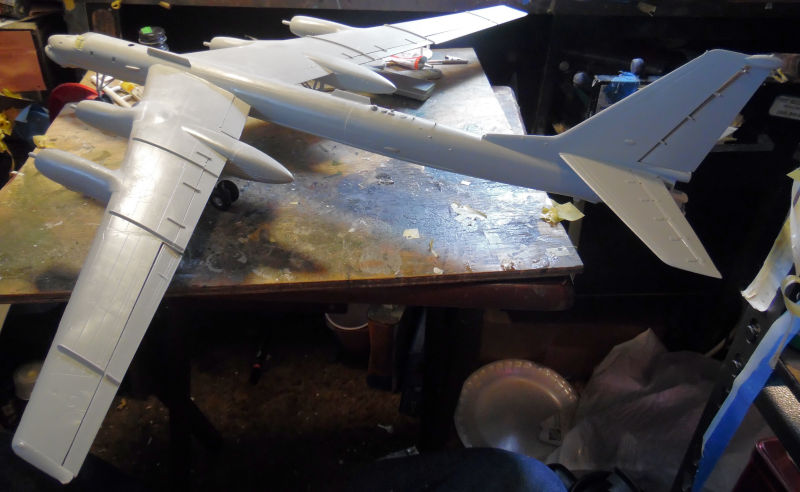
Later on, this Big Bird got it's first color:
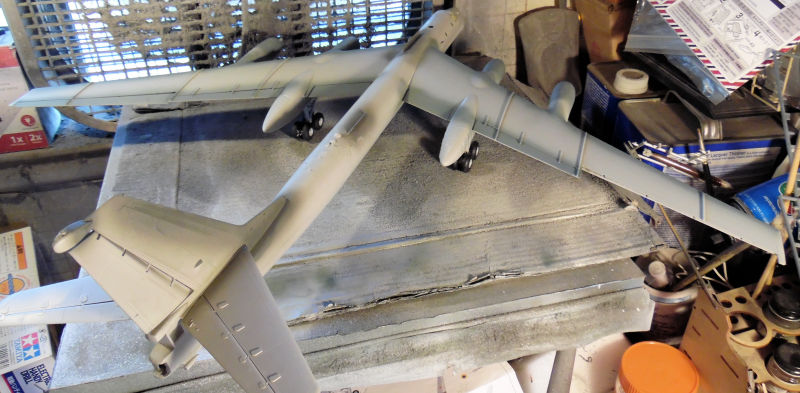
That will all be masked when it's time to put the main bare metal silver coat on. First, we still need to add some of the lighter greys on certain areas first.
Now this tour has been quite extensive already so we shall continue the tour in the Shipyards and the Motor Pool in the next post.
So, all aboard the trams for the latest tour!
The Hangar is the first stop as always and here is where the majority of the progress has been. Starting in this first bay, we have some Russian ordinance. This was a short run kit that I got in the Distressed Kit Auction some time back. These finally got some paint on them and since the stand to the flying one went on walkabout, we modified one to hold it:
Not too shabby...
In the next bay is a project that got started because of all the white we were spraying on the Concorde. so, while I had the white out, we shot a white on the fuselage of this Canadian Otter to get a jump on it:
Now on to the next bay, we have another started project; something that had been crying out for me to start. This is the Eduard Profipak Israeli S-199. The cockpit sans instrument panel was started first:
After that the basic fuselage was assembled:
Then we completed the rest of the fuselage and slipped the cockpit sub-assembly inside to dry fit so we could see how it fit:
Looking pretty good so far. Next we worked more on the Italian Macchi C.205. The canopy went on after some more sanding had taken place:
The the canopy was masked; it was easier to do it while installed on the aircraft:
Next stop was the paint station, where this got the undercoat. Once it was dry, we masked it off for the upper coat:
The upper coat went on after that:
Followed later by the darker green splotches since we still had that color in the color cup after spraying the T-34:
Moving along, we got some more progress done on the two Reapers (that I mislabeled as "Predators") shooting a base coat of Light Ghost Grey over them both:
Once that was dry, a gloss coat was sprayed and we got the decals down on the British Reaper:
I'm waiting for word from my nephew to see if he knows a particular drone he's flown the most so I can model it.
Now for the larger stuff. In this bay we have another attempt at shooting a gloss coat on the Concorde:
I was not satisfied with the joint between the tail and the main fuselage. However, to facilitate things we did what I should have done long before: we built the stand that came in the kit:
Now this is much easier to maneuver without having to touch it and dirty up the white! It also made it easier to add the additional Mr. Surfacer to try and smooth out the troublesome joint again:
Moving on while that dried, we have in this next bay both of the T-16 Badgers under construction. Both cockpit modules had the clear parts masked off to prepare for paint:
The engines were added to the main fuselages of both planes and the main fuselage halves were cemented together. You can see one of them had already got the cockpit module attached:
Afterward, the other cockpit module was attached and the wings were installed on both planes:
Later their first color went on. I'm not exactly happy with this shade and I may re-shoot another one....or not:
Now for the next big model, we go to this next bay where the Tu-95H (also mislabeled as the "Tu-142) is being built. I wasn't happy with the way the inside nacelle on one wing was sitting; there were too many large gaps along the nacelle and wing. The only thing to do was to remove it and re-set it correctly so that that the gaps are gone:
Once re-set there was still a bit of putty needed at the top joint where the nacelle meets the wing:
Naturally doing all that caused the main landing gear to break, so this was fixed to dry along with everything else:
While that was drying we moved on to the front fuselage section where the canopy was installed:
This was then masked when it was dry:
After that, the rear fuselage and the front fuselage were joined together. Now you can get some idea of how big this thing is as it is sitting on a standard tray table:
Naturally you'll be able to see how incredibly messy my bench is, but hey, it can't be helped....
Moving on, we then installed the wings:
I had to pull the entire tray table out to fit that thing! Here's another view of this thing on the tray table:
Later on, this Big Bird got it's first color:
That will all be masked when it's time to put the main bare metal silver coat on. First, we still need to add some of the lighter greys on certain areas first.
Now this tour has been quite extensive already so we shall continue the tour in the Shipyards and the Motor Pool in the next post.
The Duke
Virtuoso of Miniatures
"Do you know what the chain of command is? It's the chain I get and beat you with 'till you understand who's in ruttin' command!"
-Jayne Cobb, Firefly Episode 2 "The Train Job"
We are modelers - the same in spirit, in hunger to insanely buy newly released kits, hustlers in hiding our stash from our better halves and experts in using garbage as replacements for after-market parts.
Virtuoso of Miniatures
"Do you know what the chain of command is? It's the chain I get and beat you with 'till you understand who's in ruttin' command!"
-Jayne Cobb, Firefly Episode 2 "The Train Job"
We are modelers - the same in spirit, in hunger to insanely buy newly released kits, hustlers in hiding our stash from our better halves and experts in using garbage as replacements for after-market parts.
-
Duke Maddog
- Elite Member
- Posts: 7100
- Joined: Tue Jun 03, 2014 11:22 am
- Location: Rowland Heights, CA
Re: Maddog Manufacturing Open for 2024
And now to continue our tour of the Shipyards next.
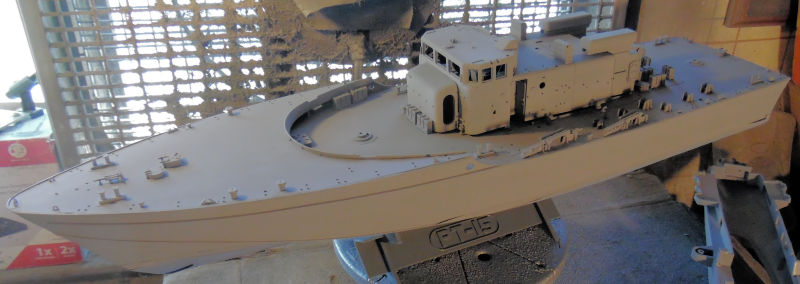
In the first slipway here we have the Japanese PT-15 that finally got the base coat of grey on it:
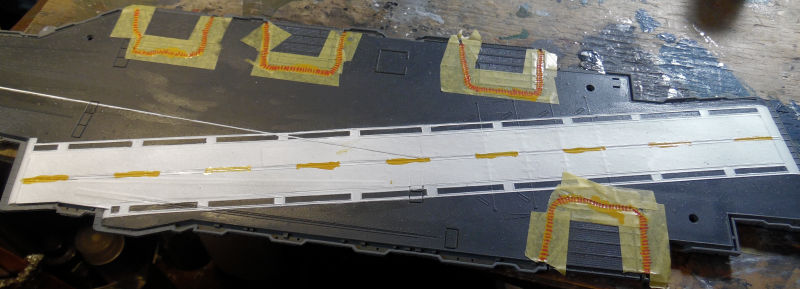
In the next slipway, we continued work on the deck of the USS Enterprise. Some masking was pulled off, but the the yellow stripes were painted on the deck:
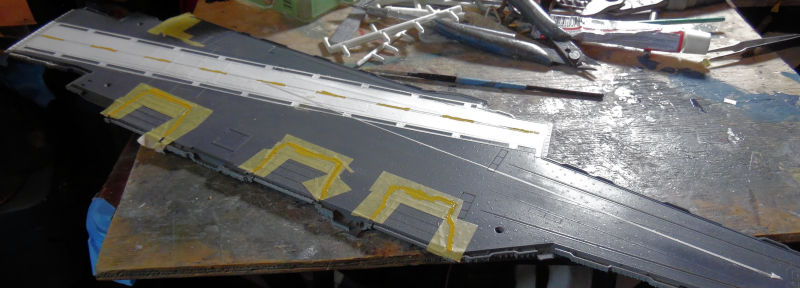
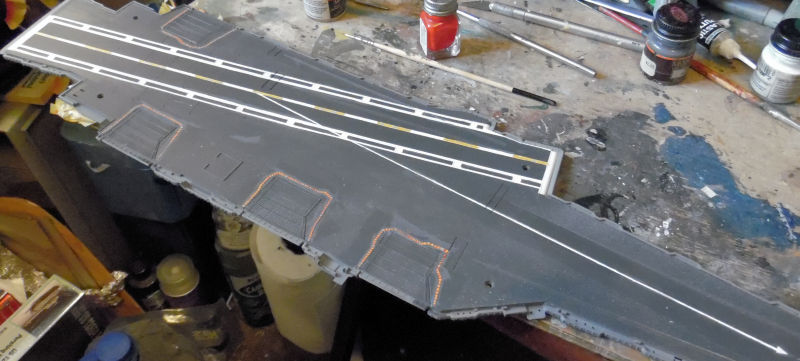
Later, the remaining elevator stripes were masked off, the yellow painted on it and then we added the red stripes on these same elevator stripes:
After some touchup, this deck is done:
Finally, in this last slipway, we worked on getting the railings on the Robert E. Lee looking more even and refined. Additional parts were added and the seams on the upper cabin and deck were filled as well:

That completes our tour so far of the Shipyards and so we move on to the Motor Pool.
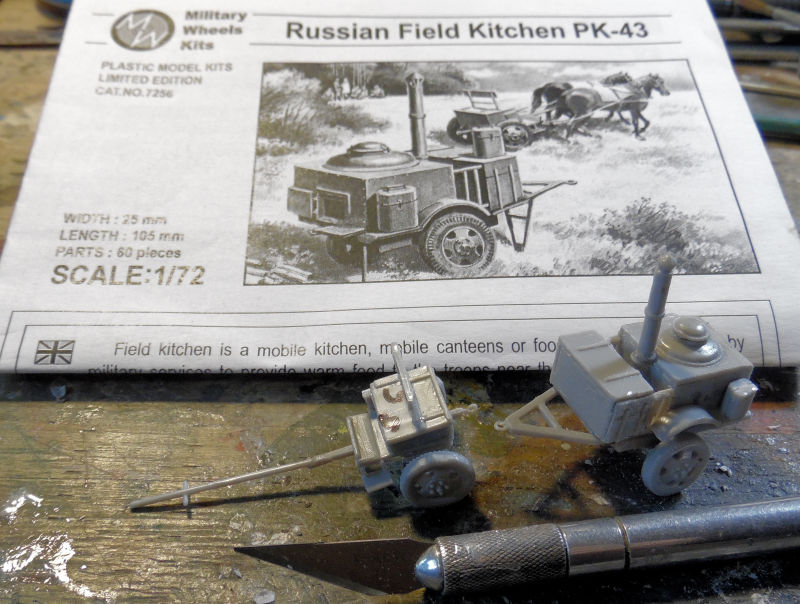
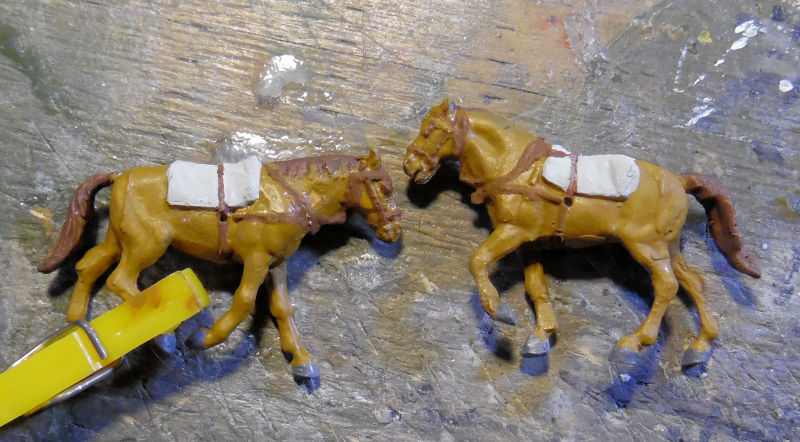
Production has been picking up, starting with a small shelf queen project that I wanted on the display shelf. This is the Military Wheels 1/72 scale Russian Field Kitchen. We had started it some time ago, found the box again and decided it was time to get it finished. First off the kitchen and limber were completed:
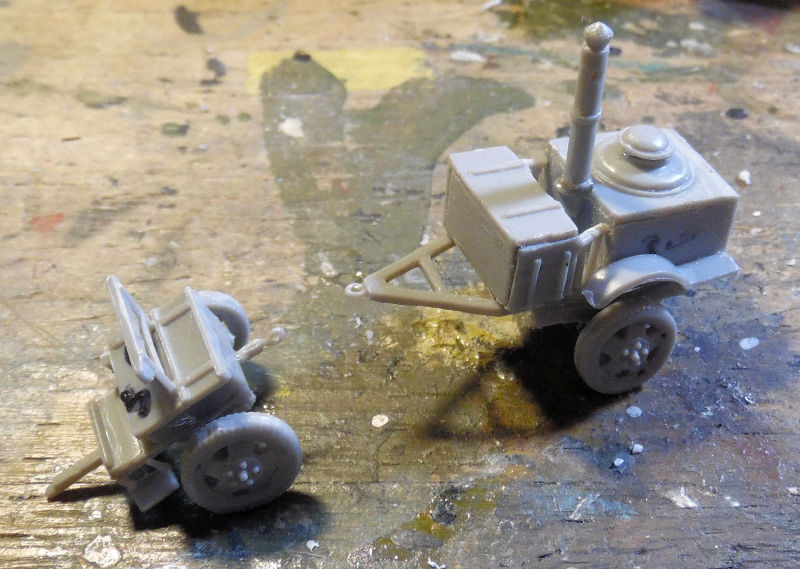
Here's an idea of how small this is too:
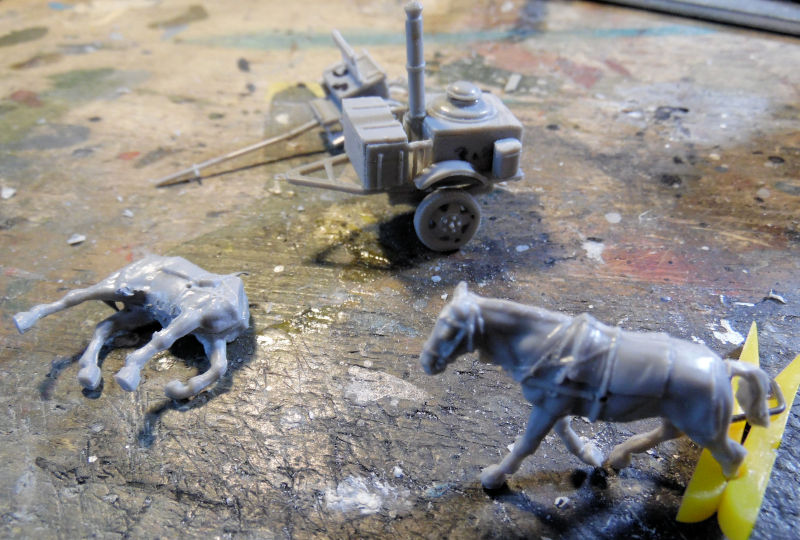
The horses were in four parts. Seriously. Two body halves, the head and the tail. They seemed pretty desperate to add some kind of 'detail' to this model! It didn't help that the parts were all so badly molded that massive sanding, carving and other adjustments needed to be made:
Finally we got them painted:
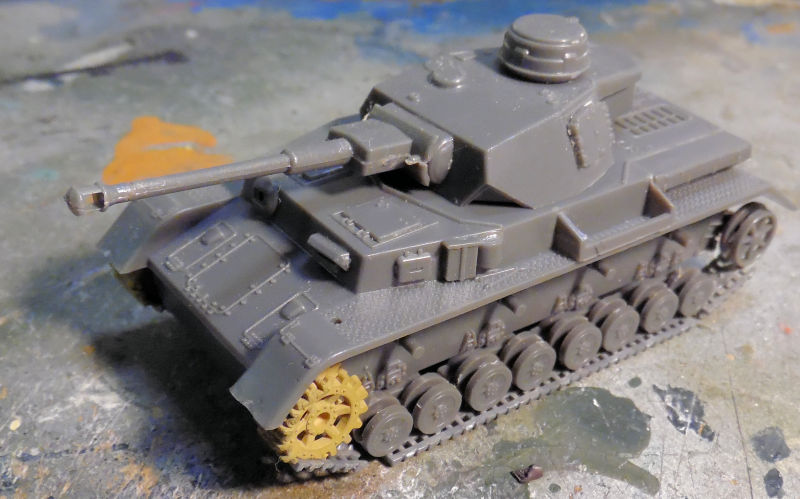
Moving along to the next bay, the Syrian PzIV got a partial run of tracks from the spares box. More will go on this when additional track pieces are found:
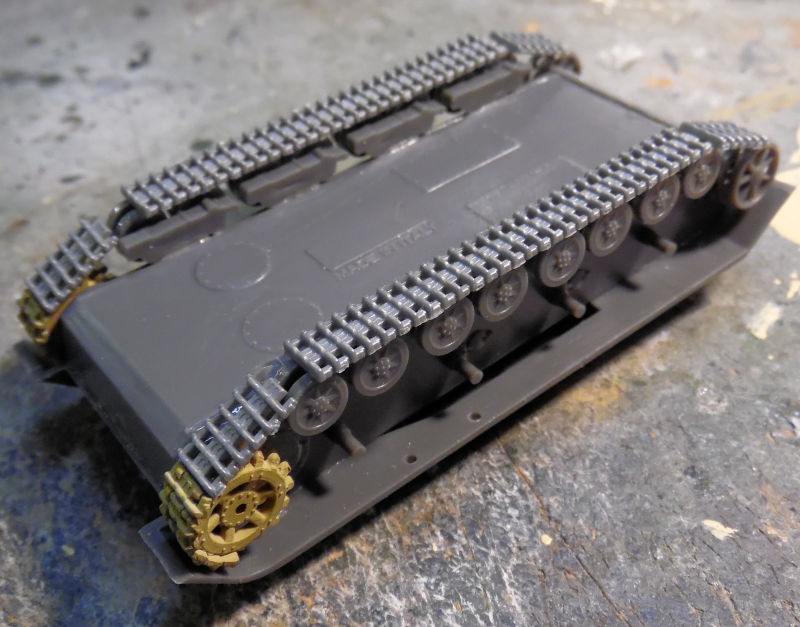
Overall it's looking pretty good:
Next are two Distressed Kit Auction winnings. These were mostly assembled by someone else before they gave up and donated them to our club for our Auction. First is this Dragon StuG III ausf H that they had added photo etch zimmerit to:
This is going to be a Syrian StuG, and yes, there are pictures of several of these in Syrian service still sporting their Zimm. We started on the tracks for this for now:
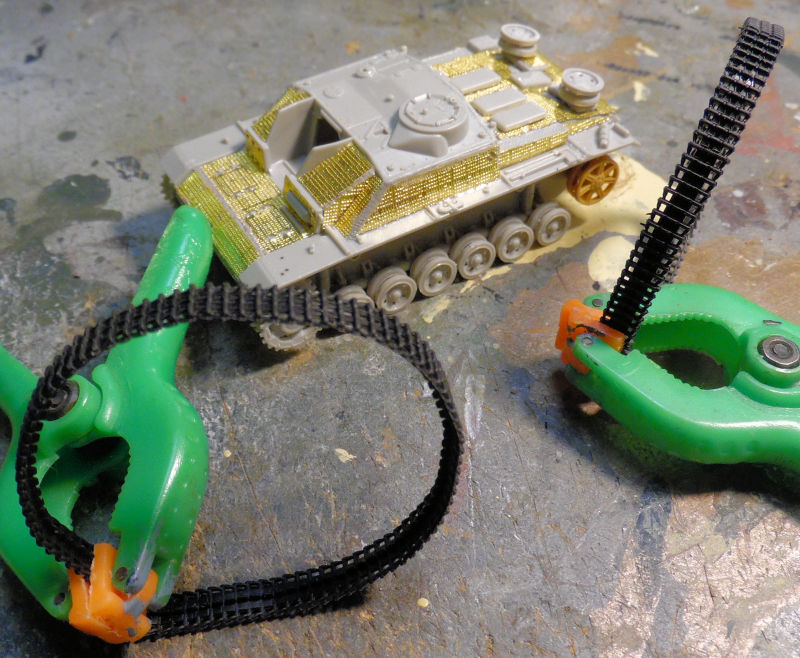
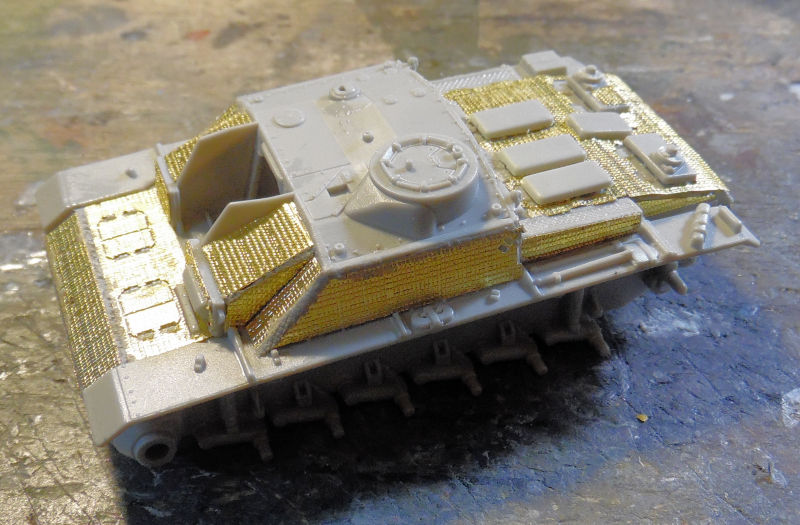
Our last Syrian tank is this Trumpeter T-34/85 that they had given up on because one of the idler wheels disappeared. I conjured up a replacement pair and added them to this tank:
Next the tracks went on:

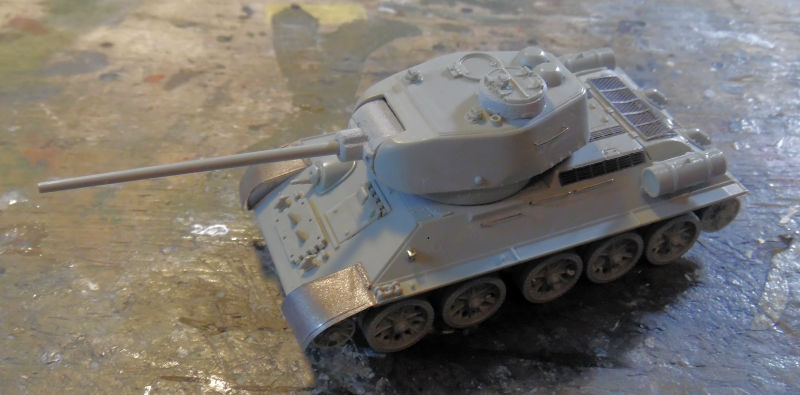
Someone else added those metal fenders, saving me the trouble....
And then this got basecoated with the dark green:

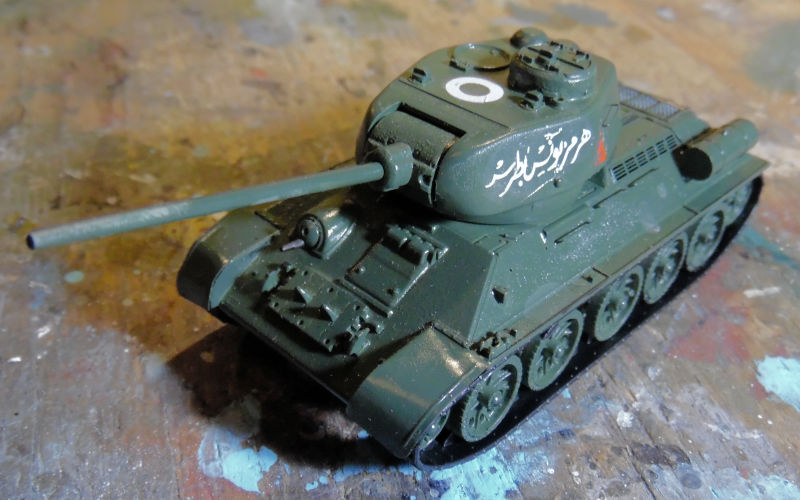
Then the decals went on. These are Braille Strike decals and went on well. I just forgot to trim them very close so some judicious cutting with a very sharp Exacto knife got them the right size. You can also see in my clumsiness, I messed up the red triangle on this side. Nothing a little paint can't fix:
Lastly, I've been talking about starting my P.1000 Ratte to make into a carrying case for my small scale vehicle contest entries. Well, one Hobby Day Monday I made good on that statement. No, it never existed, or was ever used. Yes, this is in 1/72 scale. No, I don't think I will count it as one of the collection....mostly because it is pure fantasy that never got built or used. But I am building it.
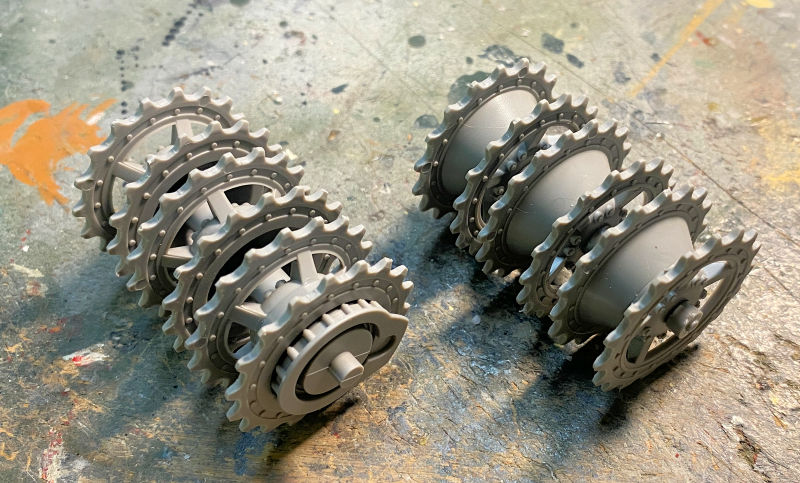
Here are all of the components and/or sub assemblies for the main track bogies. The drive sprockets are already finished:
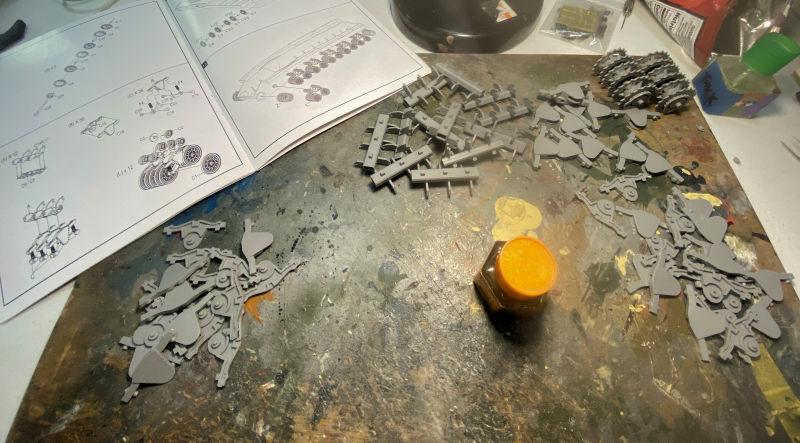
We had to make 32 of these rocker arms... or was it 36?

This kit gives you springs so that the bogies articulate:

Here's a close up of the drive sprockets:
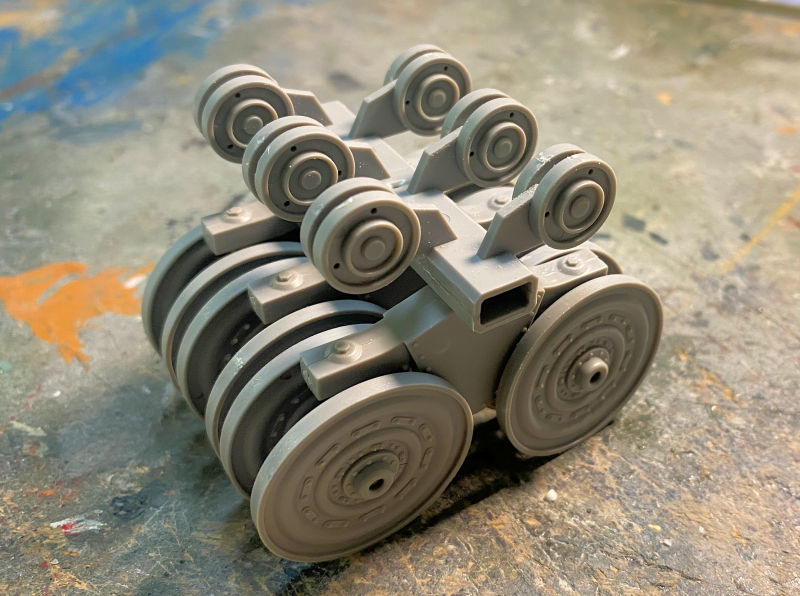
And finally, here is ONE bogie consisting of 44 parts in that one assembly.... I need to make eleven more:
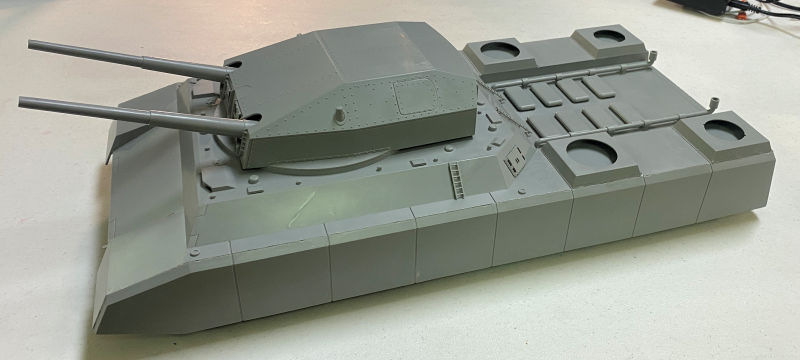
While that was drying, we finished up the majority of the main hull and turret:
Now in this back lot, given how much lumber we use, we are building a new Lumber Mill:
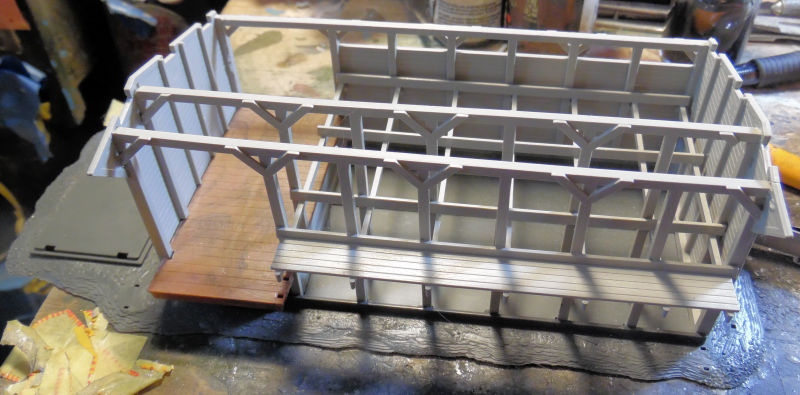
This is also a tribute of sorts for my paternal grandfather who was not permitted to serve in WWII: he owned one of these and because it was a vital industry back then, the government made sure he stayed on and supplied them throughout the war.
And that completes this tour of Maddog Manufacturing for this time. Thank you all for looking in and as always, comments are welcome.
In the first slipway here we have the Japanese PT-15 that finally got the base coat of grey on it:
In the next slipway, we continued work on the deck of the USS Enterprise. Some masking was pulled off, but the the yellow stripes were painted on the deck:
Later, the remaining elevator stripes were masked off, the yellow painted on it and then we added the red stripes on these same elevator stripes:
After some touchup, this deck is done:
Finally, in this last slipway, we worked on getting the railings on the Robert E. Lee looking more even and refined. Additional parts were added and the seams on the upper cabin and deck were filled as well:
That completes our tour so far of the Shipyards and so we move on to the Motor Pool.
Production has been picking up, starting with a small shelf queen project that I wanted on the display shelf. This is the Military Wheels 1/72 scale Russian Field Kitchen. We had started it some time ago, found the box again and decided it was time to get it finished. First off the kitchen and limber were completed:
Here's an idea of how small this is too:
The horses were in four parts. Seriously. Two body halves, the head and the tail. They seemed pretty desperate to add some kind of 'detail' to this model! It didn't help that the parts were all so badly molded that massive sanding, carving and other adjustments needed to be made:
Finally we got them painted:
Moving along to the next bay, the Syrian PzIV got a partial run of tracks from the spares box. More will go on this when additional track pieces are found:
Overall it's looking pretty good:
Next are two Distressed Kit Auction winnings. These were mostly assembled by someone else before they gave up and donated them to our club for our Auction. First is this Dragon StuG III ausf H that they had added photo etch zimmerit to:
This is going to be a Syrian StuG, and yes, there are pictures of several of these in Syrian service still sporting their Zimm. We started on the tracks for this for now:
Our last Syrian tank is this Trumpeter T-34/85 that they had given up on because one of the idler wheels disappeared. I conjured up a replacement pair and added them to this tank:
Next the tracks went on:
Someone else added those metal fenders, saving me the trouble....
And then this got basecoated with the dark green:
Then the decals went on. These are Braille Strike decals and went on well. I just forgot to trim them very close so some judicious cutting with a very sharp Exacto knife got them the right size. You can also see in my clumsiness, I messed up the red triangle on this side. Nothing a little paint can't fix:
Lastly, I've been talking about starting my P.1000 Ratte to make into a carrying case for my small scale vehicle contest entries. Well, one Hobby Day Monday I made good on that statement. No, it never existed, or was ever used. Yes, this is in 1/72 scale. No, I don't think I will count it as one of the collection....mostly because it is pure fantasy that never got built or used. But I am building it.
Here are all of the components and/or sub assemblies for the main track bogies. The drive sprockets are already finished:
We had to make 32 of these rocker arms... or was it 36?
This kit gives you springs so that the bogies articulate:
Here's a close up of the drive sprockets:
And finally, here is ONE bogie consisting of 44 parts in that one assembly.... I need to make eleven more:
While that was drying, we finished up the majority of the main hull and turret:
Now in this back lot, given how much lumber we use, we are building a new Lumber Mill:
This is also a tribute of sorts for my paternal grandfather who was not permitted to serve in WWII: he owned one of these and because it was a vital industry back then, the government made sure he stayed on and supplied them throughout the war.
And that completes this tour of Maddog Manufacturing for this time. Thank you all for looking in and as always, comments are welcome.
The Duke
Virtuoso of Miniatures
"Do you know what the chain of command is? It's the chain I get and beat you with 'till you understand who's in ruttin' command!"
-Jayne Cobb, Firefly Episode 2 "The Train Job"
We are modelers - the same in spirit, in hunger to insanely buy newly released kits, hustlers in hiding our stash from our better halves and experts in using garbage as replacements for after-market parts.
Virtuoso of Miniatures
"Do you know what the chain of command is? It's the chain I get and beat you with 'till you understand who's in ruttin' command!"
-Jayne Cobb, Firefly Episode 2 "The Train Job"
We are modelers - the same in spirit, in hunger to insanely buy newly released kits, hustlers in hiding our stash from our better halves and experts in using garbage as replacements for after-market parts.
-
tempestjohnny
- Elite Member
- Posts: 3372
- Joined: Sat Oct 15, 2016 4:51 am
- Location: Naples. FL
Re: Maddog Manufacturing Open for 2024
Your production never ceases to amaze me
-
BlackSheep214
- Elite Member
- Posts: 10492
- Joined: Sun Apr 06, 2014 8:47 pm
Re: Maddog Manufacturing Open for 2024
Fantastic stuff, Mark! I've always wanted to build the Otter aircraft. The Russian Field Kitchen is on my watch list over at scalehobbyist.
An interesting display idea for your Badger aircrafts - build a couple Vipers or F-15 Eagles with it escorting them away from US airspace.
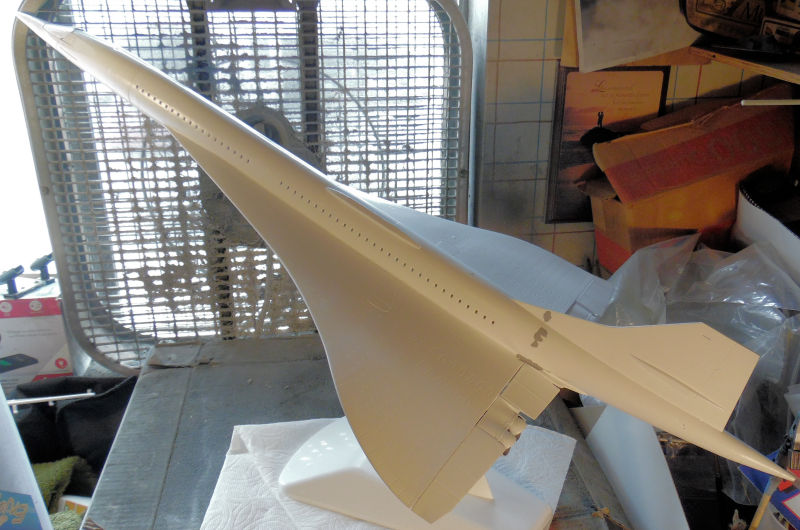
I'm loving the display for the Concorde. Now I gotta get one for myself. I did one in my youth years - I recall it had British Airways decals. Fun kit then...
Keep it coming, Mark!
An interesting display idea for your Badger aircrafts - build a couple Vipers or F-15 Eagles with it escorting them away from US airspace.
I'm loving the display for the Concorde. Now I gotta get one for myself. I did one in my youth years - I recall it had British Airways decals. Fun kit then...
Keep it coming, Mark!
“Who controls the skies, controls the fate of this Earth”
Author unknown- 352nd Fighter Group, Blue-Nosed Bastards of Bodney
“Send one plane it’s a sortie; send two planes it’s a flight; send four planes it’s a test of airpower. - Richard Kohn
Author unknown- 352nd Fighter Group, Blue-Nosed Bastards of Bodney
“Send one plane it’s a sortie; send two planes it’s a flight; send four planes it’s a test of airpower. - Richard Kohn
-
Medicman71

- Elite Member
- Posts: 9775
- Joined: Mon Apr 07, 2014 9:32 am
- Location: Houston, Tx
Re: Maddog Manufacturing Open for 2024
Some great looking builds Mark!
Mike
Sponsored by Boeing, Lockheed Martin, Northrop Grumman, Saab, BAE, and Dassault
Sponsored by Boeing, Lockheed Martin, Northrop Grumman, Saab, BAE, and Dassault
Re: Maddog Manufacturing Open for 2024
Looking good Mark!
That P.1000 Ratte really looks like a 1:48 if not even a 1:35 sized kit !
Like the horses as well, not that often seen here!
- Kari
That P.1000 Ratte really looks like a 1:48 if not even a 1:35 sized kit !
Like the horses as well, not that often seen here!
- Kari
---
On the bench:
Tamiya F-4B Phantom II 1/48
Kinetic F-16A (new tool) 1/48
https://www.facebook.com/GrundAsk-Scale ... 721218708/
On the bench:
Tamiya F-4B Phantom II 1/48
Kinetic F-16A (new tool) 1/48
https://www.facebook.com/GrundAsk-Scale ... 721218708/