Maddog Manufacturing Open for 2024

Show off your completed work! One or two pictures and a brief explanation. Let others have a quick look at your finished masterpieces!
User avatar
Duke Maddog
Elite Member
Posts: 7091
Joined: Tue Jun 03, 2014 11:22 am
Location: Rowland Heights, CA

Maddog Manufacturing Open for 2024

Post by Duke Maddog »

Even though I have a number of projects going from last year, I'm going to skip posting them and just start this with this latest tour.

Well, despite having a lot of time to work on my hobby thanks to Hobby Days; I have had no real time to start a new tour. Because of that, this will be another two part post so all my projects can be viewed.


So, all aboard the trams everyone, it's time to start our tour!


As always, we start in the Hangar. We only worked on one aircraft this past week. It's the old Italeri kit of the 1/72 scale B-66 Destroyer. The cockpit had been built already so it finally got painted. Yes, it might look a bit sloppy, but it won't be seen once this gets closed up inside the fuselage:


Image


Image


Later that is what we did, we closed this up, cemented it and allowed it to dry:


Image


It was so surprising how well this fuselage.wings and tail fit together! As you can see here, half the cockpit can't even be seen:


Image


The canopy was added and masked off for paint next:


Image


...which came later. We hit this with a black primer to see what issues we had:


Image


We found a considerable number of small issues, (all of which I brought on myself!) so some filler, sanding and more filler and sanding happened:


Image


We had started out with Tamiya putty, then moved to Mr. Surfacer 500. Later we shot a gloss black coat on this to see if everything got fixed. It didn't so another round of sanding and filling will be happening.... not that you can see here:


Image


Finally, the little AS-15 Kent had it's trailer painted up. Not too much longer before that one gets done:


Image


That completes the tour of the Hangar for now, our tour continues in the Shipyards....


​Here in the Shipyards, we tried to mask off the main deck of the 1/600 scale USS Enterprise. It started out pretty good:


Image


However, we found out that the flexible Tamiya tape doesn't play well with the cold and humidity we had that night. Expensive lesson to learn:


Image


The regular Tamiya tape seemed to stick well, unless it was on the flexible stuff, so everything will be replaced with Tamiya tape later.


In the next slipway, we have the Tamiya British Vospers Perkasa. The main bridge was painted and detailed before being closed up inside the cabin:


Image


Meanwhile, the barrel broke on the 40mm Bofors so we had to fabricate a new one and replace the broken one. I can hear the comments now, but this was the best way to make sure it glued straight:


Image


The crew at least showed up to prepare for training:


Image


We started adding some of the detail parts to the main deck; the Bofors is only dry fit right now, that is why it's cocked. There isn't much to see here:


Image


More parts went on....


Image


....and still more. The torpedoes are only dry fit to see how well they place, we still need to touch them up. The hand rail stanchions are installed, they just need to be rigged:


Image


That is as far as we got on that one, so we move on to the next slipway where the Robert E Lee has been fighting me. In this shot, you can see the incredible warp of the rear railings that required us to glue, clamp; wait for it to dry. Then move a little further, glue and clamp, etc. You get the idea:


Image


Later the rear deck got added. Because of a mistake made earlier, I had to compensate for it by shaving a section of one side of this so that the paddle wheel housing would fit where it's supposed to... or close enough:


Image


Once that was dry enough, we added the upper cabin walls to the deck. These too needed to be finessed into place. The curved section next to the housing needed to be shaped to fit:


Image


Later we added the front portion of that deck after prepping the upper parts of the cabins and pylons below. This also needed to be shaved on the one side so it would sit straight and not have a huge gap. You can see here how much persuasion it needed to hold in place:


Image


When the tape came off, it looked pretty good:


Image


While all that had been drying, we went to work on the Grand Staircase:


Image


Again it took some serious finagling to get that staircase installed. We had to fix the railings three times before everything stayed in place as it supposed to do:


Image


Here's the look over all so far. It's starting to look like a riverboat:


Image


Later the forward cabin went on the deck. This was slightly easier to build, but we still had some issues with some gaps, too-long pieces, and other issues. After dealing with them and getting everything cemented down, I'm happy with the results:


Image


Just for fun, we test fit the upper deck on top of all this. It's going to be a bit easier than the previous two decks:


Image


That concludes this tour of the Shipyards for now; as we head on over to the Motor Pool, you can see some damaged buildings and sandbag emplacements we are working on for another project:


Image


I found a whole mess of Matchbox bases that they used to include in all their armor models, some were even duplicates. My idea is to find a way to arrange them all on a board in some manner, add these ruin pieces, fill in the area between them with putty or something and create some kind of scene/base. It'll be interesting.....


The Motor Pool tour will continue in the next post due to the large quantity of pics for that tour.......
The Duke
Virtuoso of Miniatures

"Do you know what the chain of command is? It's the chain I get and beat you with 'till you understand who's in ruttin' command!"
-Jayne Cobb, Firefly Episode 2 "The Train Job"

We are modelers - the same in spirit, in hunger to insanely buy newly released kits, hustlers in hiding our stash from our better halves and experts in using garbage as replacements for after-market parts.
User avatar
Duke Maddog
Elite Member
Posts: 7091
Joined: Tue Jun 03, 2014 11:22 am
Location: Rowland Heights, CA

Re: Maddog Manufacturing Open for 2024

Post by Duke Maddog »

And now for our tour of the Motor Pool. There's a lot going on here that also includes a couple of started models as well. So without further ado, let's visit this first bay here.
In this first bay we have the M103A2 Marine tank getting it's base coat:
Image

After that dried, we added the decals and some detail painting. This one is very close to being done:
Image

Speaking of almost done, in the next bay we have this Russian SCUD C that has been a bit of a challenge all this time. It finally got the correct launcher arms on it:
Image

Then all of the new parts were painted up:
Image

Later on we weathered the wheels and tires; put them together and installed them on this model. Some additional weathering was applied to the vehicle as well:
Image

On this model, they had no call outs for decals, even though there was a full sheet of them included. Well, I had to add something, so this beastie now sports a Guards emblem on the doors:
Image

Final weathering was added and the missile was sent out to be painted:
Image

Yeah, that beastie is almost done too.
Moving on, in this next bay is the Stryker engineering vehicle. It's got it's basecoat of green, now we just need to find the decals so we can finish this one too:
Image

In this next bay is a model we previously started, it's one of two GAZ AAA trucks that has been slowly worked on between other projects. Here we have the cab half built and the bed installed:
Image

Only a few additional parts were added to this:
Image

In the interest of working on something fast and easy, we pulled out this M109A7 from Foreart and got started on it. Hull was done first:
Image


While that was drying, we completed the basic upper turret assembly by adding many of the detail parts to it. We had been having difficulty with the gun mount so that is why we went this route:
Image

The hull was indeed fast and easy, we got wheels and tracks, detail parts and everything else installed that wouldn't break with handling:
Image

Finally we got the gun mount sorted and were able to finish the turret almost completely:
Image

Yes, that turned metal barrel and 3-D printed muzzle brake came in the kit, not aftermarket. It's coming togfether nicely:
Image

Next we assembled the turret baskets and then added all the photo etch to this vehicle:
Image

Moving on to the next bay, we have this long-term shelf queen. It's the Modelcollect 1/72 scale BMP-3 with full cage armor! It has to have been close to nine years since I picked this up again. First thing that we needed to do was to try and assemble the turret cage armor. This was the result of trying to get the main parts at least completed:
Image

Here's our first attempt to mount it on the turret. I figured it would be easier putting the straight lengths of the rear cage on after the main parts had dried:
Image

It got done, but still looks like crap! Even then something was off on it:
Image

Our attempt to fix it resulted in the loss of a strut:
Image

While that was drying, we went ahead and installed the tracks on the wheels and sprockets. These tracks will be covered in deep skirts so we only did the lower runs of track:
Image

In testing this in the hull, we found numerous protrusions on the bottom of the cage armor that kept snagging on hull parts... and I hadn't even put in all the hatches and such:
Image

Eventually, we attached all the hatches and other additional detail parts to the main hull. Some filing had been done on the bar armor, but it only helped a little:
Image

I originally had hoped to paint this with the three tone camouflage, but that ain't gonna happen. Now that the turret is mostly completed, it got a coat of the base color that I'll be painting it:
Image

After all that, we wanted to get back to a simple build, so out came this Academy 1/72 scale French Le Clerc tank. Upper and lower hull got assembled first:
Image

Then the wheels and sprockets were added, later the tracks went on:
Image

Finally, the turret was completed, the tracks added and the side skirts installed:
Image

And that quickly, this was ready for paint:
Image

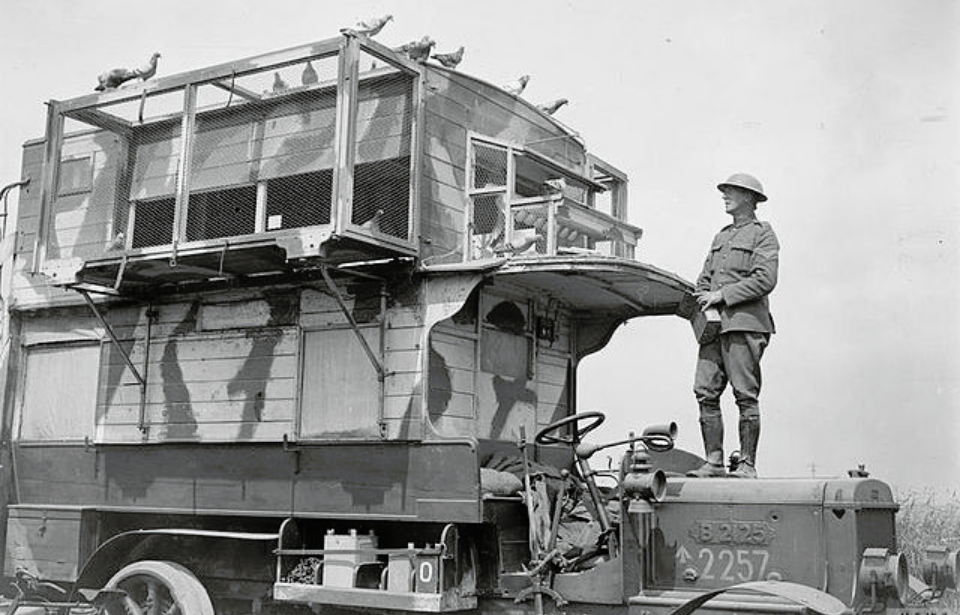
Finally, in this last bay, I decided that the last Roden bus I needed to build should be done. Out it came and the main body and chassis were assembled:
Image

We then added the interior and painted it:
Image

The underside got the suspension installed afterward:
Image

While that was drying, the pigeon loft was mostly built:
Image

It made for a pretty good fit. This is only dry fit too, I want to keep it separate until everything was done before it gets cemented in place permanently:
Image

After that,the lower part got painted, the wheels and fenders got installed and the main window covers went on:
Image

Once that was sufficiently dry, the remaining headlights, steering wheel, and other detail parts were added:
Image

The top pigeon loft was also painted and for fun, here it is dry fit again on the bus:
Image

While that was drying, we went to work detailing the pigeon loft. Pigeons like to nest in straw, so we added some to the pigeon loft interior:
Image

We used this rough twine cut into 1/8th to 1/16th inch lengths:
Image

Then we slathered the floor with Gator Grip glue and poured the straw inside, pressed it down and then shook the loose straw out:

Now that the straw was in place, we started adding the screen material on all the sections we could before closing it up:
Image

Once again the loft was dry fit in place, and the pigeons came home to roost:
Image

I expect that in a day or so, we might have this bus finished!
And that concludes this latest tour of Maddog Manufacturing! I do hope you enjoyed the latest progress we've made here. As always, comments are welcome, thanks to all who came in to take this tour!
The Duke
Virtuoso of Miniatures

"Do you know what the chain of command is? It's the chain I get and beat you with 'till you understand who's in ruttin' command!"
-Jayne Cobb, Firefly Episode 2 "The Train Job"

We are modelers - the same in spirit, in hunger to insanely buy newly released kits, hustlers in hiding our stash from our better halves and experts in using garbage as replacements for after-market parts.
User avatar
keavdog
Elite Member
Posts: 3560
Joined: Thu Jan 10, 2019 1:14 am
Location: Goodyear, AZ

Re: Maddog Manufacturing Open for 2024

Post by keavdog »

Busy as usual Mark. That type B w/pigeon loft sent me googling. I know homing pigeons were used but never thought how they were cared for. Interesting subject.

Image

Did you ever finish the A-400?
Thanks,
John
User avatar
BlackSheep214
Elite Member
Posts: 10422
Joined: Sun Apr 06, 2014 8:47 pm

Re: Maddog Manufacturing Open for 2024

Post by BlackSheep214 »

Mark! I have the same pigeon loft bus in my stash. Looks like you gave me some good ideas on the straw.

As far as the screen goes, I had thought about using some scrap pieces of window screen. Not sure if it’ll work as to scale but we’ll see.
“Who controls the skies, controls the fate of this Earth”

Author unknown- 352nd Fighter Group, Blue-Nosed Bastards of Bodney

“Send one plane it’s a sortie; send two planes it’s a flight; send four planes it’s a test of airpower. - Richard Kohn
User avatar
Stuart
Elite Member
Posts: 9601
Joined: Sun Apr 06, 2014 1:06 pm
Location: North Wales
Contact:

Re: Maddog Manufacturing Open for 2024

Post by Stuart »

bloody heck as like Mark, that's a massive pile of work - which all looks superb! :shoutout: :shoutout: :shoutout:
Stuart Templeton 'I may not be good but I'm slow...'

My blog: https://stuartsscalemodels.blogspot.com/
User avatar
Medicman71
Elite Member
Posts: 9729
Joined: Mon Apr 07, 2014 9:32 am
Location: Houston, Tx

Re: Maddog Manufacturing Open for 2024

Post by Medicman71 »

Some really nice builds Mark!
Mike

Sponsored by Boeing, Lockheed Martin, Northrop Grumman, Saab, BAE, and Dassault
User avatar
Duke Maddog
Elite Member
Posts: 7091
Joined: Tue Jun 03, 2014 11:22 am
Location: Rowland Heights, CA

Re: Maddog Manufacturing Open for 2024

Post by Duke Maddog »

keavdog wrote: Wed Feb 14, 2024 6:27 pm Busy as usual Mark. That type B w/pigeon loft sent me googling. I know homing pigeons were used but never thought how they were cared for. Interesting subject.

Image

Did you ever finish the A-400?
Thank you John! Yes, the pigeon bus was a very interesting subject. It ls also the final bus in the entire 1/72 scale Roden line that I needed to build and now I have it done.

Yes, I did finish the A-400 at the beginning of last year:

Image


That is so cool Steve! I look forward to seeing yours done! As for the screen, scrap window screen is far too large for e 1/72 scale model like this. The kit comes with a plastic mesh material, but in my opinion, it is still slightly too large. Still, it looks good when painted, and is probably the closest you'll come to screen material.

Thank you Stuart! Now to get going on more of these to bring them over the finish line.

Thank you Mike!
The Duke
Virtuoso of Miniatures

"Do you know what the chain of command is? It's the chain I get and beat you with 'till you understand who's in ruttin' command!"
-Jayne Cobb, Firefly Episode 2 "The Train Job"

We are modelers - the same in spirit, in hunger to insanely buy newly released kits, hustlers in hiding our stash from our better halves and experts in using garbage as replacements for after-market parts.
User avatar
jeaton01
Elite Member
Posts: 2071
Joined: Thu Apr 23, 2020 9:20 am
Location: Northern California
Contact:

Re: Maddog Manufacturing Open for 2024

Post by jeaton01 »

Enjoyed the tour, Mark. Always fun to see the wide range of subjects.
My modelling website, with build logs.

http://goldeneramodel.com/mymodels/mymodels.html
User avatar
LyleW
Admin
Posts: 13657
Joined: Fri Dec 13, 2013 7:25 am
Location: Mt. Washington KY

Re: Maddog Manufacturing Open for 2024

Post by LyleW »

The pigeon palace has to be a favorite! All of these are well done!
To make each build less crappy than the last one. Or, put another way, "Better than the last one, not as good as the next one!"..
User avatar
Duke Maddog
Elite Member
Posts: 7091
Joined: Tue Jun 03, 2014 11:22 am
Location: Rowland Heights, CA

Re: Maddog Manufacturing Open for 2024

Post by Duke Maddog »

Thank you John! Stay tuned, I got more!

Thank you Lyle! I do love that pigeon palace!
The Duke
Virtuoso of Miniatures

"Do you know what the chain of command is? It's the chain I get and beat you with 'till you understand who's in ruttin' command!"
-Jayne Cobb, Firefly Episode 2 "The Train Job"

We are modelers - the same in spirit, in hunger to insanely buy newly released kits, hustlers in hiding our stash from our better halves and experts in using garbage as replacements for after-market parts.
Post Reply

Return to “Member's Gallery”