Hi Guys - Thought I'd post some WIP. its not really new. I started the project 4-6 weeks ago so I'll post some of the highlights since then up till now.
This was a buddy build with a fellow modeler who lives near my house. He wanted to improve his construction techniques. I let him work on the construction of the main sub-assemblies. and time to time I would do check ups on the quality of his work.
If anyone wants to see the complete photo gallery, I've posted them on my flickr page https://flic.kr/s/aHsm8Nh8yN
Chassis and Engine Construction
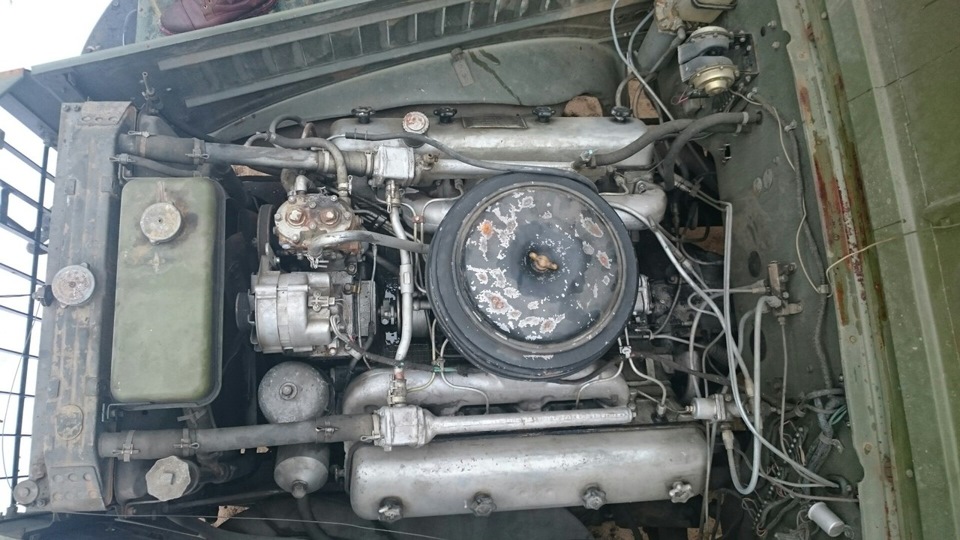
Chassis looks awesome. it was made of many small parts. the details however will be mostly unseen once he driver's cabin and open cargo area are installed. same goes with the engine. the basic shape is real good with many intricate details. no wiring were included.
Chassis and Engine Painted
I painted the chassis with XF-69 Nato Black and toned it down with a layer of XF-63 German Grey. The engine block was painted Alclad ALC-101 Aluminum, while the radiator was sprayed with Xtreme AK-480 Dark Aluminum.
I minimized the over-spray by simply masking different areas with masking tape. despite that, there were some slight over-spray. and touch-up those areas with a paint brush.
Hobby Boss Kraz-255B Russian Truck
- dmminiatures
- Master Member
- Posts: 536
- Joined: Mon Apr 07, 2014 10:16 am
Hobby Boss Kraz-255B Russian Truck
Monty / dmminiatures
Re: Hobby Boss Kraz-255B Russian Truck
Monty, what a great idea and what a fantastic way for someone to improve in our hobby. To have such a skilled mentor on your side is a blessing. All the best for your project!dmminiatures wrote: This was a buddy build with a fellow modeler who lives near my house. He wanted to improve his construction techniques. I let him work on the construction of the main sub-assemblies. and time to time I would do check ups on the quality of his work.
- dmminiatures
- Master Member
- Posts: 536
- Joined: Mon Apr 07, 2014 10:16 am
Re: Hobby Boss Kraz-255B Russian Truck
Weathering the Chassis and Engine
I gave both objects the same basic weathering, which were a mix of AMMO PLW 1620 Dust, and 1621 Desert Brown, 1622 Ochre for Sand Color. Usually with these AMMO washes, after I brush one of them on, I wait for 5-7 minutes before mopping them up with Tamiya enamel thinners. and then apply the other PLWs.
Without the plumbing and wiring, the engine look bland. I used stretched sprues for the larger tubes, and EZ-Line thread for the smaller wires. EZ-Lines are stretchy threads use for railroad and shipping. the come in several sizes and they adhere very well with just common white glue.
At this stage, the focus of the weathering is on the engine. I added more grime and filth towards the lower part of the engine using MIG.1407 Engine Grime, 1408 Fresh Engine Oil, and 1409 Fuel Stain, mixed up with pigment powder MIG.3013 Rubble and 3014 Russian Earth.
the cylindrical air filter was not yet added at this stage. The exhaust manifolds were XF-64 Red Brown and sponged with MIG.1004 Light Rust Wash.
Last edited by dmminiatures on Thu Nov 23, 2017 7:54 am, edited 2 times in total.
Monty / dmminiatures
- dmminiatures
- Master Member
- Posts: 536
- Joined: Mon Apr 07, 2014 10:16 am
Re: Hobby Boss Kraz-255B Russian Truck
Thanks! The least I can do, Mostrich. His gluing skills, attention to properly cut and clean parts have improved. No longer blobs of CA glue or big seam lines staring at you. He still requires some more control over the use of adhesives like Tamiya Extra Thin, but I hope there are more projects I can share with him in the future.mostrich wrote: Monty, what a great idea and what a fantastic way for someone to improve in our hobby. To have such a skilled mentor on your side is a blessing. All the best for your project!
Monty
Monty / dmminiatures
- dmminiatures
- Master Member
- Posts: 536
- Joined: Mon Apr 07, 2014 10:16 am
Re: Hobby Boss Kraz-255B Russian Truck
Some real good reference on the Kraz-255B engine. I found out that there are no two engines alike. I always found small differences among them, be that color, wiring, optional features.
Another thing that I found out was the Kraz-255 series seems a very popular topic. there are a TON of images and reference about this in the Interwebs. just makes my life a bit easier LOL
Monty / dmminiatures
- dmminiatures
- Master Member
- Posts: 536
- Joined: Mon Apr 07, 2014 10:16 am
Re: Hobby Boss Kraz-255B Russian Truck
The Driver's Cabin
The interior of the cabin pretty much look like the reference photos. However, whithout the black rubber floor mat. They povide decal sheet for the gauges. I recommend you cut the gauges individually for easy application.
The interior base color was painted the same color as the exterior. I used Tamiya XF-58 Olive Green. They were then gradually toned down by spraying a thin mix of the base color and XF-4 Yellow Green and subsequently XF-66 Light Grey. The seats cushion, steering wheel, gear stick, and handbrakes are XF-85 Rubber Black and lighted up with Nato Grey.
Weathering
Weathering was light. chipping was done using sponge and Mr. Metal 212 Iron.
Followed with washing with MIG.1601 PLW Medium Grey and MIG.1621 PLW Desert Brown, and some splatter with the same mix of colors.
The instrument panels were painted and added decals with the help of Mr. Mark Setter (blue bottle). the gauges and dashboar lights were glossed up with MIG Cyrstal Red and Crystal Glass.
Reference photos of the cabin
A well preserved Kraz-255
Monty / dmminiatures
Re: Hobby Boss Kraz-255B Russian Truck
Great work. As a side note. I like working with phot's for reference. But if there are to much I find it difficult to choose which ones to follow and which ones to ignore. Any tips on that?
- dmminiatures
- Master Member
- Posts: 536
- Joined: Mon Apr 07, 2014 10:16 am
Re: Hobby Boss Kraz-255B Russian Truck
Finalizing the Cabin
bonnet, doors and clear parts are glued with Extra Thin. they were later covered with Mr. Masking Sol R for the lights and Tamiya masking tape for the window clear plastic.
The cabin had some nice PE bits for the window frames. at this stage the engine compartment is pretty bare.
Installing the Cabin
When I was about to combine the engine compartment+driver's cabin together with the chassis, I found out that the engine block has a wide upper part, and the engine compartment had a narrow opening at the bottom. I have done everything I could but it failed. So the only thing I could think of was to break the front grill and hope I can glue them back together.
There were six alignment pins under the driver's cabin. Two of them were too small so I had to drill the holes to widen them to fit the pins.
The Fix
Gluing back the grill was not easy as it turned out. I had to add a 0.2mm plaplate under the grill, if not it wont adhere well. Lesson learned: I should keep the grills unglued before installing the cabin/engine compartment onto the chassis.
Plumbing and Wiring
I followed reference photos to work on plumbing and wiring of the engine compartment. Since there are many small differences, I just choose one and work based on that photo.
The main material for the plumbing and wiring is good-old stretch sprue for the larger cables/tubes. you can see the different colors of plastics I used: tan, grey, white. I always keep a few left over stretch sprue from previous builds. you never know if you need them in a hurry.
smaller wires are made of EZ-line threads. The tubes were painted Mr. Color No.8 Silver and XF-85 Rubber Black based on the reference photo and subsequently weathering with the same MIG engine grime and washes I used earlier.
Monty / dmminiatures
- dmminiatures
- Master Member
- Posts: 536
- Joined: Mon Apr 07, 2014 10:16 am
Re: Hobby Boss Kraz-255B Russian Truck
Hi Borg - I don't really have any special tips. But how i decide which one to follow depends on several factors. My thoughts include:BorgR3mc0 wrote:Great work. As a side note. I like working with phot's for reference. But if there are to much I find it difficult to choose which ones to follow and which ones to ignore. Any tips on that?
1. How close can I follow or replicate the photo references.
2. How interesting is the reference if I replicate it on my model.
3. Could I combine 2-3 photo reference to make my model more interesting.
Ideally the photo should have both no.1 and no. 2. I usually ask these questions to myself and hope that i can answer YES for no. 1 and 2. if not, then my choice fall in either one or choose reason no. 3.
Monty / dmminiatures
- Stikpusher
- Moderator
- Posts: 19020
- Joined: Sat Apr 05, 2014 8:37 pm
- Location: Ceti Alpha 5
Re: Hobby Boss Kraz-255B Russian Truck
Man you are making rapid progress on this! I’m enjoying the show...
"Surely I have made my meaning plain? I intend to avenge myself upon you, Admiral. I have deprived your ship of power, and when I swing 'round, I intend to deprive you of your life."
FLSM
FLSM