1/32 Tamiya F4U-1a Corsair - Boyington 17740
-
speedgraflex

- Moderator
- Posts: 11129
- Joined: Fri Feb 10, 2017 11:08 pm
- Contact:
Re: 1/32 Tamiya F4U-1a Corsair - Boyington 17740
The exhausts turned out so well, John! What a difference seeing the metal thinned to scale! I am always compiling lists of "areas of excellence" in building, which would include properly thinning visible surface details. You're an ace!
Make more models!

Re: 1/32 Tamiya F4U-1a Corsair - Boyington 17740
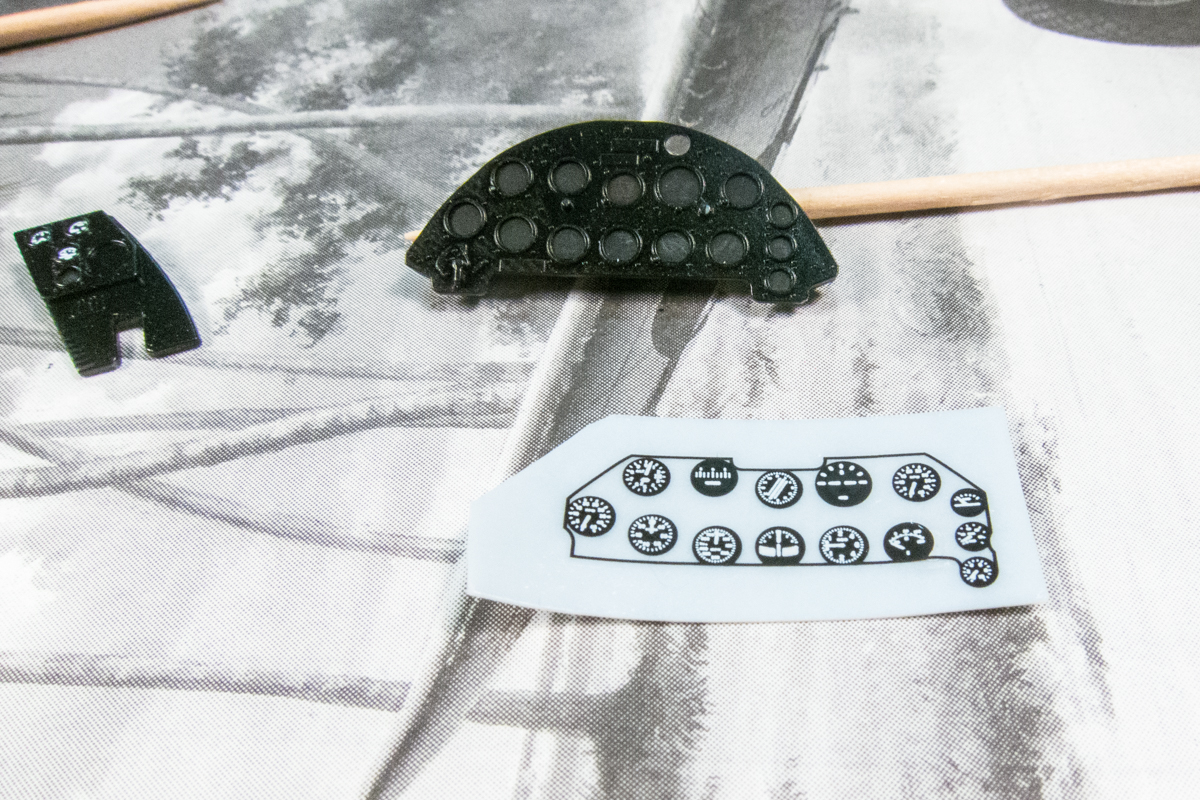
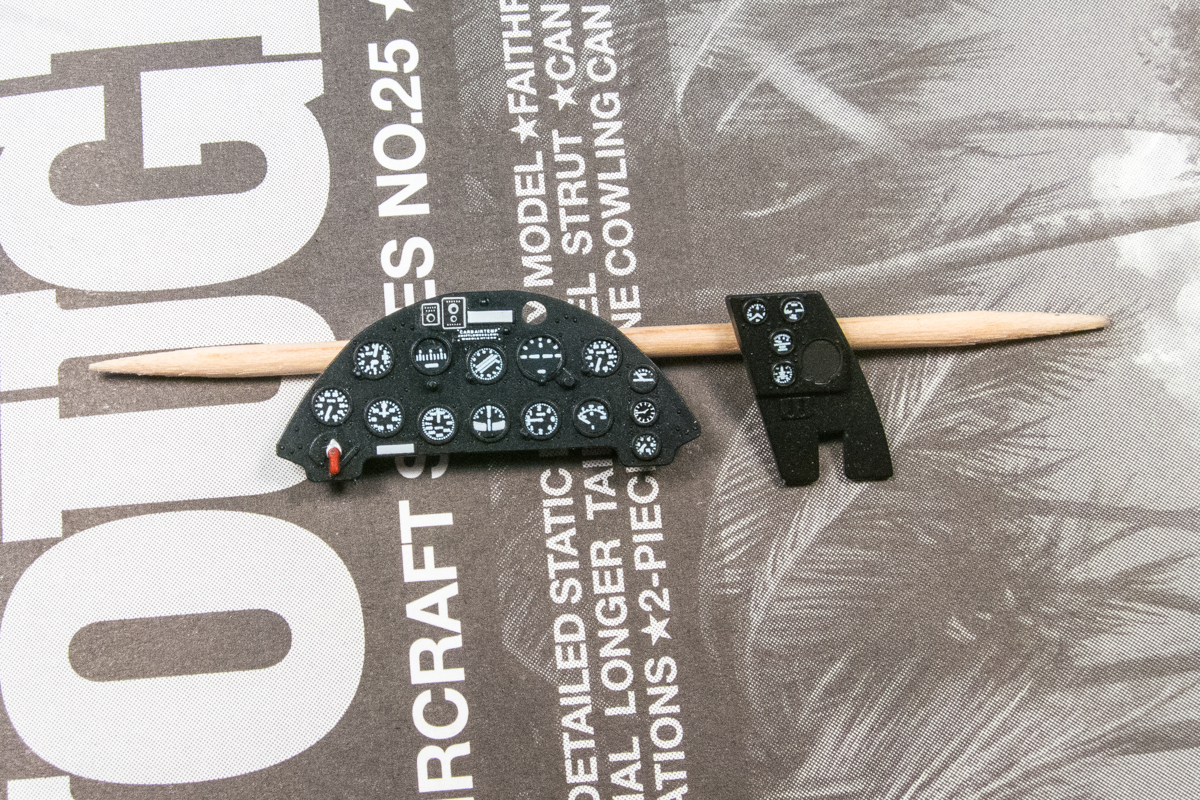
Thanks guys! Another little thing that I wanted to take a look at was the instrument panel. Tamiya does something a little bit different here. They provide a clear backing piece to the solid plastic instrument panel face. The gauges are supplied as decals that you apply to the BACK of the clear parts. So the you have a clear lens in front of the gauges without having to mask. Neat eh?
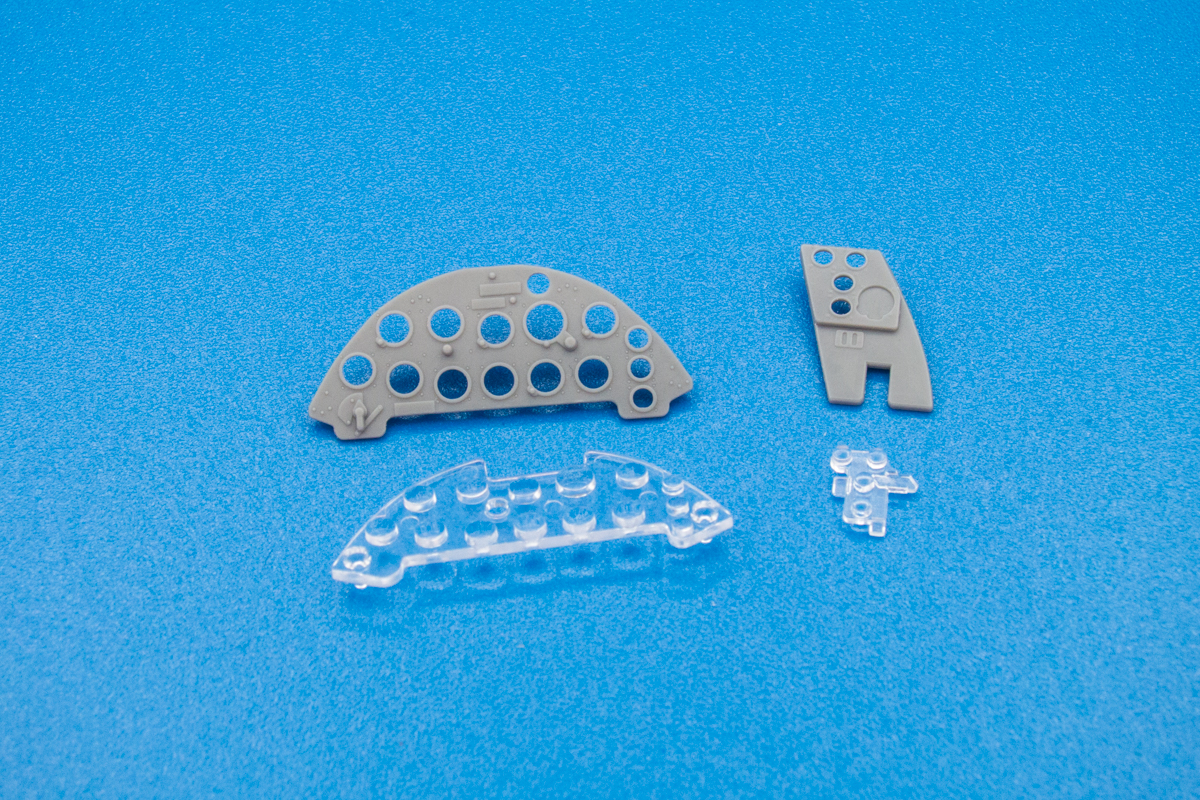
The clear plastic is domed for each gauge, giving a weird magnifying effect to whatever is behind it. Since there is so much clear plastic between the decal and the front of the panel, I didn't think it would look good. So I decided to apply the decals to the FRONT of the clear parts and do the clear glass in a different way.
I flattened the domed surfaces on the clear parts.
Since I didn't need the clear parts to be clear anymore, I glued the backing to the instrument panel and paint it black.

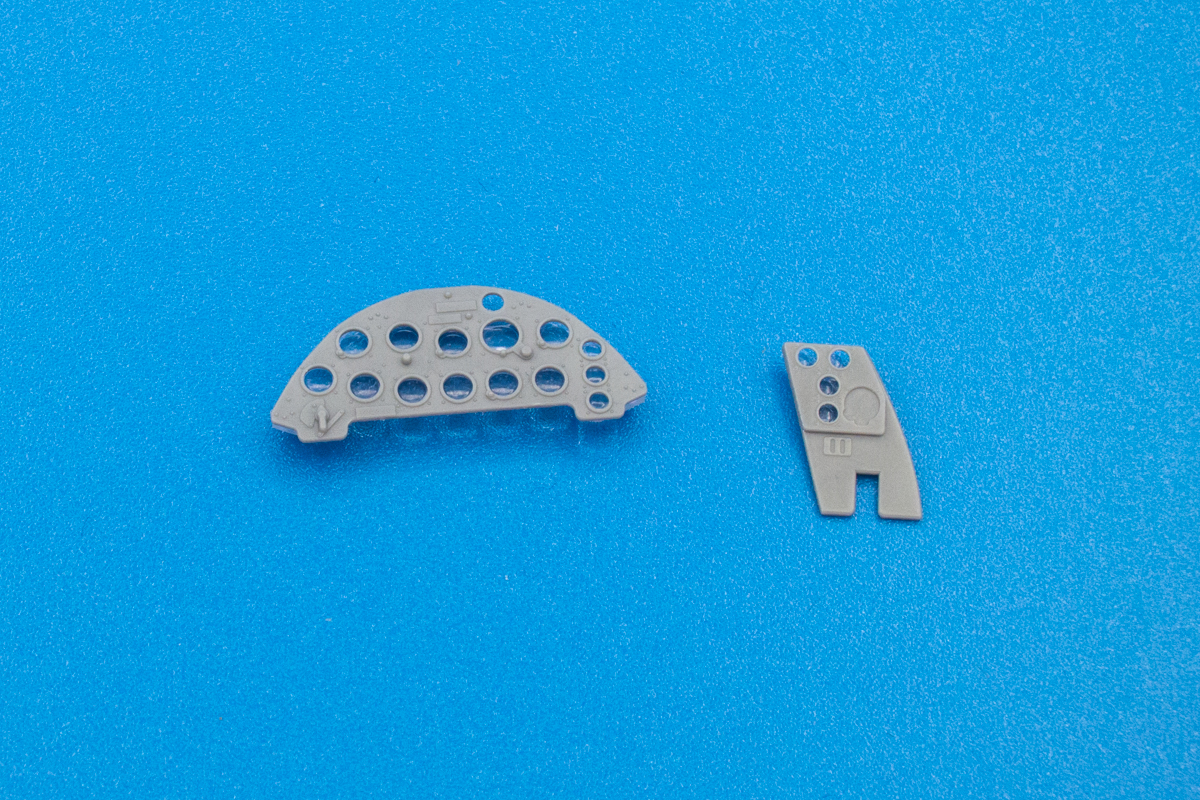
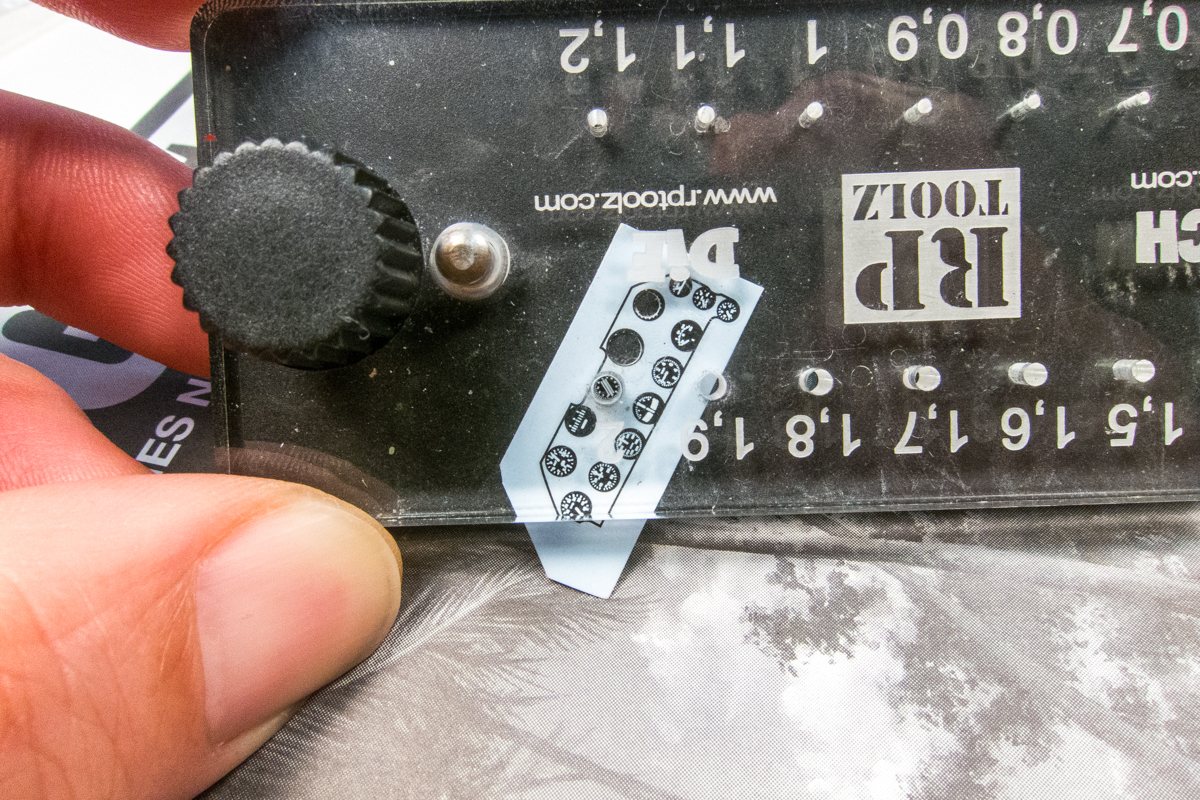
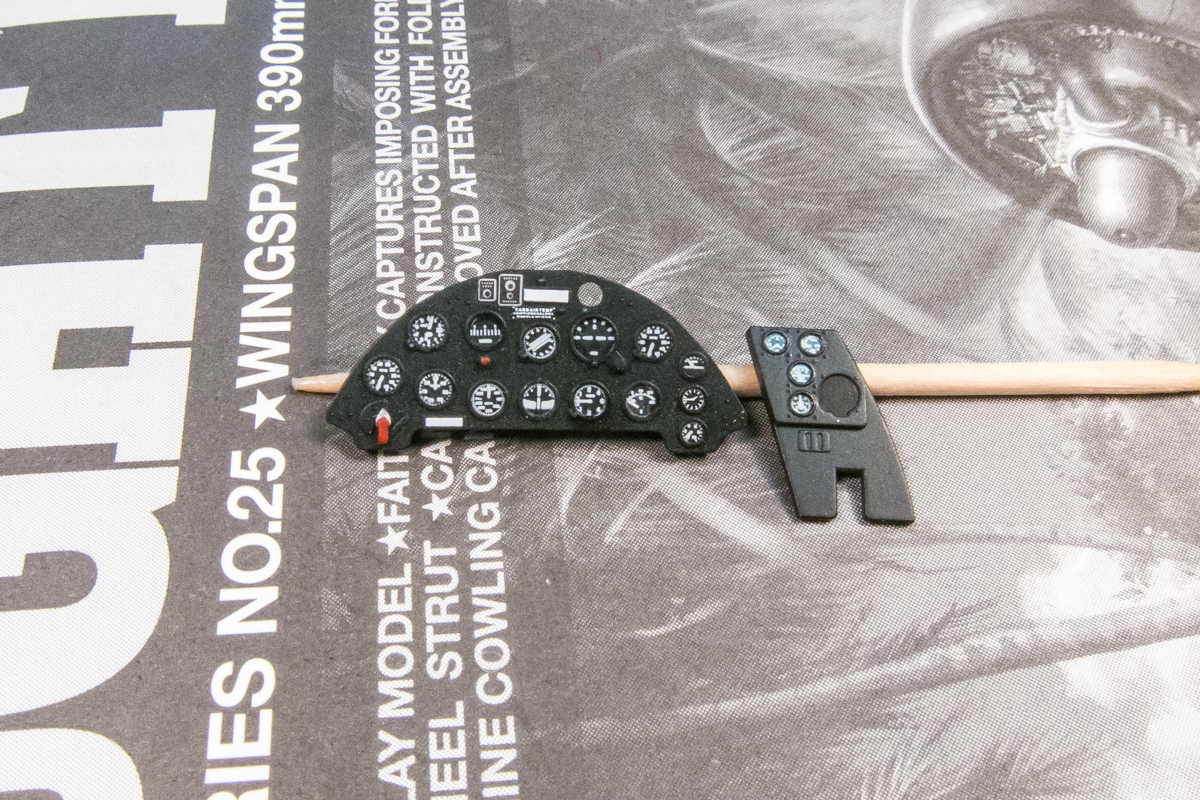
Starting with the smaller side panel, I punched out the instruments one by one and started applying them to the side panel. If you remember, the decal is printed reversed so I can't see any of the gauge details.
I noticed that my punched gauges were not centered. Not wanting to mess up the main instrument panel, I wet the decal, removed it and put it back on the wet backing reversed so that I could see the gauge details. You can see that the white gauges are not perfectly centered within their black backgrounds. I'm going to let this dry and punch them out properly tomorrow.
The clear plastic is domed for each gauge, giving a weird magnifying effect to whatever is behind it. Since there is so much clear plastic between the decal and the front of the panel, I didn't think it would look good. So I decided to apply the decals to the FRONT of the clear parts and do the clear glass in a different way.
I flattened the domed surfaces on the clear parts.
Since I didn't need the clear parts to be clear anymore, I glued the backing to the instrument panel and paint it black.
Starting with the smaller side panel, I punched out the instruments one by one and started applying them to the side panel. If you remember, the decal is printed reversed so I can't see any of the gauge details.
I noticed that my punched gauges were not centered. Not wanting to mess up the main instrument panel, I wet the decal, removed it and put it back on the wet backing reversed so that I could see the gauge details. You can see that the white gauges are not perfectly centered within their black backgrounds. I'm going to let this dry and punch them out properly tomorrow.
John aka JKim
-----------<><

-----------<><

Re: 1/32 Tamiya F4U-1a Corsair - Boyington 17740
Exciting approach and makes total sense to "skip" the clear plastics and use that instead as the fundament.
And also very interesting apporach to "flip over" the decals. So the "glue side" is on the instruments front side.. or was of course. What kind of method will you use to get the punched out instruments to get them to stay attached?
I have understood that Tamiyas 1/32 Corsair is the best kit ever produced. And already looking at the pictures you share, confirms this.
- Kari
---
On the bench:
TBM-3 Avenger 1:48 by Accurate Miniatures
SBD-5 Dauntless 1:48 by Academy
F2A Buffalo 1:48 by Special Hobby
https://www.facebook.com/GrundAsk-Scale ... 721218708/
On the bench:
TBM-3 Avenger 1:48 by Accurate Miniatures
SBD-5 Dauntless 1:48 by Academy
F2A Buffalo 1:48 by Special Hobby
https://www.facebook.com/GrundAsk-Scale ... 721218708/

Re: 1/32 Tamiya F4U-1a Corsair - Boyington 17740
I, too, like the approach. I've tried to punch out stuff like this and can never seem to get the punch directly over the dial. Is there a trick/tip you can share? I am so "challenged" sometimes.
To make each build less crappy than the last one. Or, put another way, "Better than the last one, not as good as the next one!"..
Re: 1/32 Tamiya F4U-1a Corsair - Boyington 17740
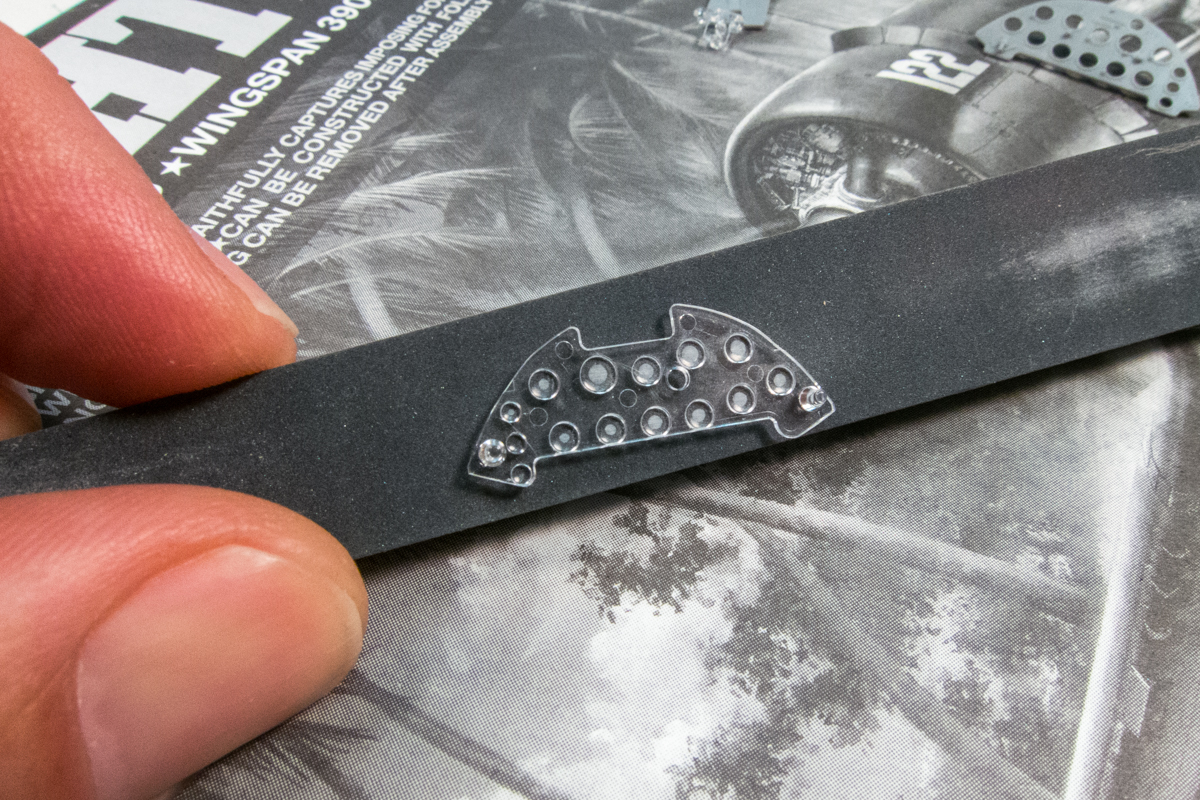
I am going to continue with the instrument panel. Here is the punch set that I am using. I also have RP Toolz larger punch set if I need bigger circles.
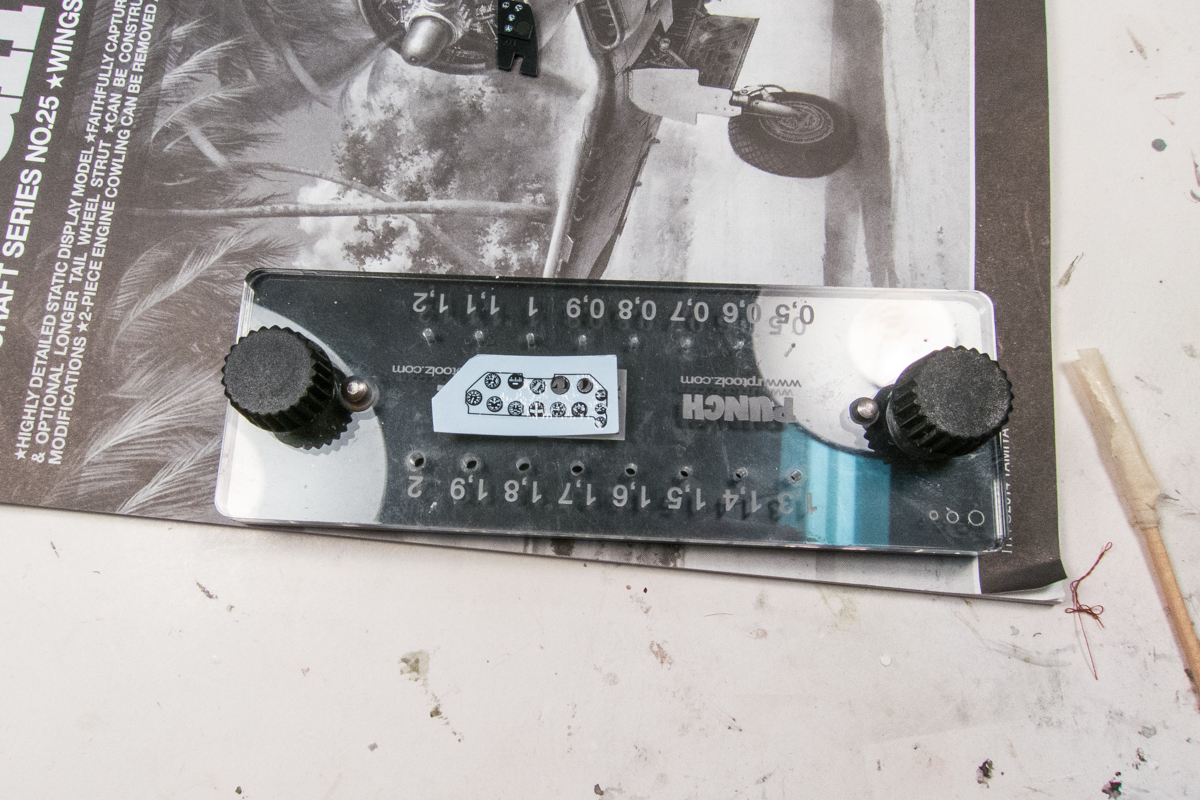
The outer plate of the punch set is clear, so you can use the view outside of the punch hole you are using as well trying to look down the barrel of the punch to center it. Once the target is fixed into place, I usually flip the punch set around and take a look from another perspective to ensure that my punch is centered.
Since the decal adhesive is on the detail side of the decal, the decal paper and decal weren't connected that solidly. In fact, during this punch and others, the decal came off of its backing paper. Not a big deal as long as the free floating dry decal is treated carefully. No sneezing! Using a small drop of water in each dial, the punched instruments were placed into each dial and positioned before dabbing into permanent position using a cotton-tipped swab. Once positioned, Solvaset was used to seal the deal.
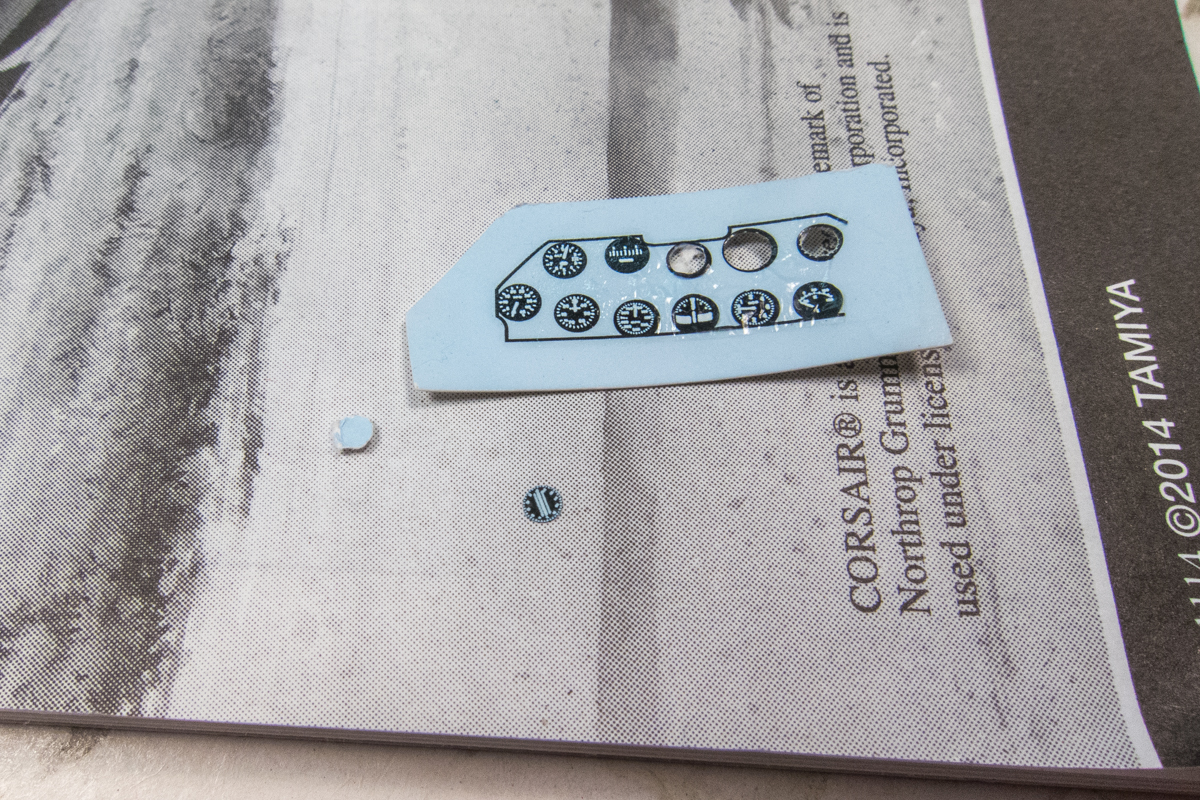
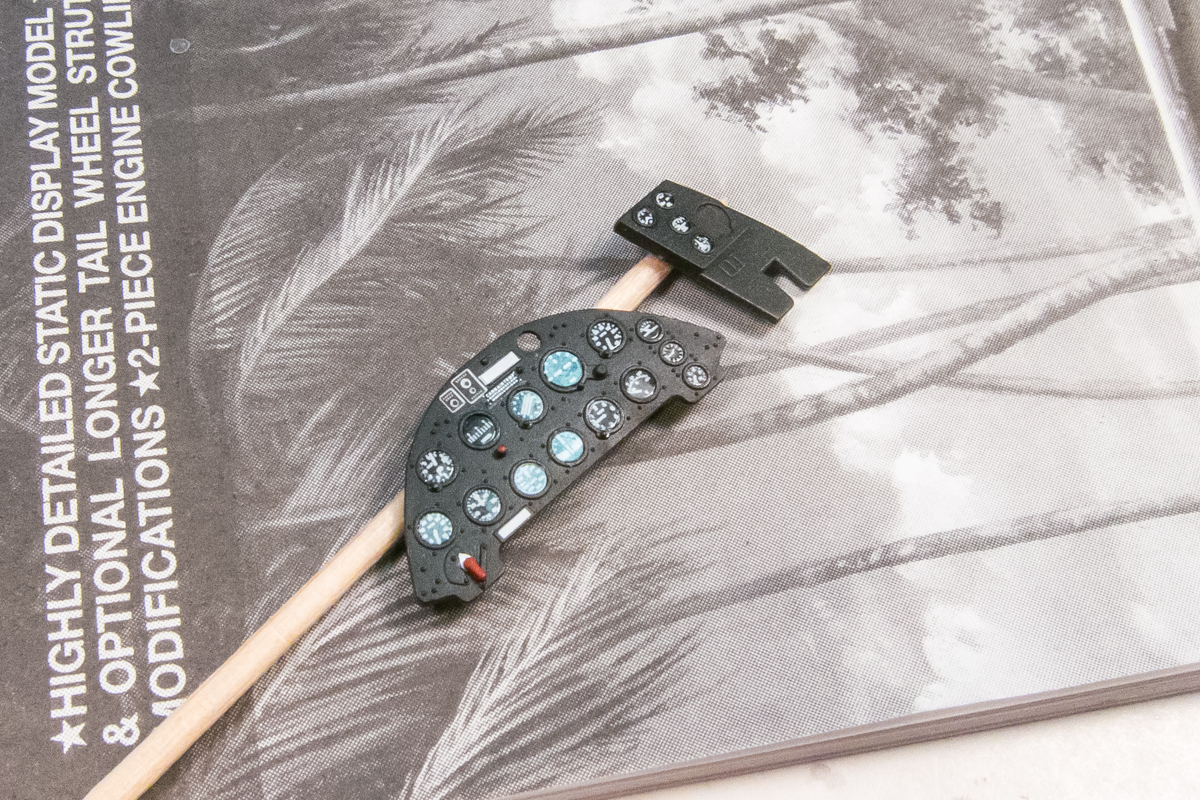
One by one, the instrument panel is fully populated with instruments. The other markings are from the kit decal sheet and the Barracuda cockpit stencil sheet. I'm going to cover this with a semi-gloss coat and let it dry for the next step.
The outer plate of the punch set is clear, so you can use the view outside of the punch hole you are using as well trying to look down the barrel of the punch to center it. Once the target is fixed into place, I usually flip the punch set around and take a look from another perspective to ensure that my punch is centered.
Since the decal adhesive is on the detail side of the decal, the decal paper and decal weren't connected that solidly. In fact, during this punch and others, the decal came off of its backing paper. Not a big deal as long as the free floating dry decal is treated carefully. No sneezing! Using a small drop of water in each dial, the punched instruments were placed into each dial and positioned before dabbing into permanent position using a cotton-tipped swab. Once positioned, Solvaset was used to seal the deal.
One by one, the instrument panel is fully populated with instruments. The other markings are from the kit decal sheet and the Barracuda cockpit stencil sheet. I'm going to cover this with a semi-gloss coat and let it dry for the next step.
John aka JKim
-----------<><
-----------<><
Re: 1/32 Tamiya F4U-1a Corsair - Boyington 17740
Many thanks John for a very visually clear step-by-step explanation!
I got an answer ( and a litrle bit more ) to all my Q:s !
- Kari
I got an answer ( and a litrle bit more ) to all my Q:s !
- Kari
---
On the bench:
TBM-3 Avenger 1:48 by Accurate Miniatures
SBD-5 Dauntless 1:48 by Academy
F2A Buffalo 1:48 by Special Hobby
https://www.facebook.com/GrundAsk-Scale ... 721218708/
On the bench:
TBM-3 Avenger 1:48 by Accurate Miniatures
SBD-5 Dauntless 1:48 by Academy
F2A Buffalo 1:48 by Special Hobby
https://www.facebook.com/GrundAsk-Scale ... 721218708/
-
speedgraflex
- Moderator
- Posts: 11129
- Joined: Fri Feb 10, 2017 11:08 pm
- Contact:
Re: 1/32 Tamiya F4U-1a Corsair - Boyington 17740
What am extraordinary idea to modify the kit’s clear components, John! The level of your work is simply outstanding. Is the clear coat / a flat varnish or gloss?
Make more models!
-
Medicman71

- Elite Member
- Posts: 11122
- Joined: Mon Apr 07, 2014 9:32 am
- Location: Houston, Tx
Re: 1/32 Tamiya F4U-1a Corsair - Boyington 17740
That's a cool way of doing it. Really looks good.
Mike
Sponsored by Boeing, Lockheed Martin, Northrop Grumman, Saab, BAE, and Dassault
Sponsored by Boeing, Lockheed Martin, Northrop Grumman, Saab, BAE, and Dassault
Re: 1/32 Tamiya F4U-1a Corsair - Boyington 17740
Since the punch set was already out, I decided to use it to make clear dial covers for each instrument. These little clear discs were secured into place using a drop of Alclad Aqua Gloss as an adhesive. One step up from simply using a drop of clear gloss to replicate the glass covers.
It's hard to tell unless the glare reflects off the glass.
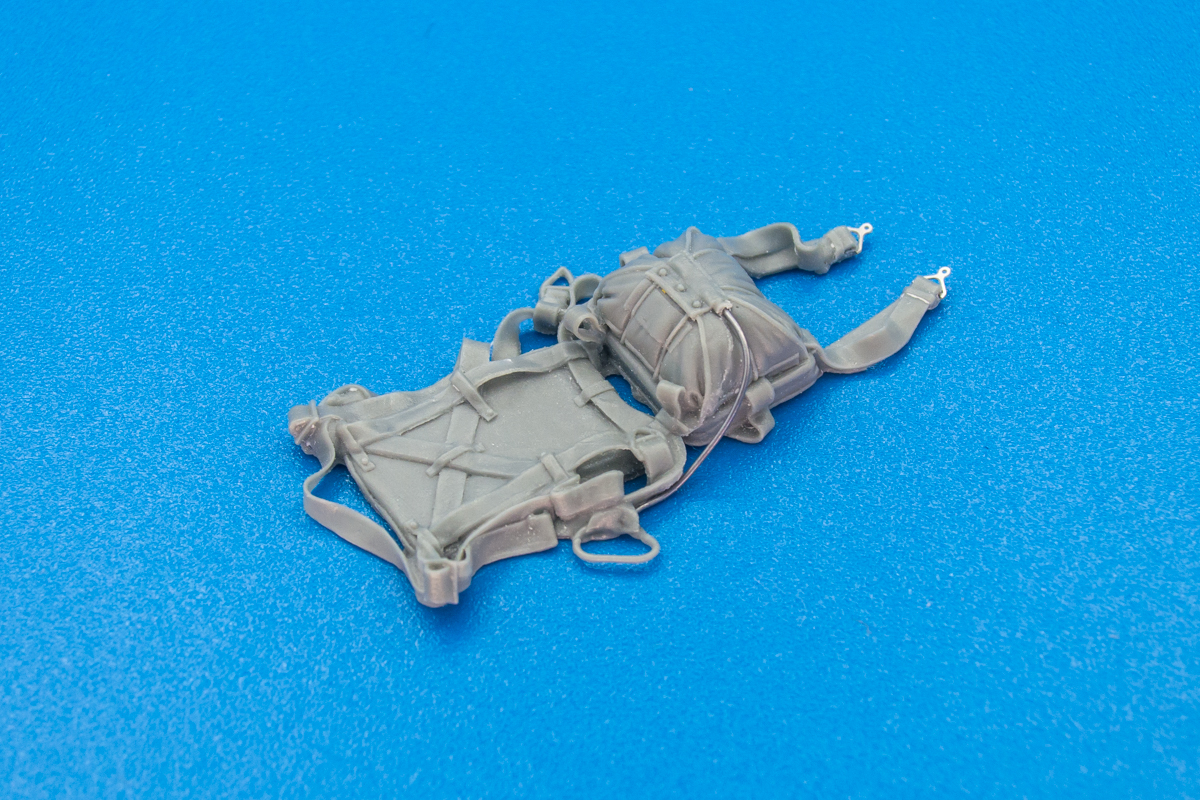
I put the instrument panel parts in a little plastic baggy for safe keeping. I jumped over to the resin parachute to see how easy/difficult it would be to remove the casting block from the resin parachute. I was especially concerned about the delicate loops and buckles.
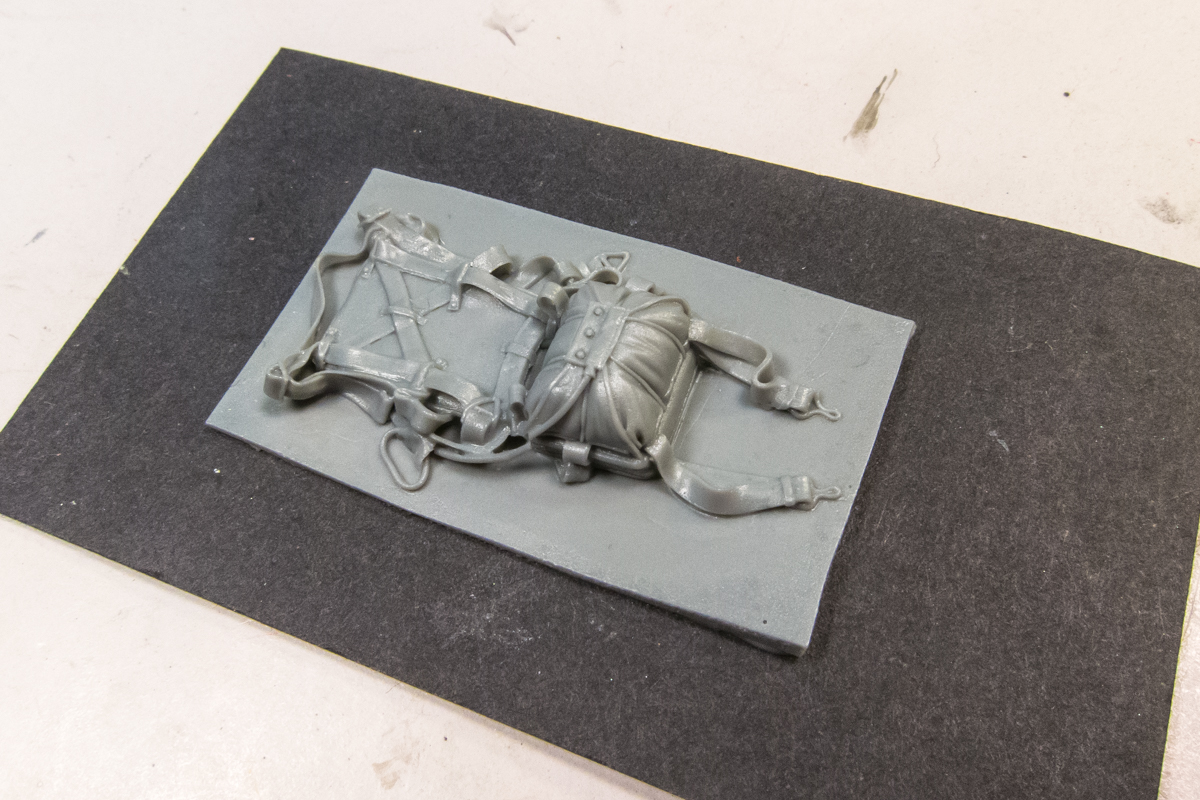
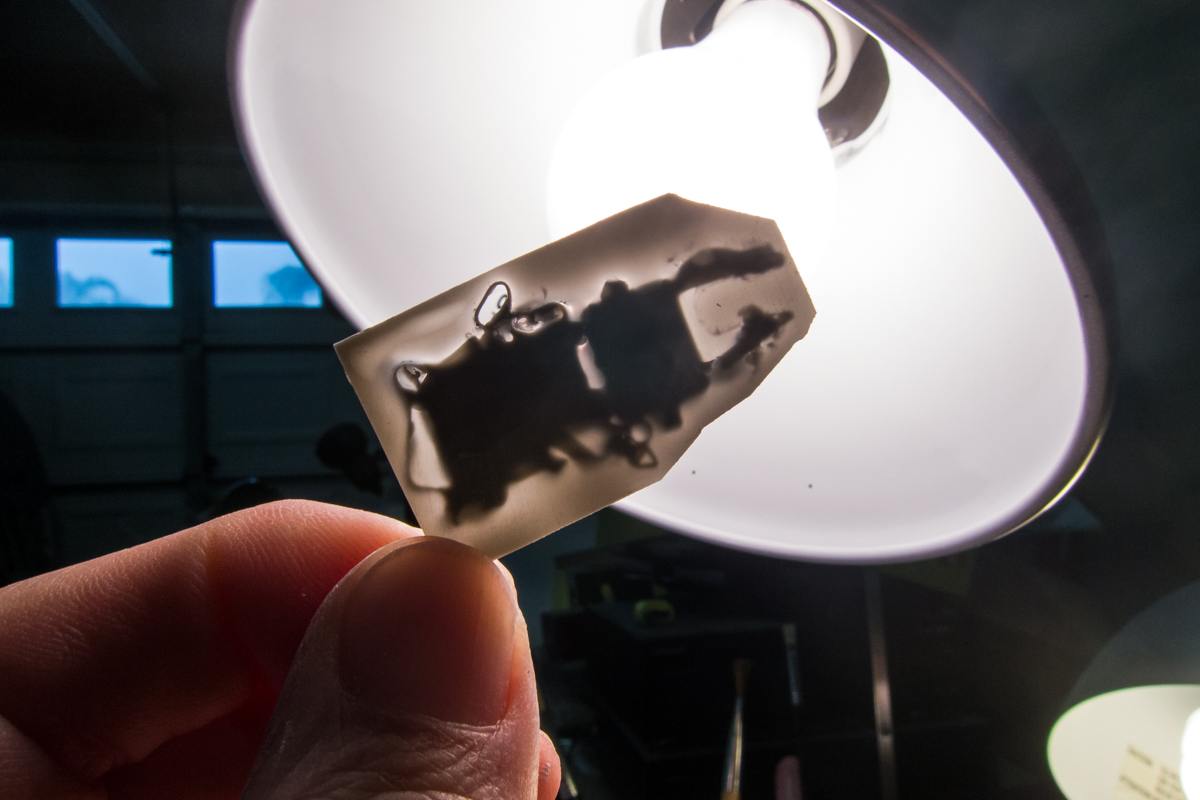
Holding up the resin to the light, I can see that the resin is quite thin around alot of the parachute. These areas would be fairly easy to poke through with a single swipe of a sharp knife. But there are other parts that have some thicker resin underneath.
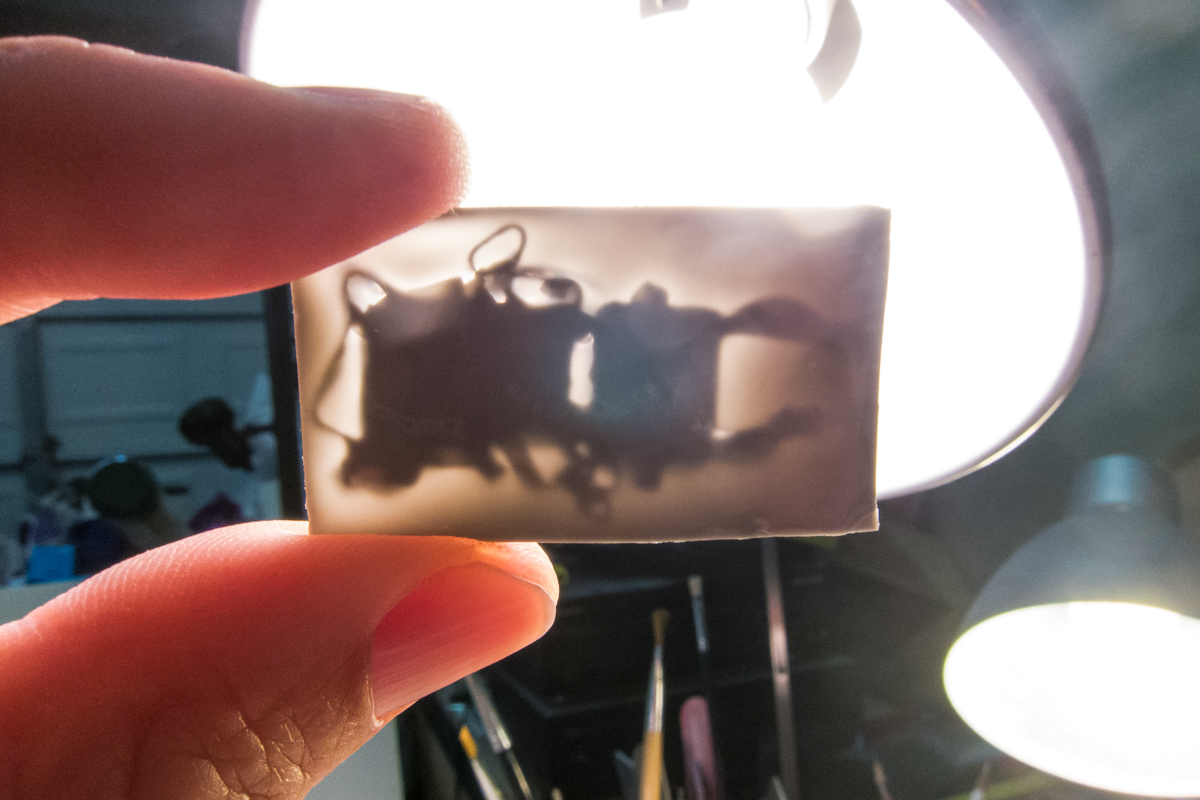
Instead of trying to extract the piece in this state and risk a broken buckle, I sanded down the casting block until the excess resin was paper thin around the entire part.
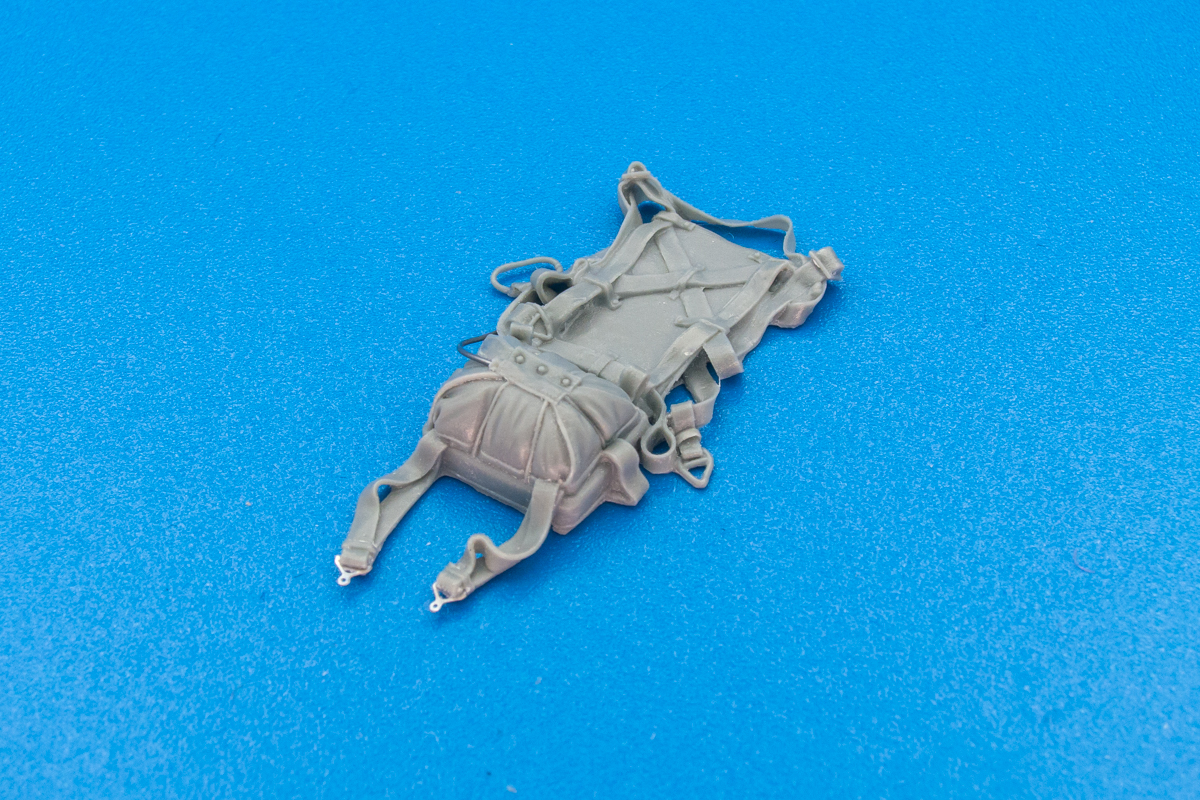
After that, tracing lightly around the parachute was enough to free it from the excess. But even with my precautions, I had some casualties. You can see that the release cord has broken.

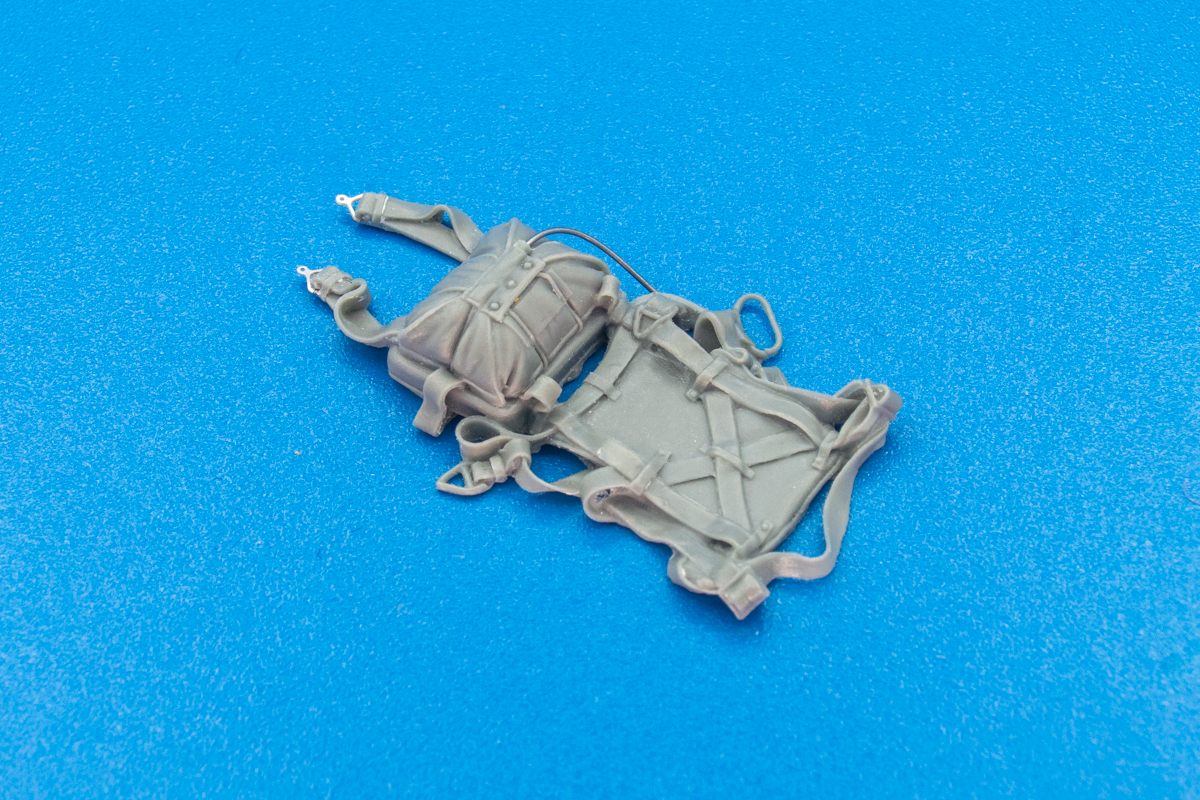
In the end, those delicate parts I had tried so hard to protect ended up breaking anyway. So I had to craft some replacements. The release cord is a piece of 0.15mm lead wire and the harness clips are from some Luftwaffe belts I had in the spare box.
It's hard to tell unless the glare reflects off the glass.
I put the instrument panel parts in a little plastic baggy for safe keeping. I jumped over to the resin parachute to see how easy/difficult it would be to remove the casting block from the resin parachute. I was especially concerned about the delicate loops and buckles.
Holding up the resin to the light, I can see that the resin is quite thin around alot of the parachute. These areas would be fairly easy to poke through with a single swipe of a sharp knife. But there are other parts that have some thicker resin underneath.
Instead of trying to extract the piece in this state and risk a broken buckle, I sanded down the casting block until the excess resin was paper thin around the entire part.
After that, tracing lightly around the parachute was enough to free it from the excess. But even with my precautions, I had some casualties. You can see that the release cord has broken.
In the end, those delicate parts I had tried so hard to protect ended up breaking anyway. So I had to craft some replacements. The release cord is a piece of 0.15mm lead wire and the harness clips are from some Luftwaffe belts I had in the spare box.
John aka JKim
-----------<><
-----------<><
Re: 1/32 Tamiya F4U-1a Corsair - Boyington 17740
Absolutely well done John with the parachute pack !!
- Kari
---
On the bench:
TBM-3 Avenger 1:48 by Accurate Miniatures
SBD-5 Dauntless 1:48 by Academy
F2A Buffalo 1:48 by Special Hobby
https://www.facebook.com/GrundAsk-Scale ... 721218708/
On the bench:
TBM-3 Avenger 1:48 by Accurate Miniatures
SBD-5 Dauntless 1:48 by Academy
F2A Buffalo 1:48 by Special Hobby
https://www.facebook.com/GrundAsk-Scale ... 721218708/